Ruckus ZoneDirector
Ruckus Zone Director Passpoint Conversion - Basic Settings
For support, please contact: support@longfisolutions.com
High-Level Steps:
- Deploy Local RadSecProxy
- ZoneDirector Configuration
- Configure AAA Server
- Configure AAA Server Accounting
- Configure Hotspot 2.0 Services
- Create WLAN
- Create WLAN Group
- Test & Validate
Deploy Local RadSecProxy
Ruckus ZoneDirector does not support RadSec natively, so we need a Local RadSecProxy running on a Virtual Machine on-site, or in a cloud VM that can be accessed via a VPN tunnel from the local network. Please visit our public GitHub repository for instructions on deploying the local radsecproxy:
https://github.com/LongFi-Solutions/longfi-radsecproxy
Take note of the IP address and shared secret of your Local RadSecProxy deployment. You will need this to configure the AAA RADIUS servers in Zone Director.
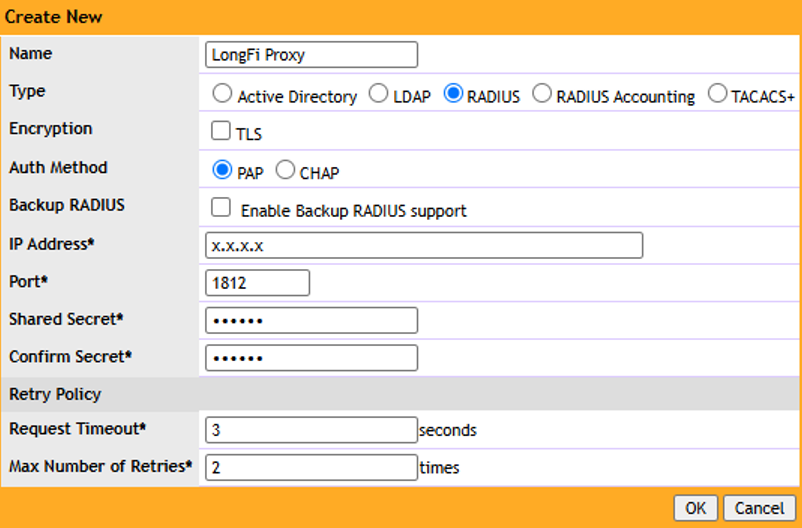
Step 1: Configure AAA Server
- Navigate to Configure → AAA Servers
- Click Create New
- Configure:
- Name: LongFi Proxy
- Type: RADIUS
- Auth Server Address: {Primary IP}
- Port: {AUTH_PORT}
- Shared Secret: {Secret}
- Click OK
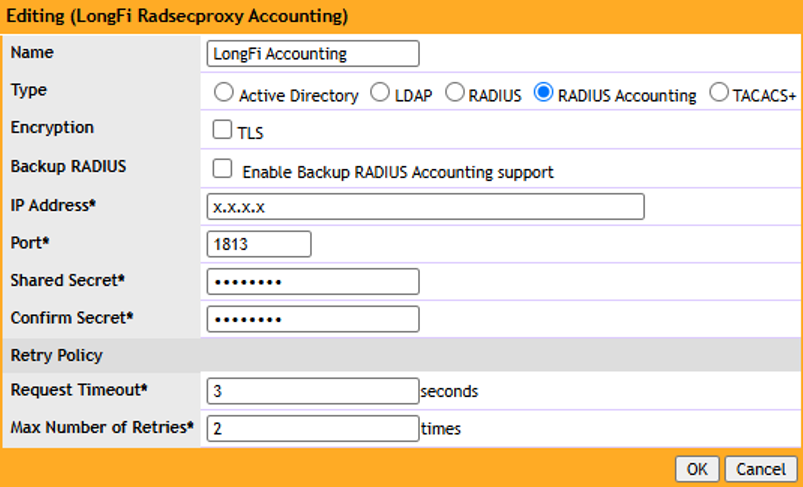
Step 2: Configure AAA Server Accounting
- Navigate to Configure → AAA Servers
- Click Create New
- Configure:
- Name: LongFi Accounting
- Type: RADIUS Accounting
- Auth Server Address: {Primary IP}
- Port: {AUTH_PORT}
- Shared Secret: {Secret}
- Click OK
Step 3: Configure Hotspot 2.0 Services
- Navigate to Configure → Hotspot 2.0 Services
- Under Service Provider Profiles, Click Create New
-
Configure:
-
3.1 – Name - Enter a descriptive profile name.
- 3.2 - Under Domain Name List, Click Create New and add the following domains:
- 3.3 – Click Advanced Options and, under Roaming Consortium List, Click Create New and add the following:
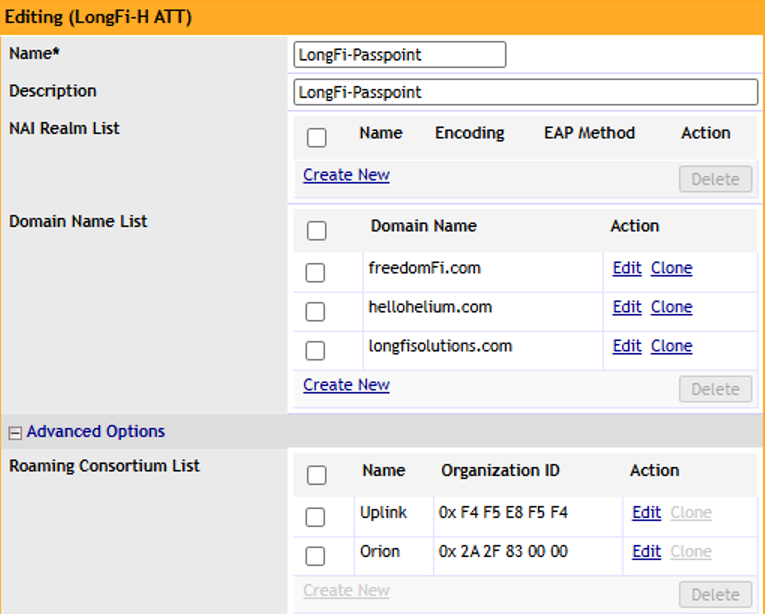
3.4 – NAI Realm and 3GPP Cellular Network - Use the values provided in your Carrier Offload Approval Email. These settings may only be activated for approved sites.
3.5 Click OK to save the profile.
Step 4: Configure Hotspot 2.0 Services
- Navigate to Configure → Hotspot 2.0 Services
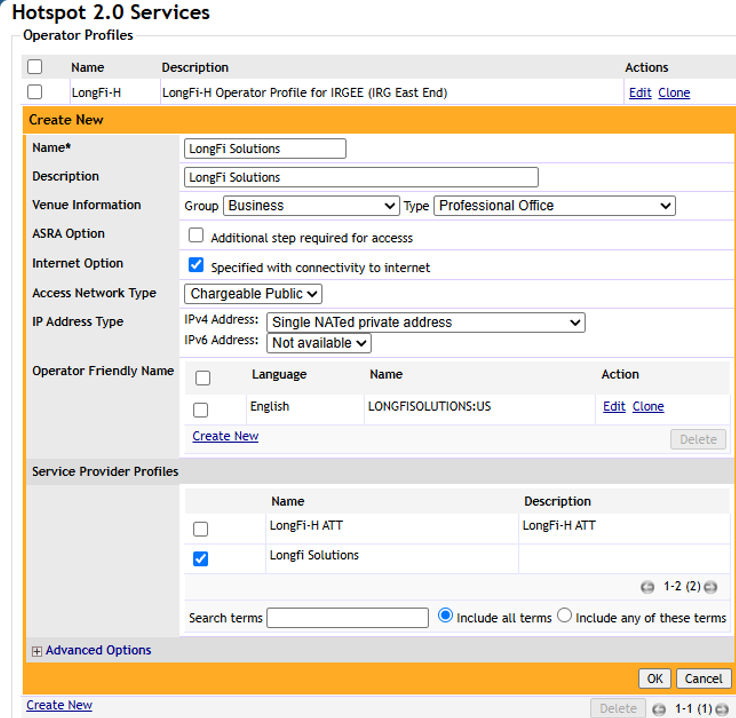
- Under Operator Profiles, Click Create New
- Configure:
3.1 – Name - Enter a descriptive operator profile name.
3.2 – Venue information - Select the Group and Type that best match the site.
3.3 – Internet Option - Enable the Specified with connectivity to internet option
3.4 - Access Network Type – Chargeable Public
3.5 - IP Address Type – IPv4 Address - Single NATed private address
3.6 - IP Address Type – IPv6 Address – Not Available
3.7 - Operator Friendly Name – Click Create NEW, choose English under Language, and under Name add LONGFISOLUTIONS:US. Click Save
3.8 - Service Provider Profiles – Enable the Service Provider Profile created in Step 3.
3.9 – Click OK to save the profile.
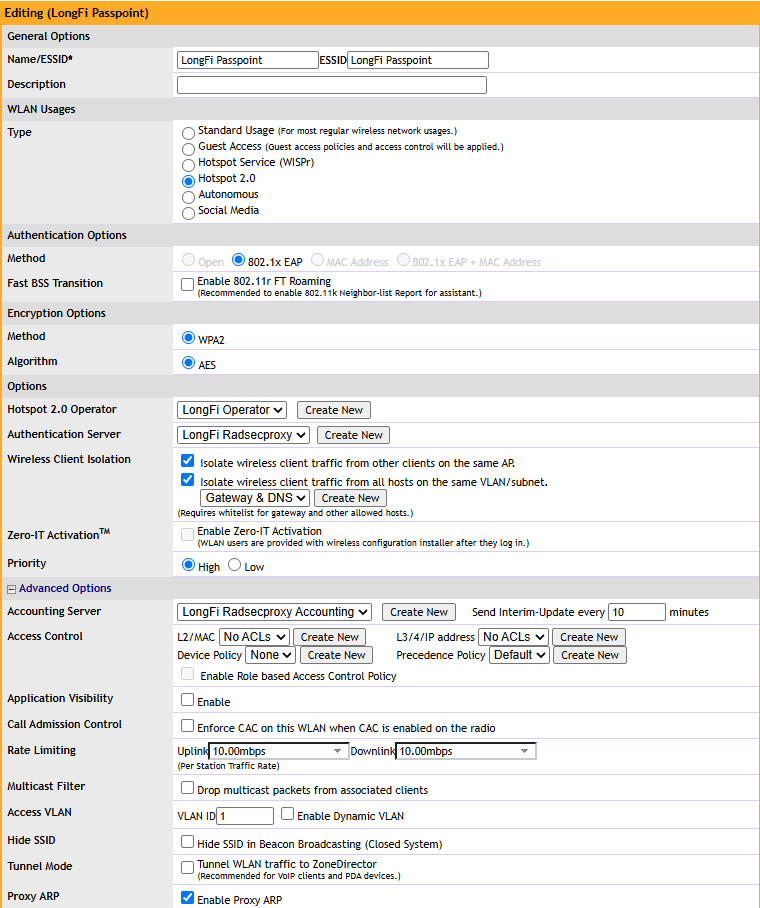
Step 5: Create WLAN
- Navigate to Configure → WLANs
- Under WLANs, Click Create New
- Configure:
3.1 Name – Enter the WLAN name
3.2 ESSID – Enter the SSID name
3.3 Type - Hotspot 2.0
3.4 Method - 802.1x EAP
3.5 Fast BSS Transition – Do NOT Enable 802.11r FT Roaming
3.6 Encryption Options – Enable WPA2 and AES
3.7 Hotspot 2.0 Operator – Select the Operator Profile created in Step 4.
3.8 Authentication Server - Select the RADIUS server created in Step 1.
3.9 Wireless Client Isolation – Enable both client-isolation options. For VLAN/subnet isolation, select Gateway & DNS.
3.10 Accounting Server - Under Advanced Options, select the RADIUS Accounting server created in Step 2.
3.11 Access VLAN – Enter the correct VLAN for this SSID
3.12 Proxy ARP – Enable Proxy ARP
3.13 Inactivity Timeout - Terminate idle user session after 5 minutes of inactivity
Step 6: Create WLAN Group
- Under WLAN Groups, Click Create New
- Select the Passpoint WLAN created in Step 5 and add any other WLAN members required for the site.
Step 7: Add the NAS ID
- SSH into the ZoneDirector
This configuration cannot be performed through the ZoneDirector GUI, so you will need to connect to the ZoneDirector via SSH.
For older ZoneDirector versions that use legacy SSH algorithms, use:
ssh -o HostKeyAlgorithms=+ssh-rsa,ssh-dss -o PubkeyAcceptedKeyTypes=+ssh-rsa,ssh-dss admin@<YOUR-ZD-IP-HERE>
Replace <YOUR-ZD-IP-HERE> with the management IP address of your ZoneDirector.
- Configure the NAS ID
Once connected to the ZoneDirector CLI, configure the NAS ID for the Passpoint WLAN created earlier in this guide.
The NAS ID should be set to the MAC address provided in the Carrier Offload Approval email.
Example of the CLI commands :
ruckus> enable
ruckus# config
ruckus(config)# wlan "LongFi Passpoint"
ruckus(config-wlan)# nasid-type user-define 11:22:33:AA:BB:CC
ruckus(config-wlan)# end
ruckus(config)# exit
The configuration will look like this in the Ruckus CLI:
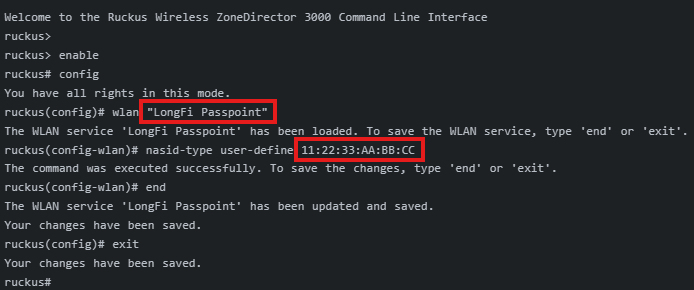
Important: Make sure the NAS ID exactly matches the MAC address provided in the Carrier Offload Approval email.
- Confirm the configuration was applied correctly to the WLAN.
The configuration will look like this in the Ruckus CLI:
ruckus# show wlan name "LongFi Passpoint"
WLAN Service:
  ID:
    9:
      NAME = LongFi Passpoint
      Tx. Rate of Management Frame(2.4GHz) = 2.0Mbps
      Tx. Rate of Management Frame(5GHz)   = 6.0Mbps
      Beacon Interval = 100ms
      SSID = LongFi Passpoint
      Description = LongFi Helium Passpoint Mobile Offloading Wi-Fi
      Type = Hotspot 2.0
      Hotspot 2.0 operator name = LongFi Operator
      Authentication = 802.1x-eap
      Encryption = wpa2
      Algorithm = aes
      Passphrase =
      FT Roaming = Disabled
      802.11k Neighbor report = Disabled
      Web Authentication = Disabled
      Authentication Server = LongFi Radsecproxy
      Accounting Server = LongFi Radsecproxy Accounting
      Interim-Update = 10 Minutes
      Called-Station-Id type = wlan-bssid
      Tunnel Mode = Disabled
      Background Scanning = Enabled
      Max. Clients = 50
      Isolation per AP = Enabled
      Isolation across AP = Enabled
      Zero-IT Activation = Disabled
      Priority = High
      Load Balancing = Disabled
      Band Balancing = Disabled
      Dynamic PSK = Disabled
      Rate Limiting Uplink = 10.00Mbps
      Rate Limiting Downlink = 10.00Mbps
      Auto-Proxy configuration:
        Status = Disabled
      Inactivity Timeout:
          Status = Enabled
          Timeout = 5 Minutes
      VLAN-ID = 1
      Dynamic VLAN = Disabled
      Closed System = Disabled
      Https Redirection = Disabled
      OFDM-Only State = Disabled
      Multicast Filter State = Disabled
      802.11d State = Enabled
      Force DHCP State = Enabled
      Force DHCP Timeout = 15
      DHCP Option82:
          Status = Disabled
          Option82 sub-Option1 = Disabled
          Option82 sub-Option2 = Disabled
          Option82 sub-Option150 = Disabled
          Option82 sub-Option151 = Disabled
      Ignore unauthorized client statistic = Disabled
      STA Info Extraction State = Enabled
      BSS Minrate = Disabled
      Call Admission Control State = Disabled
      PMK Cache Timeout= 720 minutes
      PMK Cache for Reconnect= Enabled
      NAS-ID Type= user-define
  >>> NAS-ID String= 11:22:33:AA:BB:CC <<<
      Roaming Acct-Interim-Update= Disabled
      PAP Message Authenticator = Enabled
      Send EAP-Failure = Enabled
      L2/MAC = No ACLS
      L3/L4/IP Address = No ACLS
      L3/L4/IPv6 Address = No ACLS
      Precedence = Default
      Disable DGAF = Disabled
      Proxy ARP = Enabled
      Device Policy = No ACLS
      Vlan Pool = No Pools
      Role based Access Control Policy = Disabled
      SmartRoam = Disabled  Roam-factor = 1
      White List = Gateway & DNS
      Application Visibility = disabled
      Apply Policy Group = No_Denys
ruckus#