UniFi Passpoint Conversion Guide
For support please contact: networks@longfisolutions.com
Prerequisites
LongFi Connect configuration requires the Passpoint protocol. Please ensure your Ubiquiti network is using UniFi Network Controller version 8.4.54 or higher and AP firmware version 6.6.77 or AP firmware version 7.0.66 or higher, depending on hardware release track. You can verify that your APs support Passpoint (Hotspot 2.0) and RADIUS over TLS (RadSec) at https://techspecs.ui.com/unifi/wifi
You will also need:
- The NAS ID and RadSec certificates obtained during your site Onboarding & Activation
- A guest VLAN with the appropriate network segmentation, security, traffic shaping, and firewall policies for your requirements.
- The guest VLAN needs a large DHCP pool with a short lease time. Passpoint clients can automatically discover and join a network, and there will be many more "transient client" connections than a normal guest wifi network.
High Level Steps
- Submit NAS ID, Obtain RadSec Certificates
- Configure UniFi Network Controller
- Configure RADIUS Profile
- Configure Passpoint Wi-Fi
Submit NAS ID, Obtain RadSec Certificates
Every Passpoint network requires a unique Network Access Server Identifier (NAS ID). We normally use the MAC address of the controller, gateway, or a single AP on the network.
Log into your UniFi network. Navigate to UniFi Devices, choose your Network Controller, Gateway, or AP, and copy the MAC Address.
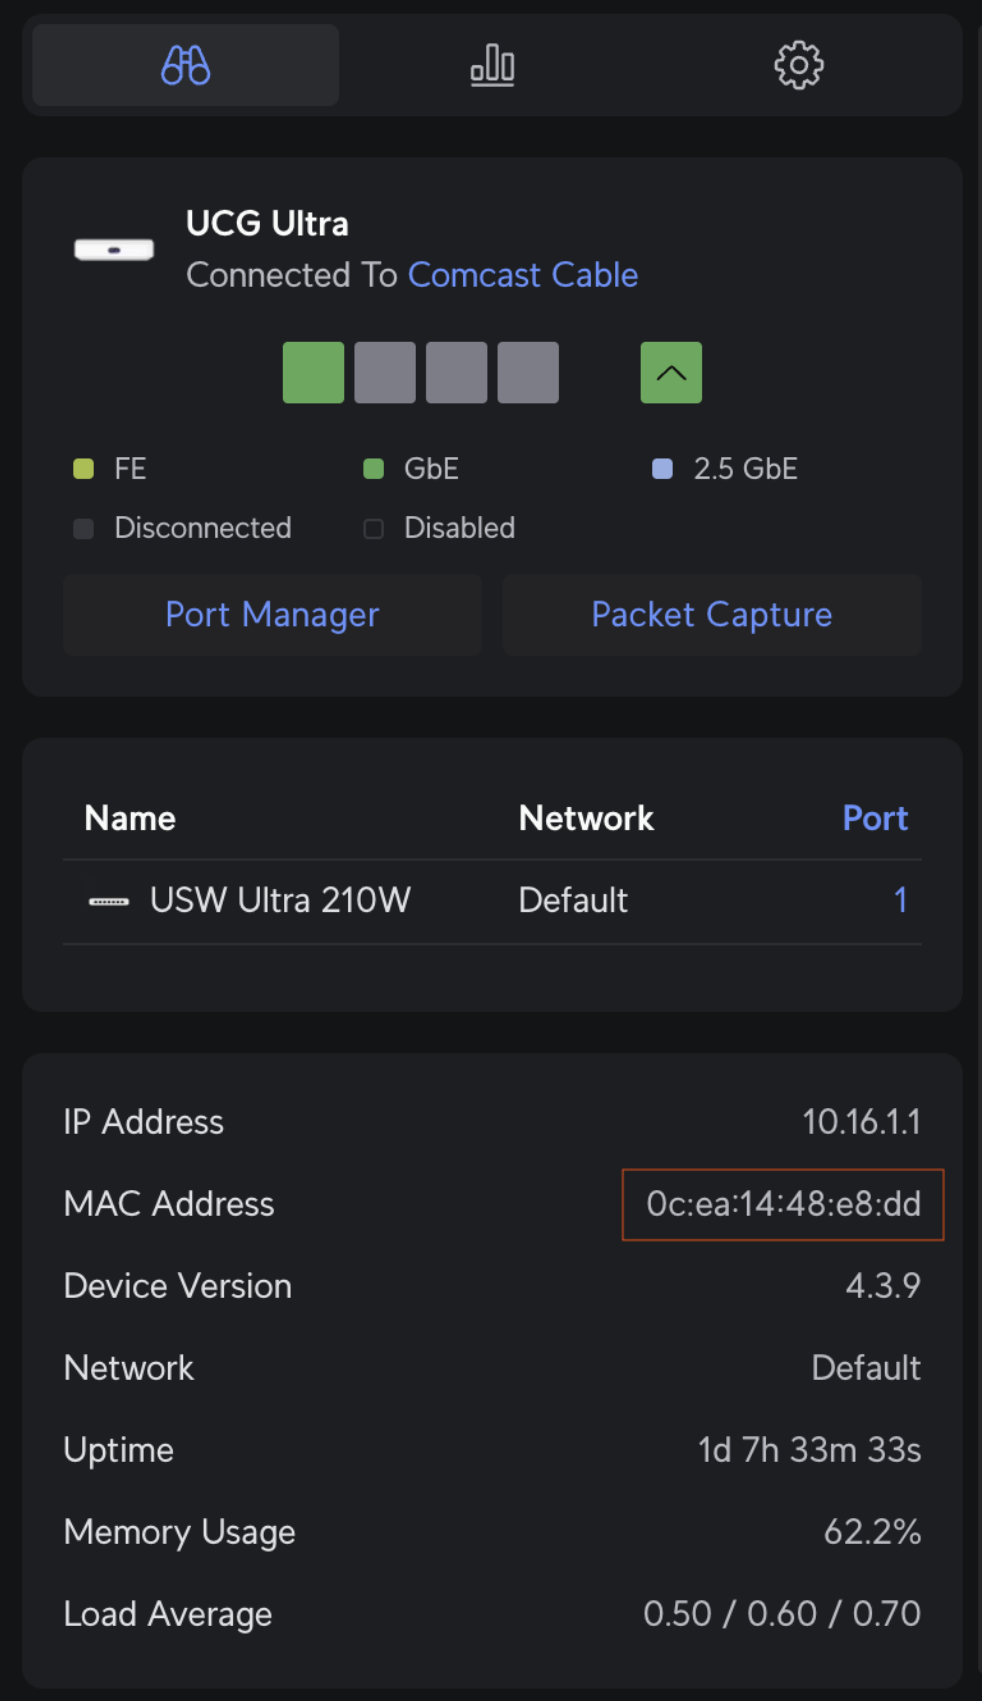
Submit this MAC address during your site Onboarding & Activation, and return to this guide after the network is onboarded and RadSec certificates have been delivered.
Configure UniFi Network Controller
After retrieving certificates, configuring the network controller for Passpoint is a two-part process. First, create the RADIUS profile, then apply the profile to a newly created WiFi SSID called 'LongFi Passpoint'.
Create a RADIUS Profile
Configure a TLS connection to LongFi Connect AAA servers, which performs Authentication, Authorization, and Accounting for the end customers. Enabling RADIUS communication over TLS (RadSec) increases the level of security for authentication that is carried out across the cloud network.
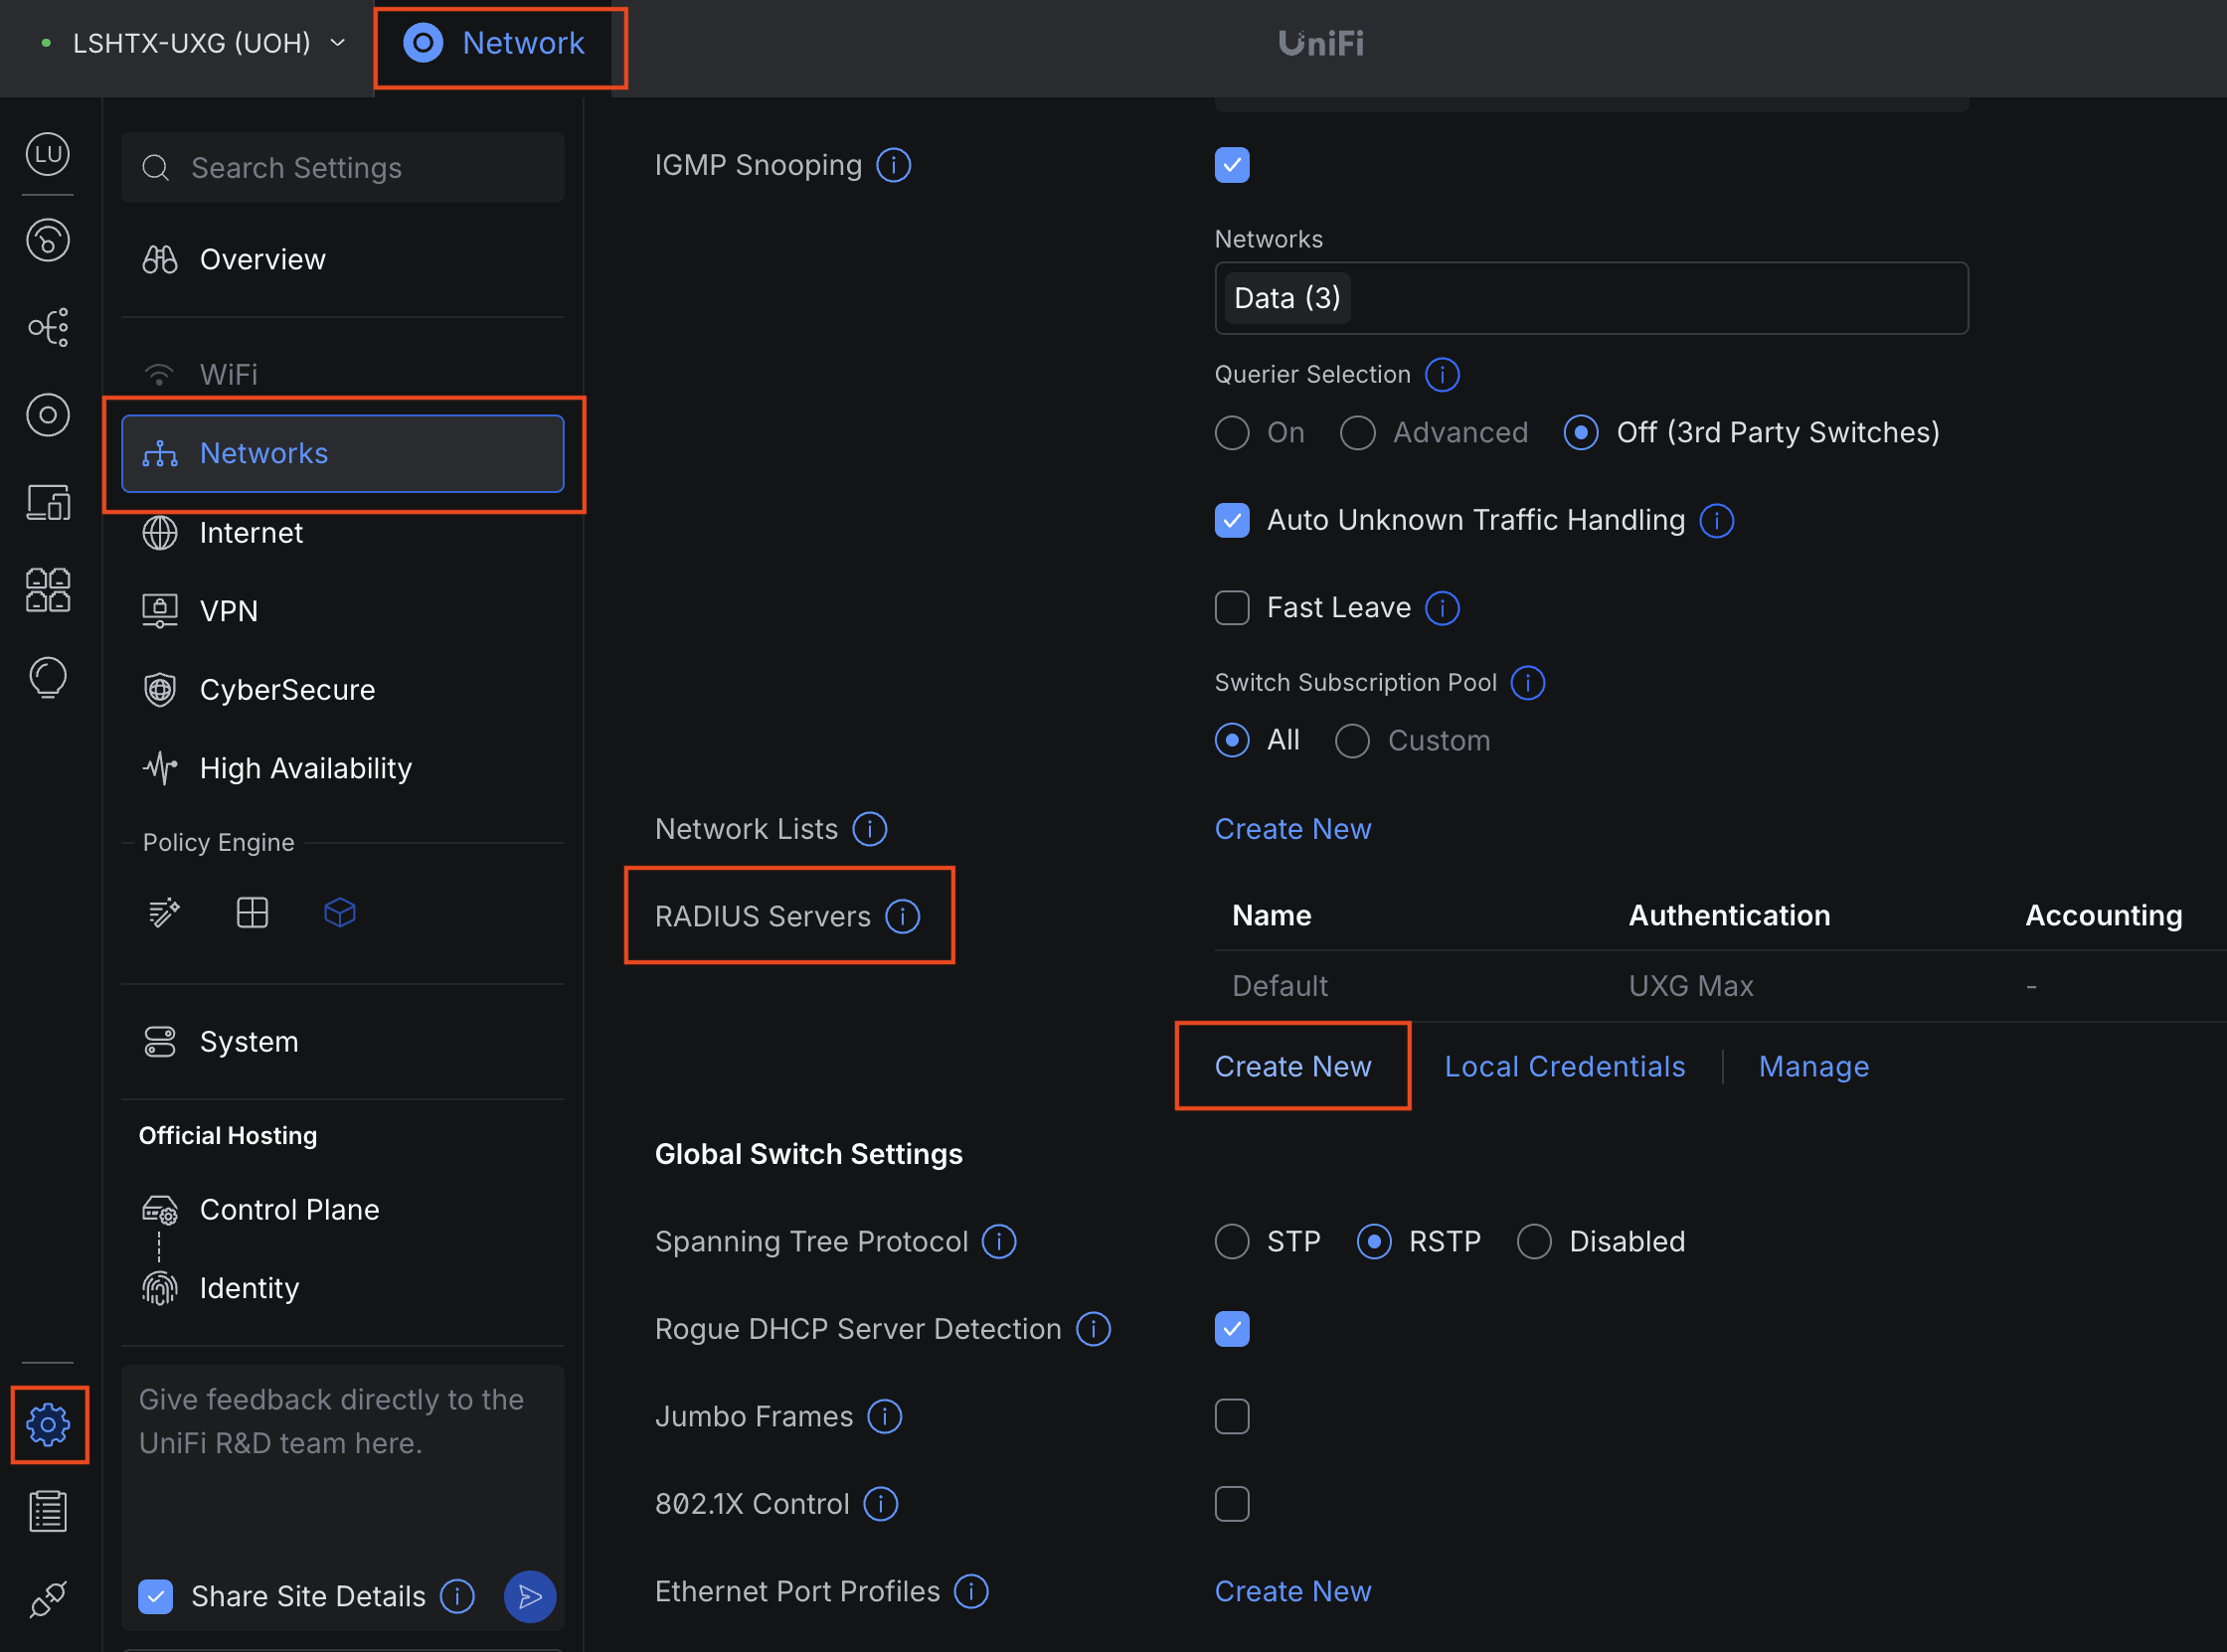
In the sidebar, choose Settings > Networks > scroll down > RADIUS Servers then click Create New:
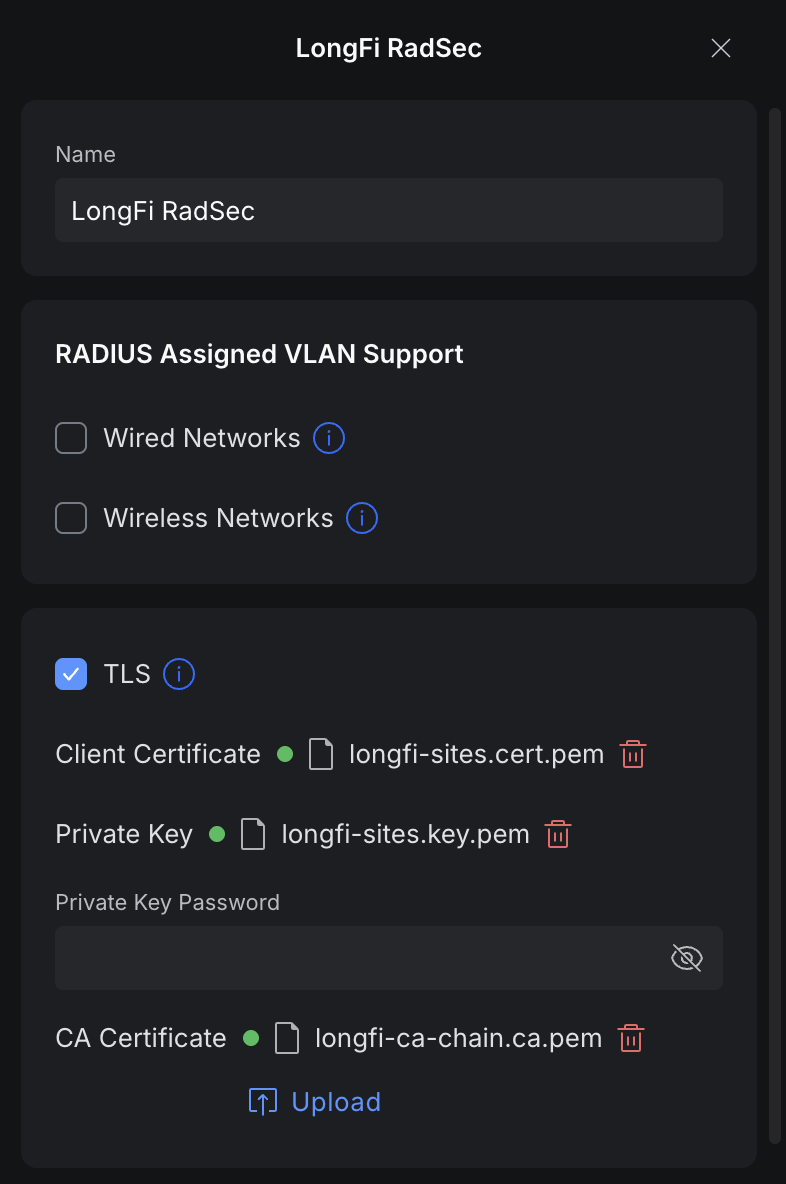
For the profile name enter LongFi RadSec.
Configure RADIUS properties
- Under Radius Settings, check the TLS box.
- Press Upload next to Client Certificate, choose the path to the file containing the extension .cert, for example your-site.cert.pem
- Press Upload next to Private Key, choose the path to the file containing the extension .key, for example your-site.key.pem
- Keep Private Key Password empty
- Press Upload next to CA Certificate, choose the path to the file containing the extension .ca, for example longfi-ca-chain.ca.pem
- *Note: these names and extensions may differ slightly based on your operating system (ie. longfi.cer.pem)
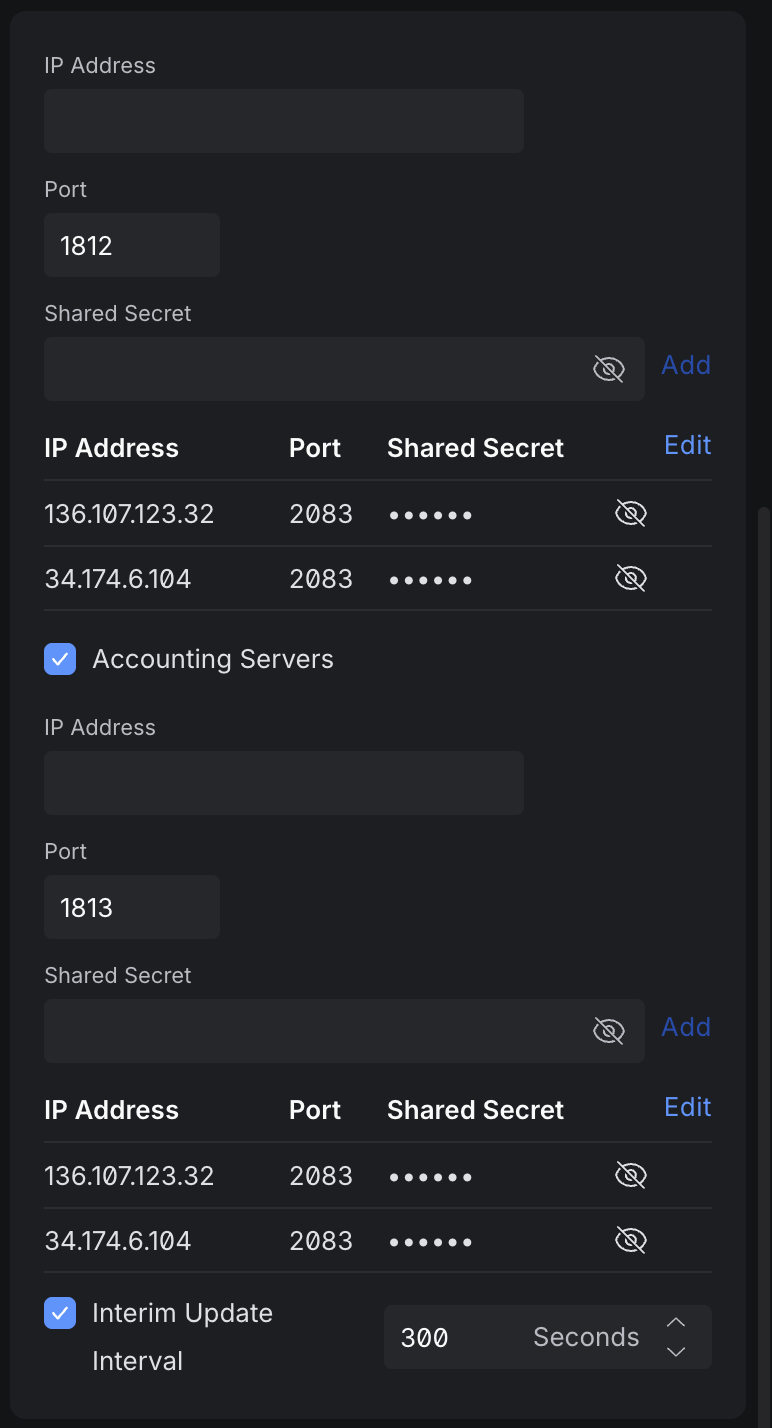
- Specify Authentication Servers:
- Enter IP Address: 136.107.123.32 Port: 2083 Shared Secret: radsec. Click Add.
- Enter IP Address: 34.174.6.104 Port: 2083 Shared Secret: radsec. Click Add.
- Check the Accounting Servers checkbox. RADIUS Accounting Server settings will appear. (*Note: in some versions of UniFi, you may have to click Add to save the RADIUS Profile and click to edit the profile again before you can enable Accounting Servers.
- Specify the following Accounting Servers (same as above):
- Enter IP Address: 136.107.123.32 Port: 2083 Shared Secret: radsec. Click Add.
- Enter IP Address: 34.174.6.104 Port: 2083 Shared Secret: radsec. Click Add.
- Check Interim Update Interval box.
- Specify Interim Update Interval with 300 Sec.
Click Add to create the new RADIUS Profile.
Create the LongFi Passpoint SSID
*Note: If you do not yet have a UniFi AP connected to your Network App controller, you will not be able to choose the option for Passpoint when creating a new WiFi network. Please connect a UniFi AP before continuing.
Navigate to the Settings in the sidebar, choose WiFi, then press Create New
[IMAGE HERE]
Configure settings for the new SSID:
- Set the Name of the SSID to LongFi Passpoint
- Leave the password blank
- Select the Network (vlan) you want to use for Passpoint WiFi clients
- Under Application choose Hotspot
- Under Hotspot Type choose Passpoint
- *Note: we normally disable 2.4 GHz in all but the highest density environments (large public venue) as most modern clients will avoid 2.4, and this band is not voice-grade
- Set Advanced to Manual

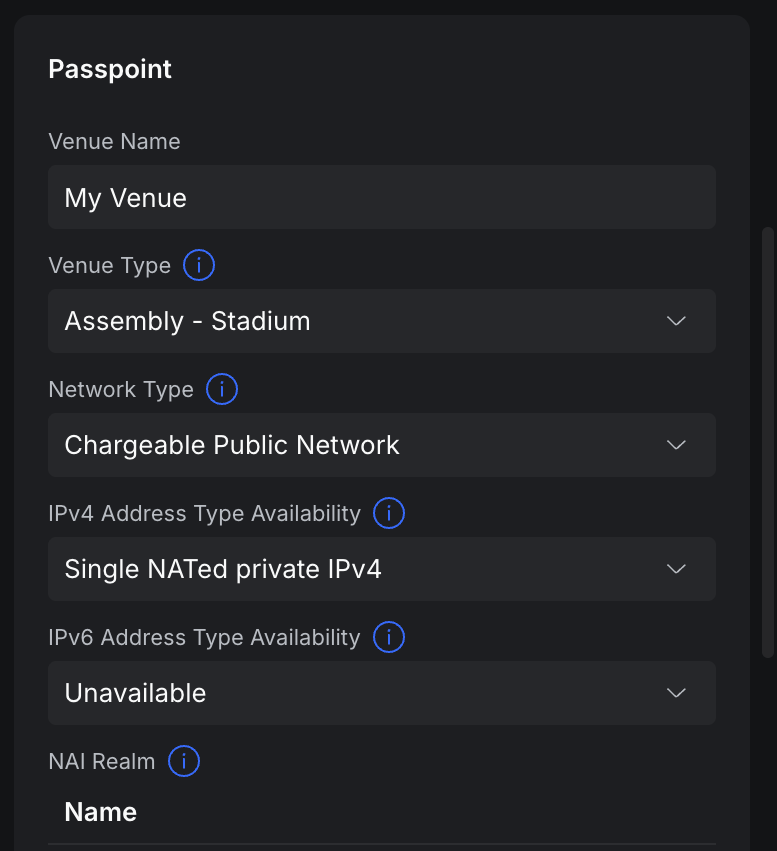
- Under Venue Name give your venue a friendly name
- Specify Venue Type as the option that best matches your site
- Set Network Type to Chargeable Public Network
- Set IP Address Type Availability:
- Set IPv4 to Single NATed private IPv4.
- *Note: choose Double NATed private IPv4 if your router is behind another router such as an ISP modem/router and has a private IP address (double NAT is not recommended for voice-grade networks).
- Set IPv6 to Unavailable
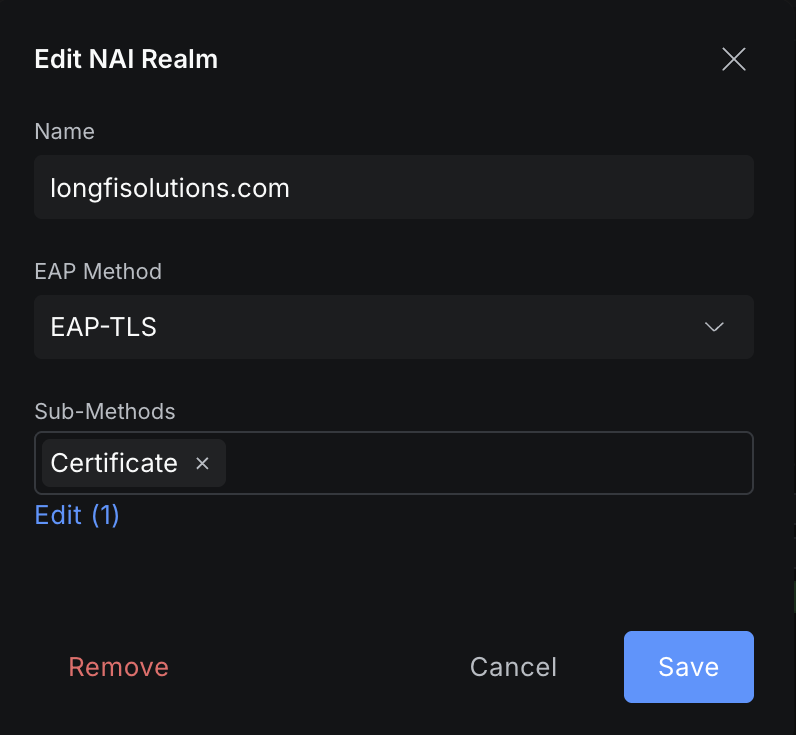
- Add NAI Realms with the following entries:
- Name: longfisolutions.com EAP Method: EAP-TLS Sub-Methods: Certificate
- Name: freedomfi.com EAP Method: EAP-TLS Sub-Methods: Certificate
- Name: hellohelium.com EAP Method: EAP-TLS Sub-Methods: Certificate
- Add the additional carrier NAI Realms and EAP Methods provided in your Carrier Offload Approval Email. These may only be activated for approved sites.
- Under Roaming Consortium List enter the name Orion and the Organization ID of F4F5E8F5F4 then click Add.
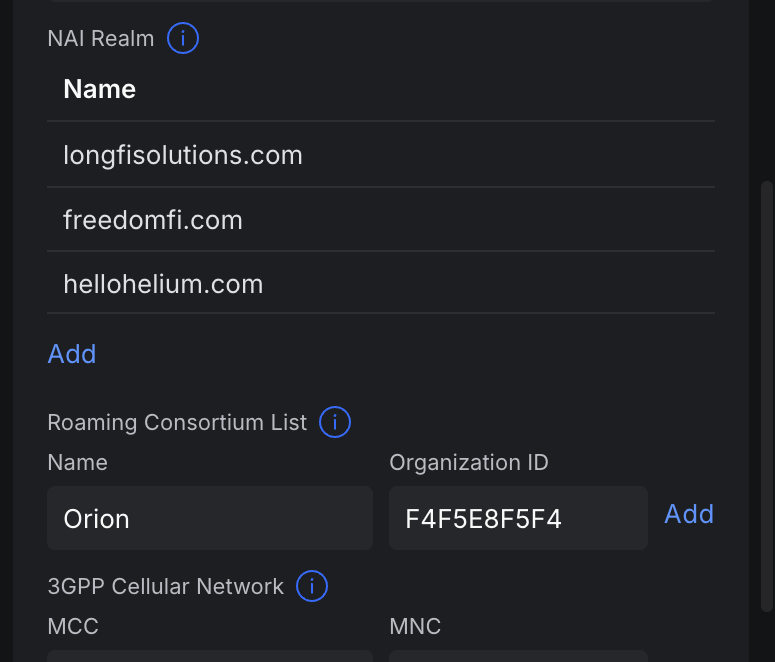
- Add the additional carrier 3GPP Cellular Network MCC and MNC codes provided in your Carrier Offload Approval Email. These may only be activated for approved sites.
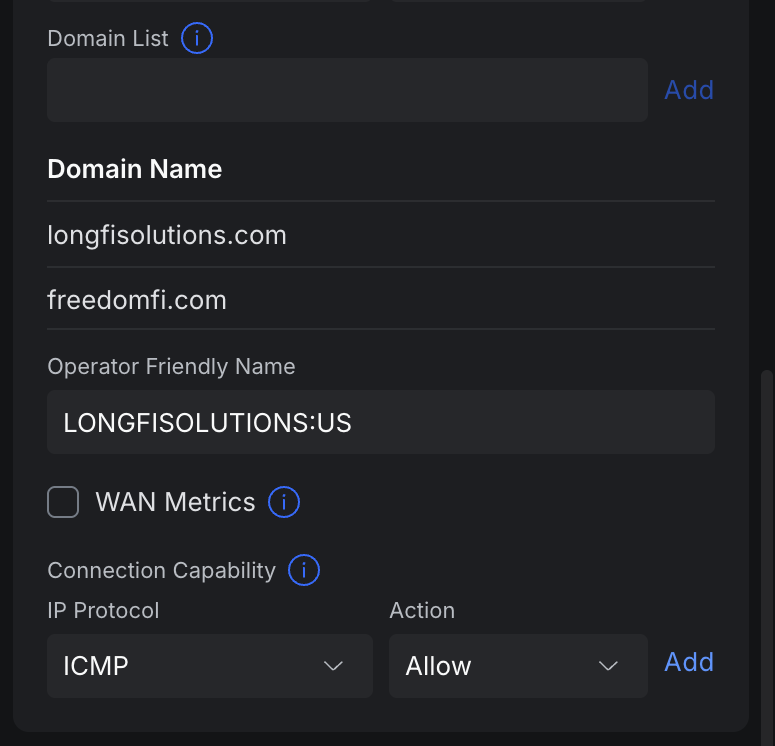
- Add Domain List:
- add longfisolutions.com
- add freedomfi.com
- Set the Operator Friendly Name to LONGFISOLUTIONS:US
- Scroll down to the Security settings. Set Security Protocol to WPA3 Enterprise
- Enable the option for External RADIUS Server
- Under RADIUS Profile choose the LongFi RadSec server we created earlier
- Scroll down and make sure that Client Device Isolation is enabled
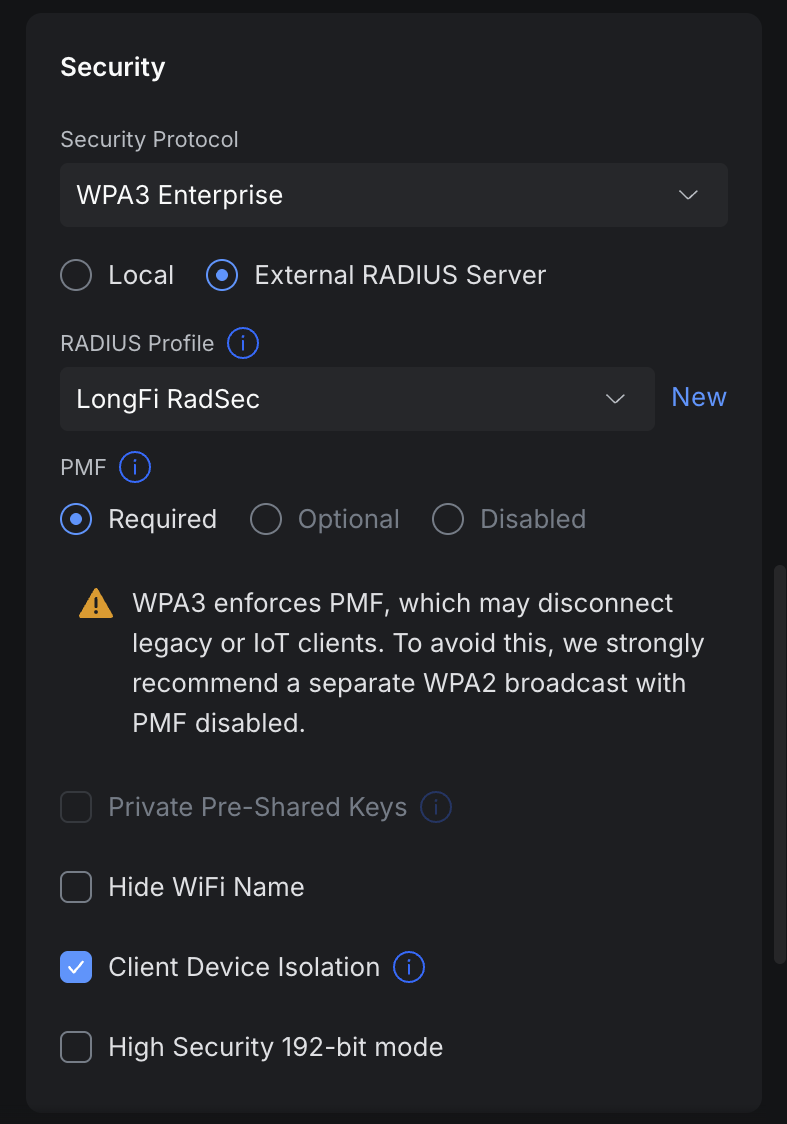
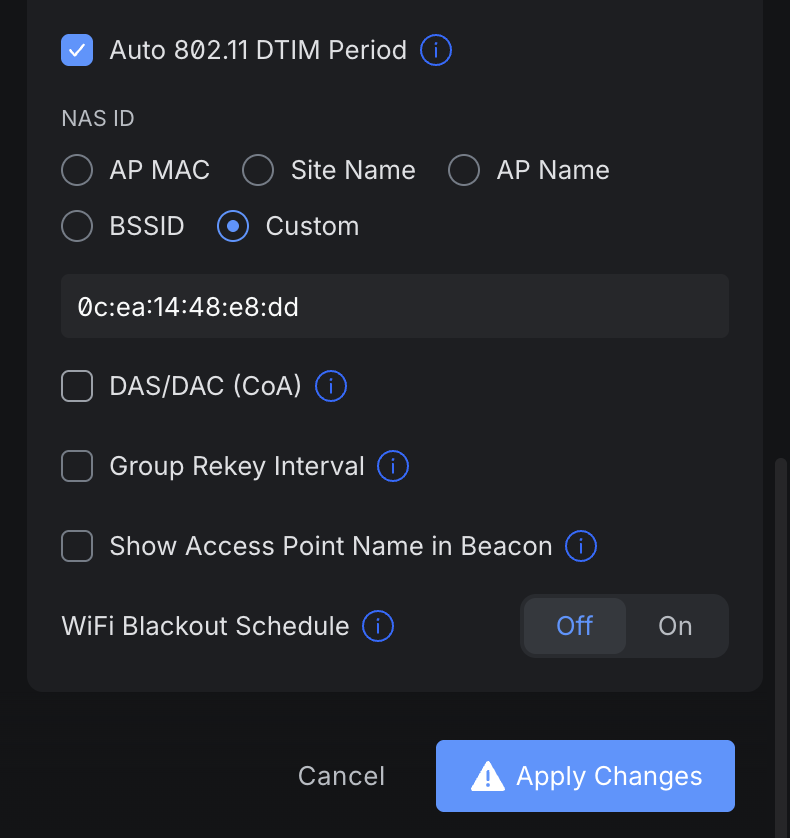
- Scroll down to the settings for NAS ID and choose Custom
- Here you will enter the NAS ID you provided during registration and onboarding. This can also be found in your Carrier Offload Approval Email
- At the bottom of the page hit Apply Changes to create the new LongFi Passpoint SSID
Congratulations!
Your LongFi Passpoint SSID is now configured and broadcasting. You can test access by forgetting any nearby Wi-Fi networks on your device (or disable auto-join and toggle wifi on/off). You do not need to manually select the LongFi Passpoint SSID from your device. If you have a device with a compatible SIM plan, it will connect automatically.
Other Recommended Settings
In order to best optimize your LongFi Passpoint SSID in a UniFi environment, here are some of the settings we recommend. You may want to edit your SSID configuration to perform further optimizations for Passpoint Wi-Fi:
- Disable 2.4 GHz
- We disable 2.4 GHz on the Passpoint SSID in all but the most dense environments (ie. stadium, arena). This band is already crowded with IoT devices, there are only 3 non-overlapping channels, and most modern SIM based devices will avoid 2.4 GHz except as a last resort. We see very little data offload benefit from enabling 2.4 GHz, and this band is discouraged by the carriers as it is not voice-grade.
- Roaming Assistance > set Fast Roaming (802.11r) to enabled
- 802.11r allows clients to be pre-authorized with neighboring APs, reducing the time it takes for a device to roam
- Hi-Capacity Tuning:
- Enable Minimum Data Rate (Basic & Multicast) and set this to 12 Mbps on all bands.
- Minimum Data Rate control defines the lowest speed allowable for client connections on an SSID, forcing "sticky" clients to roam sooner, and reducing airtime wasted by slow, distant devices
- In very high density environments, with many users and many APs in close proximity , increasing this setting to 24 Mbps will further balance clients across APs and prevent sticky clients
- Enable Multicast and Broadcast Blocker. If you have a UniFi gateway, it will automatically be added to the allow list.
- *Imporant: if you do not have a UniFi gateway, you will need to add the MAC address of the LAN facing interface of your gateway (and any separate DHCP or DNS server) to the allowlist. Otherwise important broadcast and multicast messages such as DHCP request may be blocked.
- This setting is designed to improved Wi-Fi performance by preventing excessive broadcast and multicast messages from flooding all wireless clients. The clients do not need to talk to other clients on a guest network segment, they only need to talk to the gateway, DHCP server, and DNS server.
- Do not enable Multicast to Unicast, that setting will cancel out Multicast and Broadcast Blocker and cause major issues.
- Enable Proxy ARP
- This setting greatly reduces airtime usage (that's good) and improves latency by allowing the APs to proxy ARP messages as unicast.
- Enable Client Device Isolation
- A critical security setting for Guest & Passpoint Wi-Fi
- Leave Band Steering disabled
- This setting should only be used in the most high density environments where APs have up to 100 clients per AP and enabling 2.4 GHz is unavoidable. Think a basketball or football stadium with hundreds of APs and thousands of users.
- Enable BSS Transition
- This setting assists roaming by providing a list of nearby APs so the clients know where to look
- This setting manages the transition by suggesting or steering clients to better APs
- Enable Minimum Data Rate (Basic & Multicast) and set this to 12 Mbps on all bands.