Meraki Passpoint Conversion Guide
For support please contact: support@longfisolutions.com
Prerequisites
LongFi Connect configuration requires the Passpoint protocol. Please ensure your Meraki system is running version 14.0 or later, your AP models support Passpoint/Hotspot 2.0, and you have basic traffic routing working with existing SSID(s).
Note
Before you can activate Passpoint in your Meraki Organization, you will first need to complete the RadSec with Meraki section of this guide, and share your Meraki CA with LongFi engineers (see below).
You will also need:
- The NAS ID and RadSec certificates obtained during your site Onboarding & Activation
- A guest VLAN with the appropriate network segmentation, security, traffic shaping, and firewall policies for your requirements.
- The guest VLAN needs a large DHCP pool with a short lease time. Passpoint clients can automatically discover and join a network, and there will be many more "transient client" connections than a normal guest wifi network.
the NAS ID must be unique for every site
If you are deploying a Passpoint SSID from the Organization Wide Configuration Templates in Meraki, you will not be able to use the Custom field for the NAS ID. The best approach is to use the AP Tags setting for NAS ID, and apply the NAS ID as a tag for every site and AP.
High Level Steps
- Submit NAS ID, Obtain RadSec Certificates, Share Meraki CA
- Configure the Passpoint Wi-Fi SSID
- Configure RADIUS for the Passpoint Wi-Fi SSID
- Build Hotspot 2.0 Profile
RadSec with Meraki
LongFi now supports a hosted RadSec authentication model for Cisco Meraki networks. This allows Meraki partners to connect to the LongFi network without hosting their own proxy or VPN, while maintaining carrier-grade security and data accuracy.
For more information on configuring Meraki for RadSec, see:
How It Works
1. Meraki Controller → LongFi Connect AAA Servers
- Each Meraki org downloads its CA certificate and shares it with LongFi engineers
- Each Meraki org uploads LongFi provided CA certificate to Meraki organization
- Shared certificates establish secure RadSec TLS tunnel via TCP on port 2083
- Meraki org securely transports SIM client RADIUS messages through TCP and TLS
2. LongFi Connect AAA Servers → Carrier Networks
- LongFi establishes secure RadSec tunnels to Carrier Networks using Carrier certificates
- Passpoint Client AAA messages are routed to Carrier Realms
- Carrier Authenticated users are allowed to join Meraki org Wi-Fi via EAP and 802.1X
3. Offload, Authentication, & Accounting
- Authentication: NAS_ID + certificate CN must match LongFi’s records
- Accounting: Offloaded Data maps to LongFi Partners via NAS_ID.
Customer Setup
- From the main dashboard in Meraki, go to Organization > Certificates
- Click on RADSEC
- Click on Upload CA certificate
- Upload the LongFi Connect CA certificates provided in your onboarding and activation emails
- Under RadSec AP Certificates click on Download CA
- Share your newly downloaded Meraki CA with your LongFi Connect onboarding contact
*Please Note: Meraki generates CA certificates at the Organization level. If you are managing multiple sites from a single Organization, we only need one Meraki CA. If you are an MSP managing multiple sites in multiple Meraki Organizations, we will need a Meraki CA certificate from each organization.
Please allow 2-3 days for us to upload your Meraki CA certificates to the LongFi Connect servers. Once your site has been approved for activation, follow the remainder of this guide to implement Passpoint on your Meraki networks.
Configure the Passpoint Wi-Fi SSID
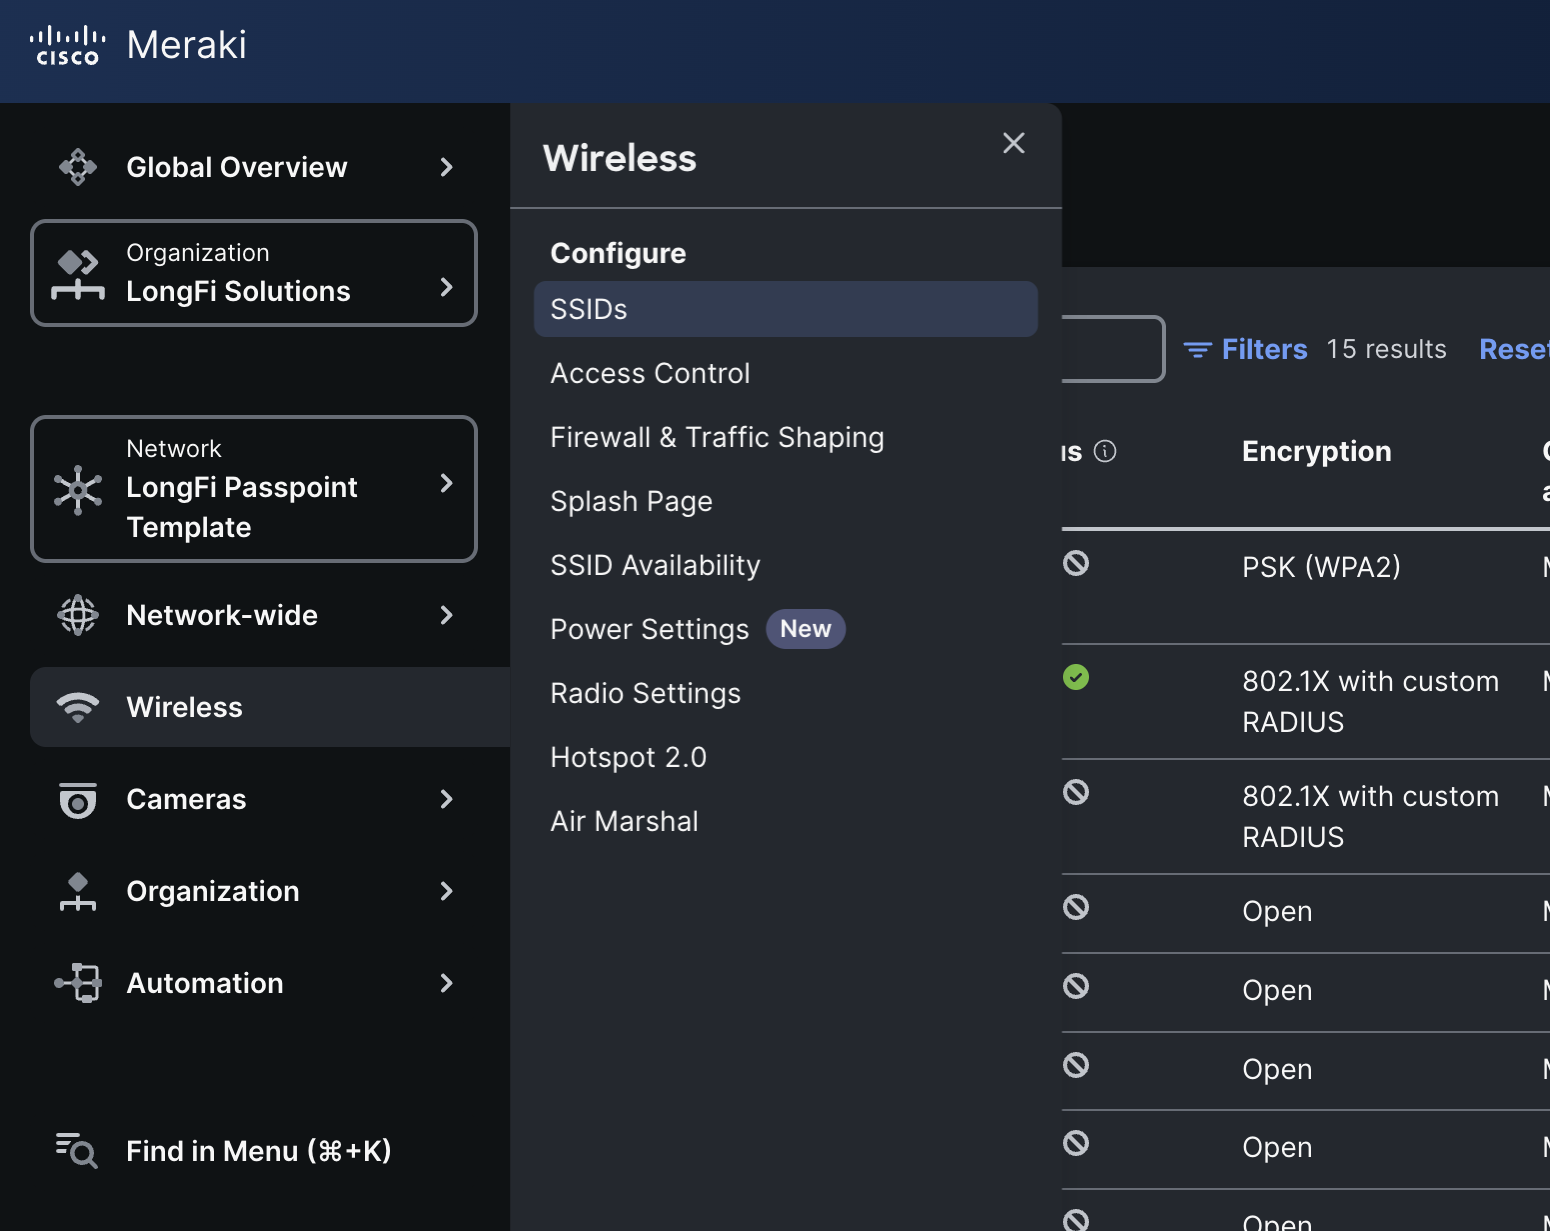
- From the Meraki main dashboard, click on Wireless > Configure > SSIDs
- Look for an Unconfigured SSID X
- Click on the new SSID to edit
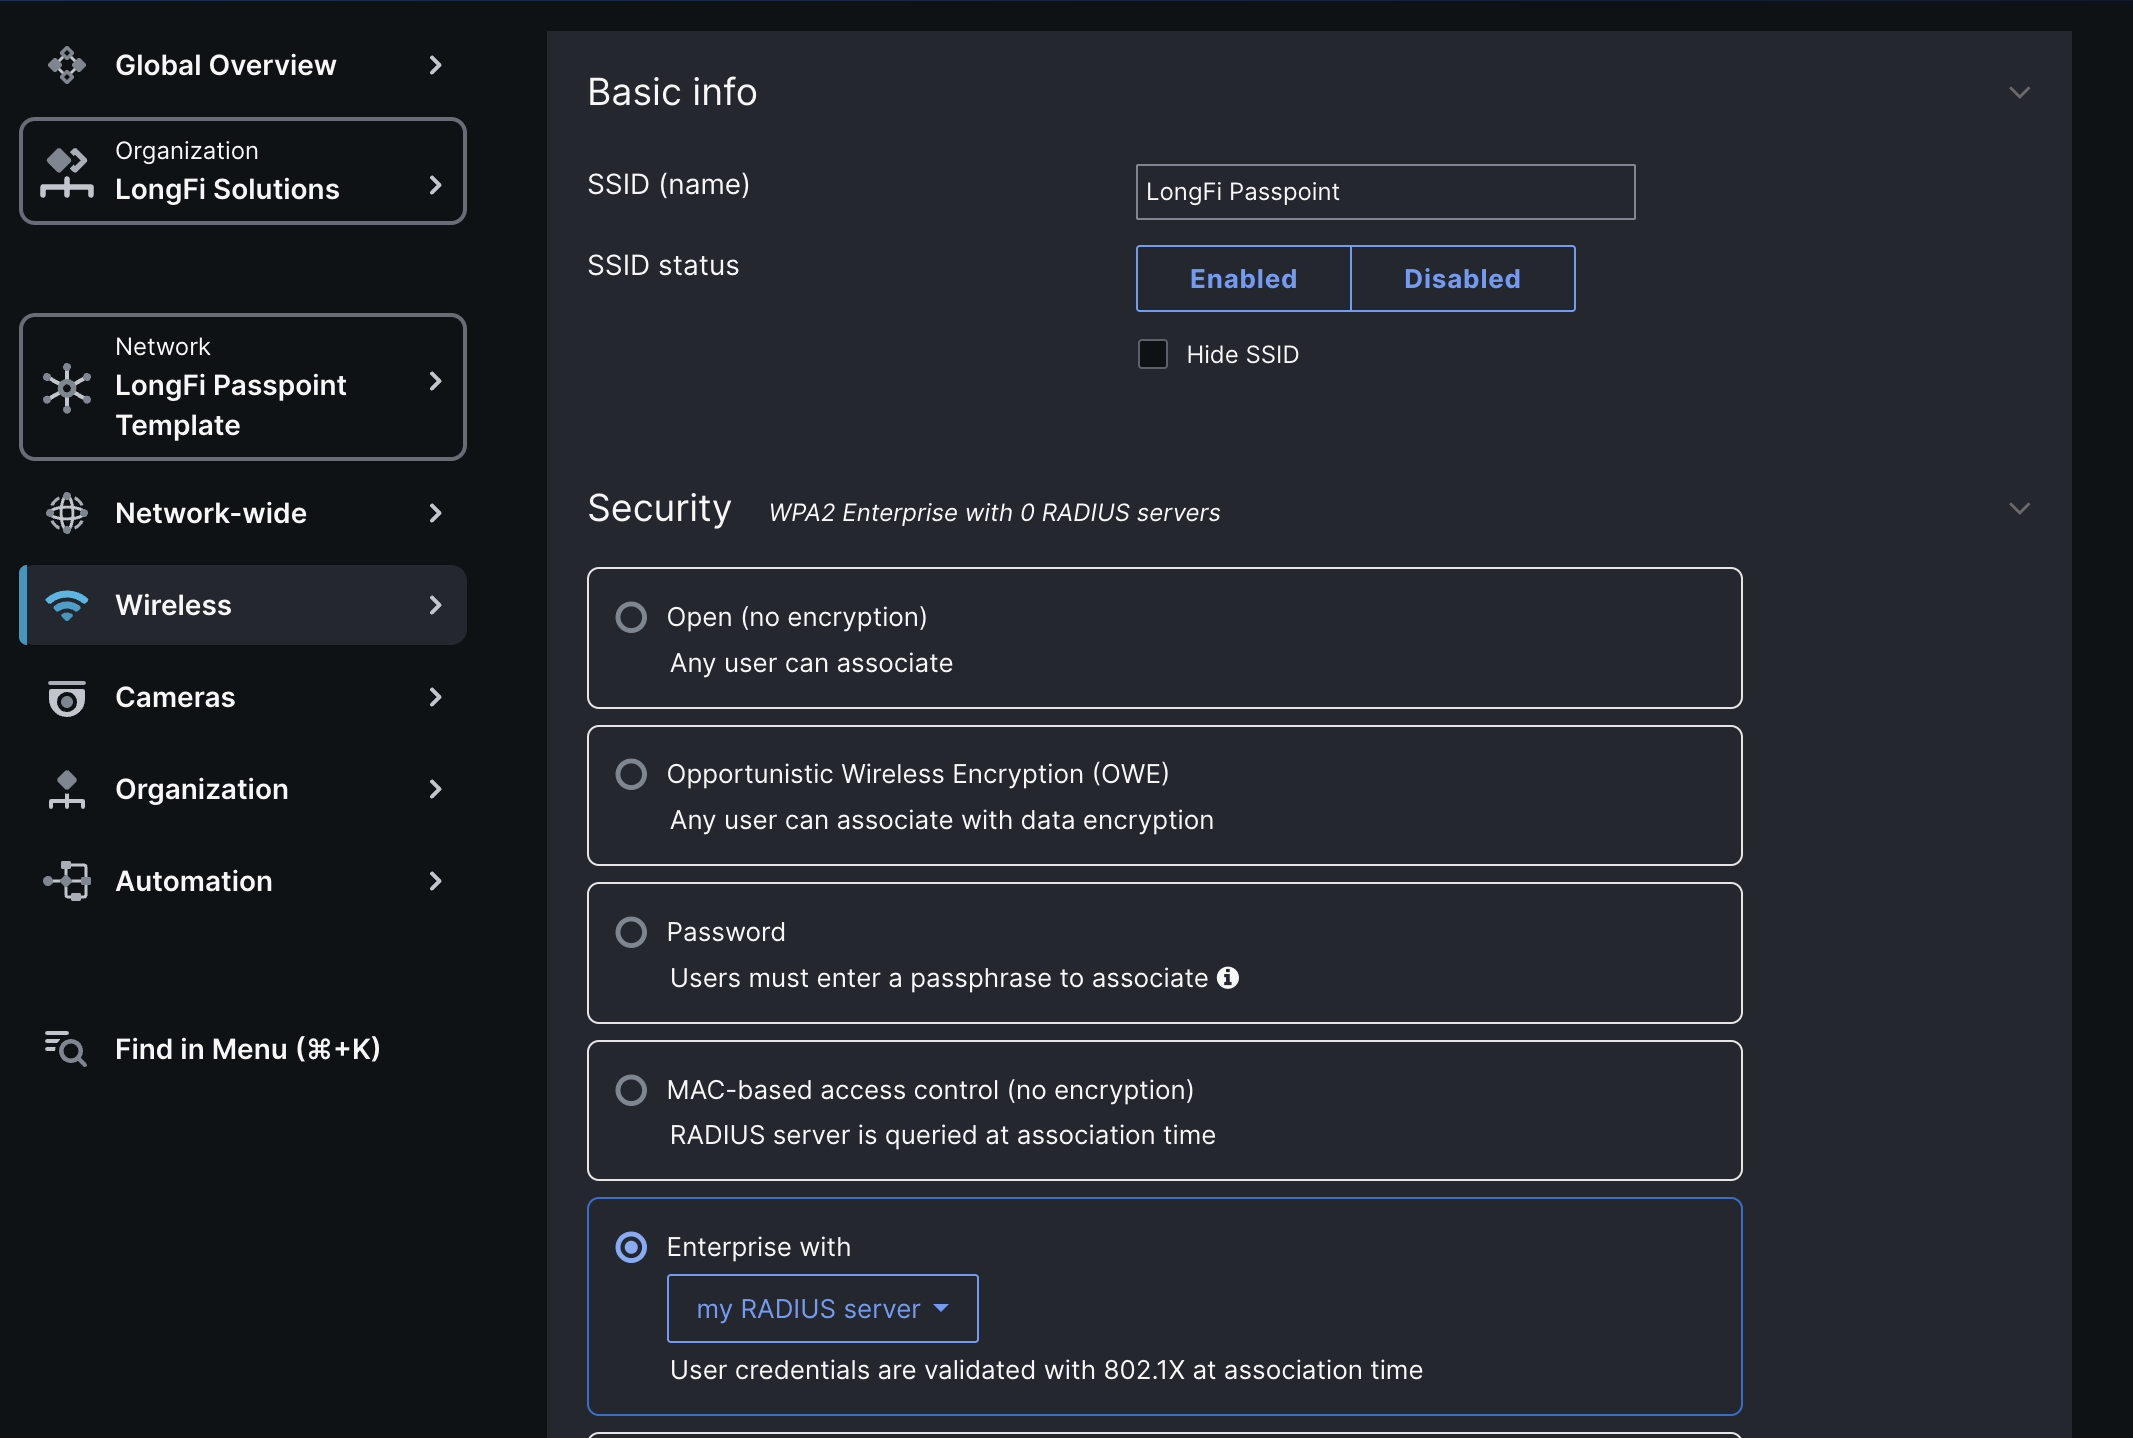
- Under SSID (name) give the SSID the name LongFi Passpoint
- Select Enabled
- Under Security choose Enterprise with and select my RADIUS server
- Scroll down to WPA encryption and choose WPA3 only
Note
Depending on your AP models and support for 6GHz, you may want to choose WPA3 Transition Mode and change 802.11w Protected Management Frames from Required to Enabled to allow support for legacy clients. Please consult your vendor documentation to make the best decision.
Configure RADIUS for the Passpoint Wi-Fi SSID
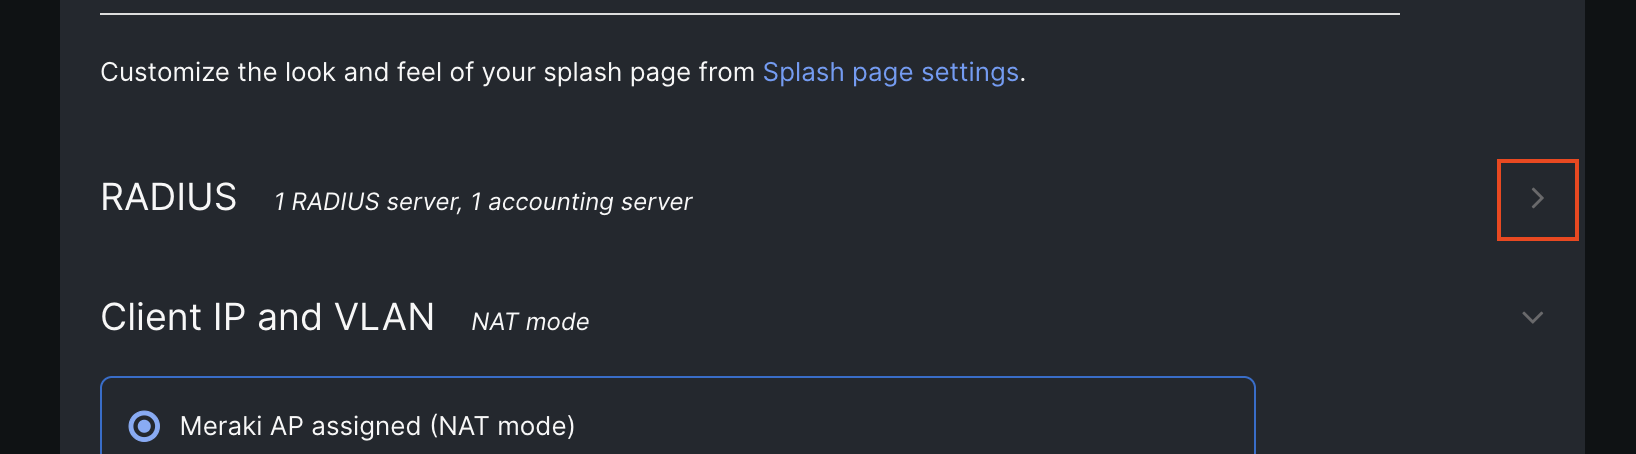
- Scroll down to RADIUS and click the side arrow to expand the RADIUS settings (this is hard to see, small arrow on the right side of the panel)
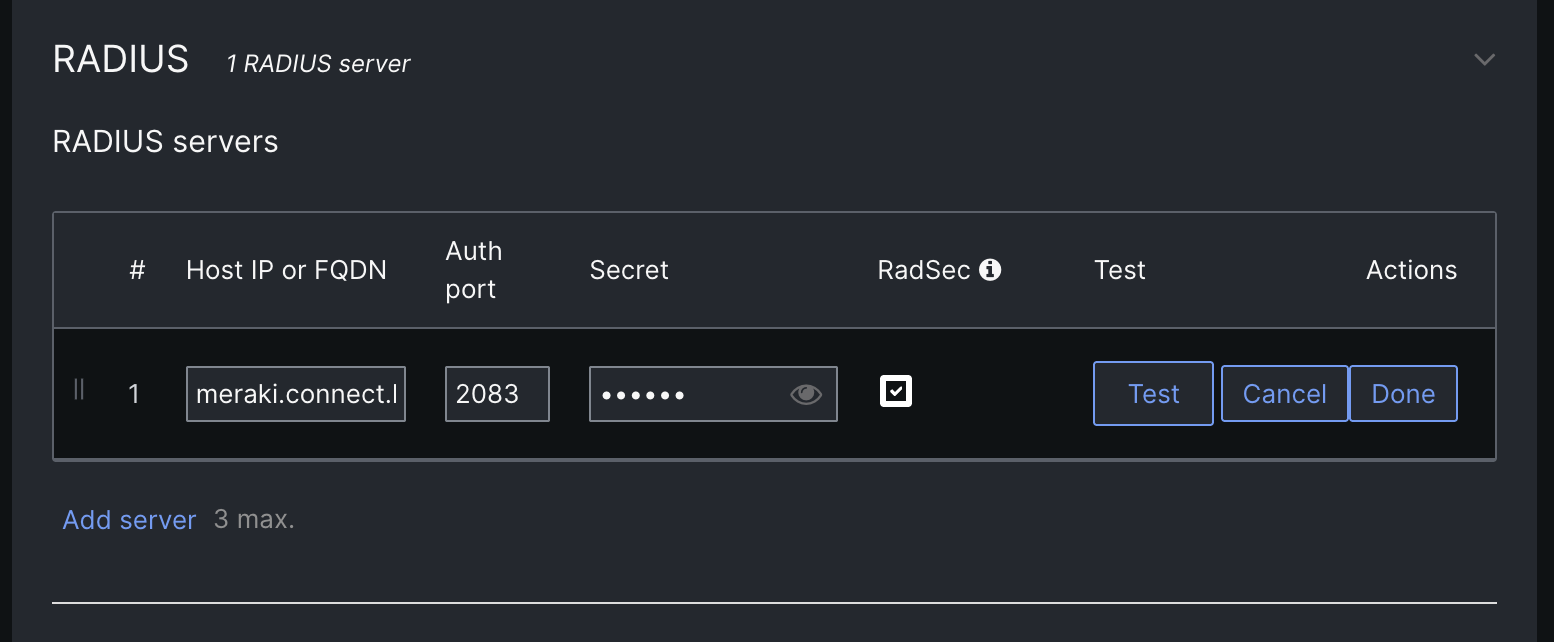
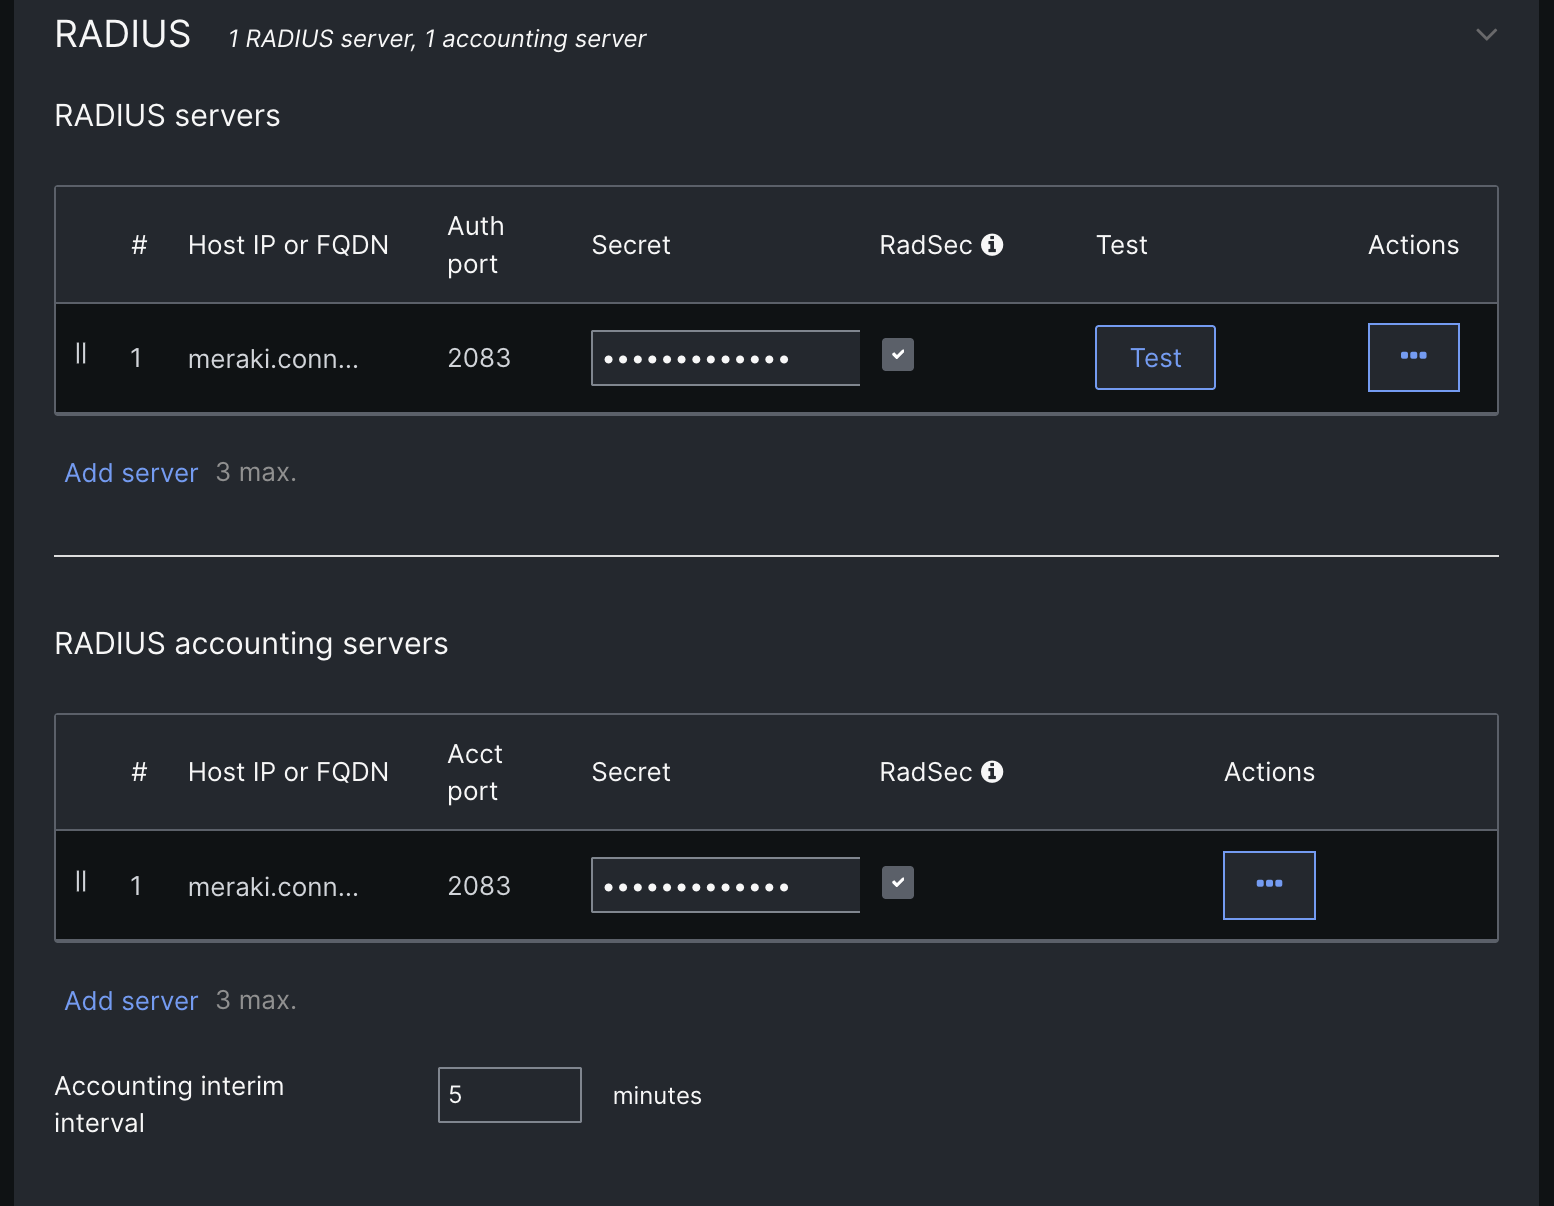
- Under RADIUS servers click Add server
- For the Host IP or FQDN enter meraki.connect.longfisolutions.com
- For the Auth port enter 2083
- For the Secret enter radsec
- Check the box to enable RadSec
- Click Done to add the new Authentication server
- Under RADIUS accounting servers click Add server
- Repeat all the same settings as the authentication server
- Set the Accounting interim interval to 5 minutes
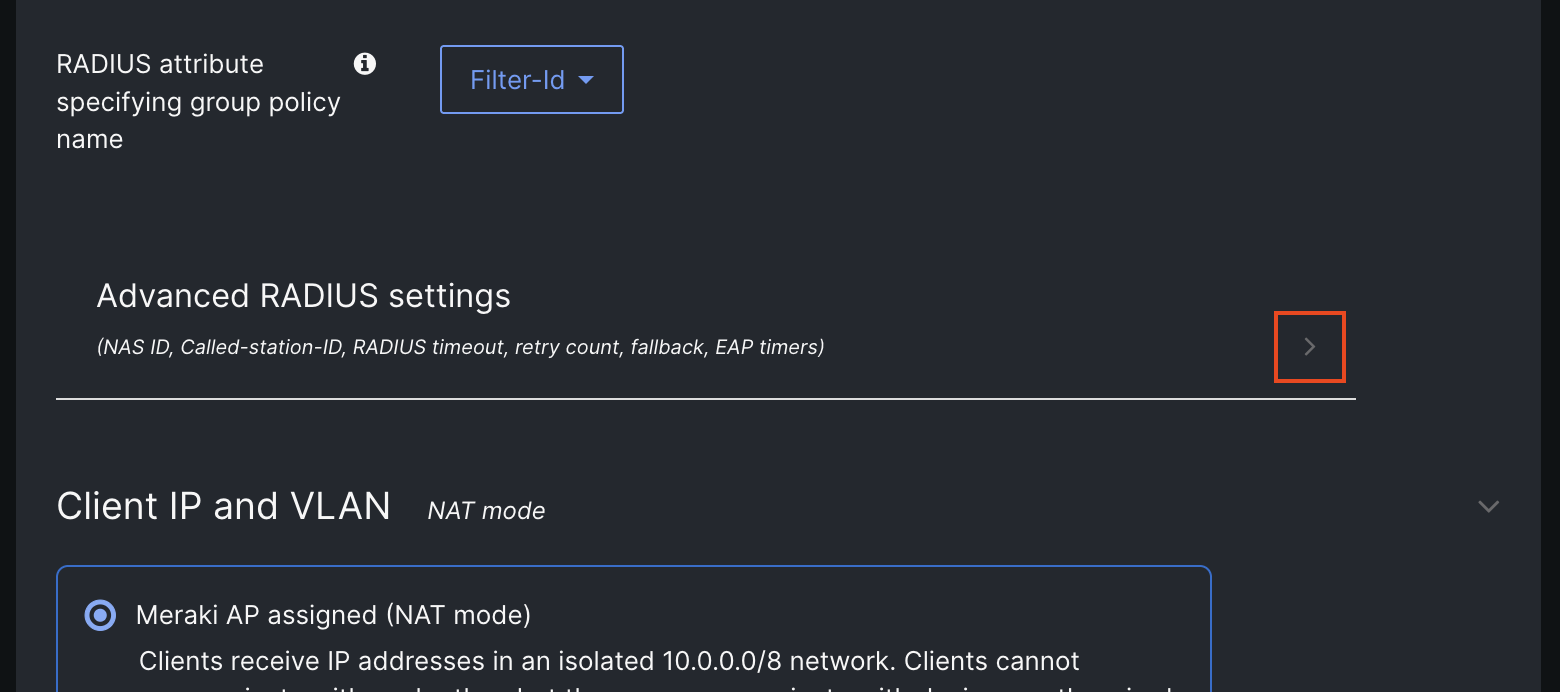
- Scroll down to Advanced RADIUS settings and click the arrow button on the right to expand the settings (this one is even harder to see than the last one)
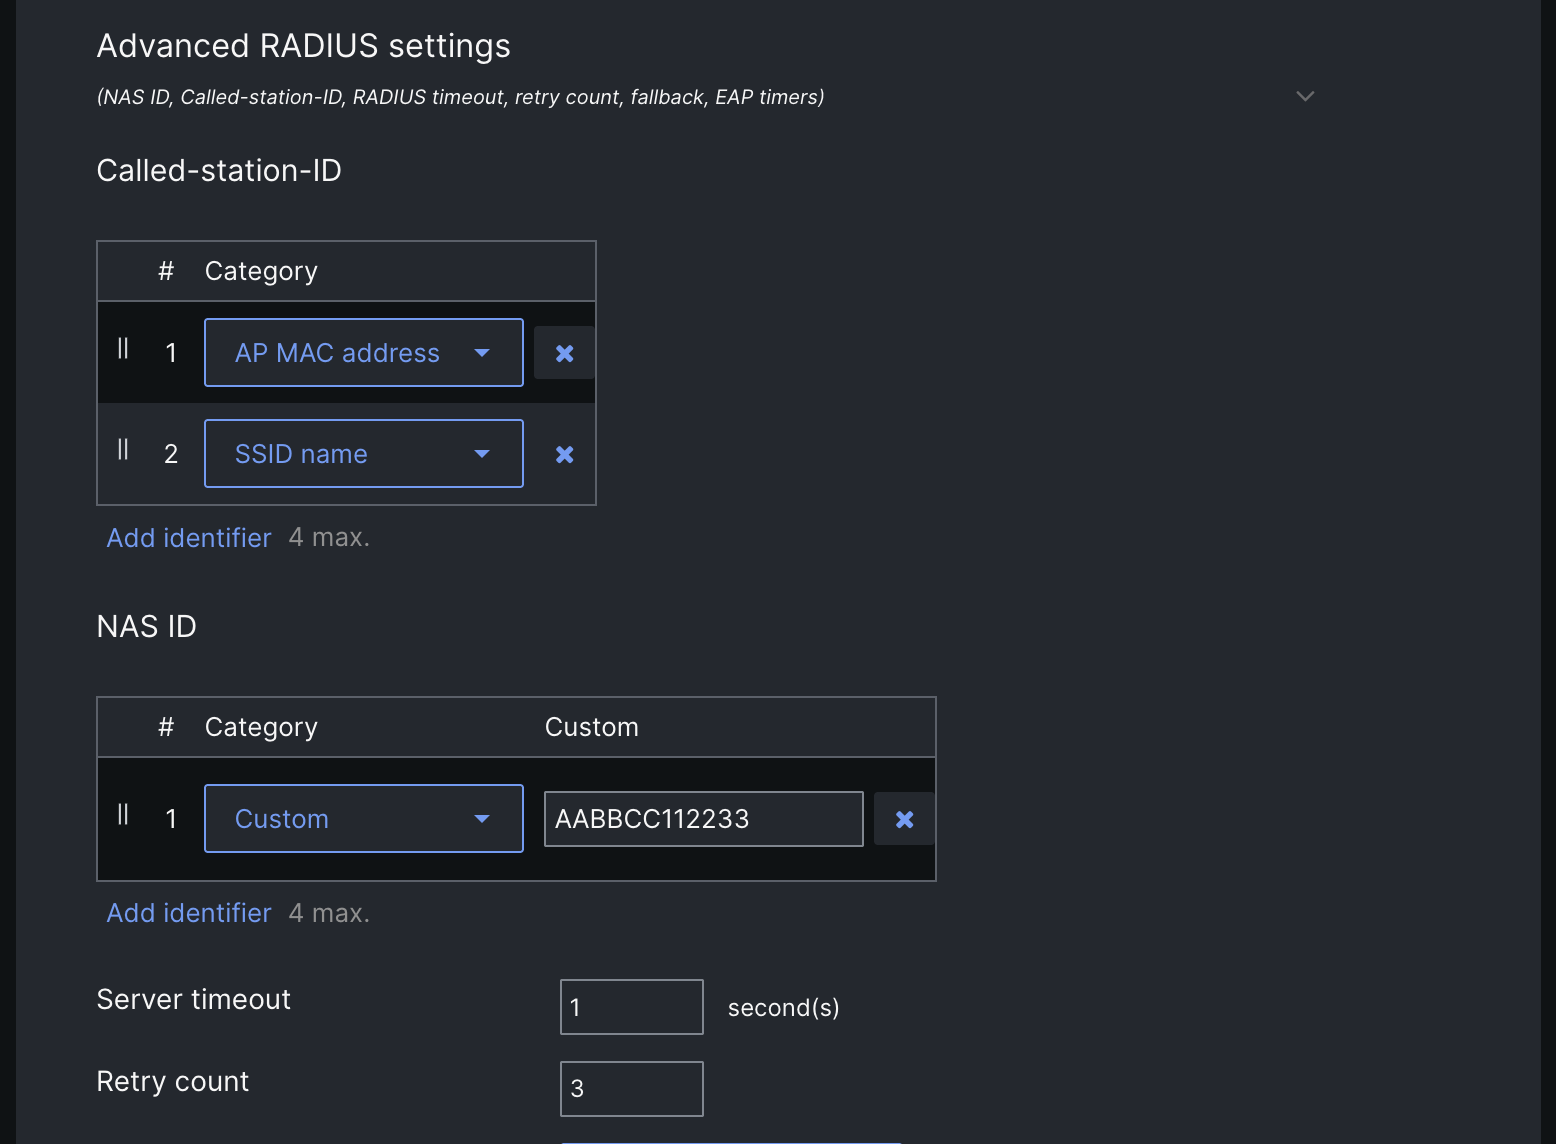
- Scroll down to NAS ID
- Change the Category to Custom
- In the Custom field, enter the NAS ID used to activate your site (this will be provided in your onboarding emails, and is normally a MAC address that you shared with us)
- Delete any additional NAS ID from the numbered list, you only need #1
NAS ID formatting
Meraki does not accept MAC address formatting in the Custom field, so we will remove any normal MAC formatting such as colons, dots, or dashes. For example, f the MAC you submitted was AA:BB:CC:11:22:33, it will be registered as AABBCC112233
the NAS ID must be unique for every site
If you are deploying the LongFi Passpoint SSID to multiple sites from an Organization level template, Meraki does not support a manual override of the NAS ID at the site level. The best option is to use the AP tags option, and tag the site and APs with the NAS ID you registered during onboarding and activation. Please contact us if you need assistance with this workaround
- Apply any other settings required by your organization
- Scroll down to the bottom and click Save to save the new SSID
Build Hotspot 2.0 Profile
- From the main dashboard in Meraki, click on Wireless and select Hotspot 2.0
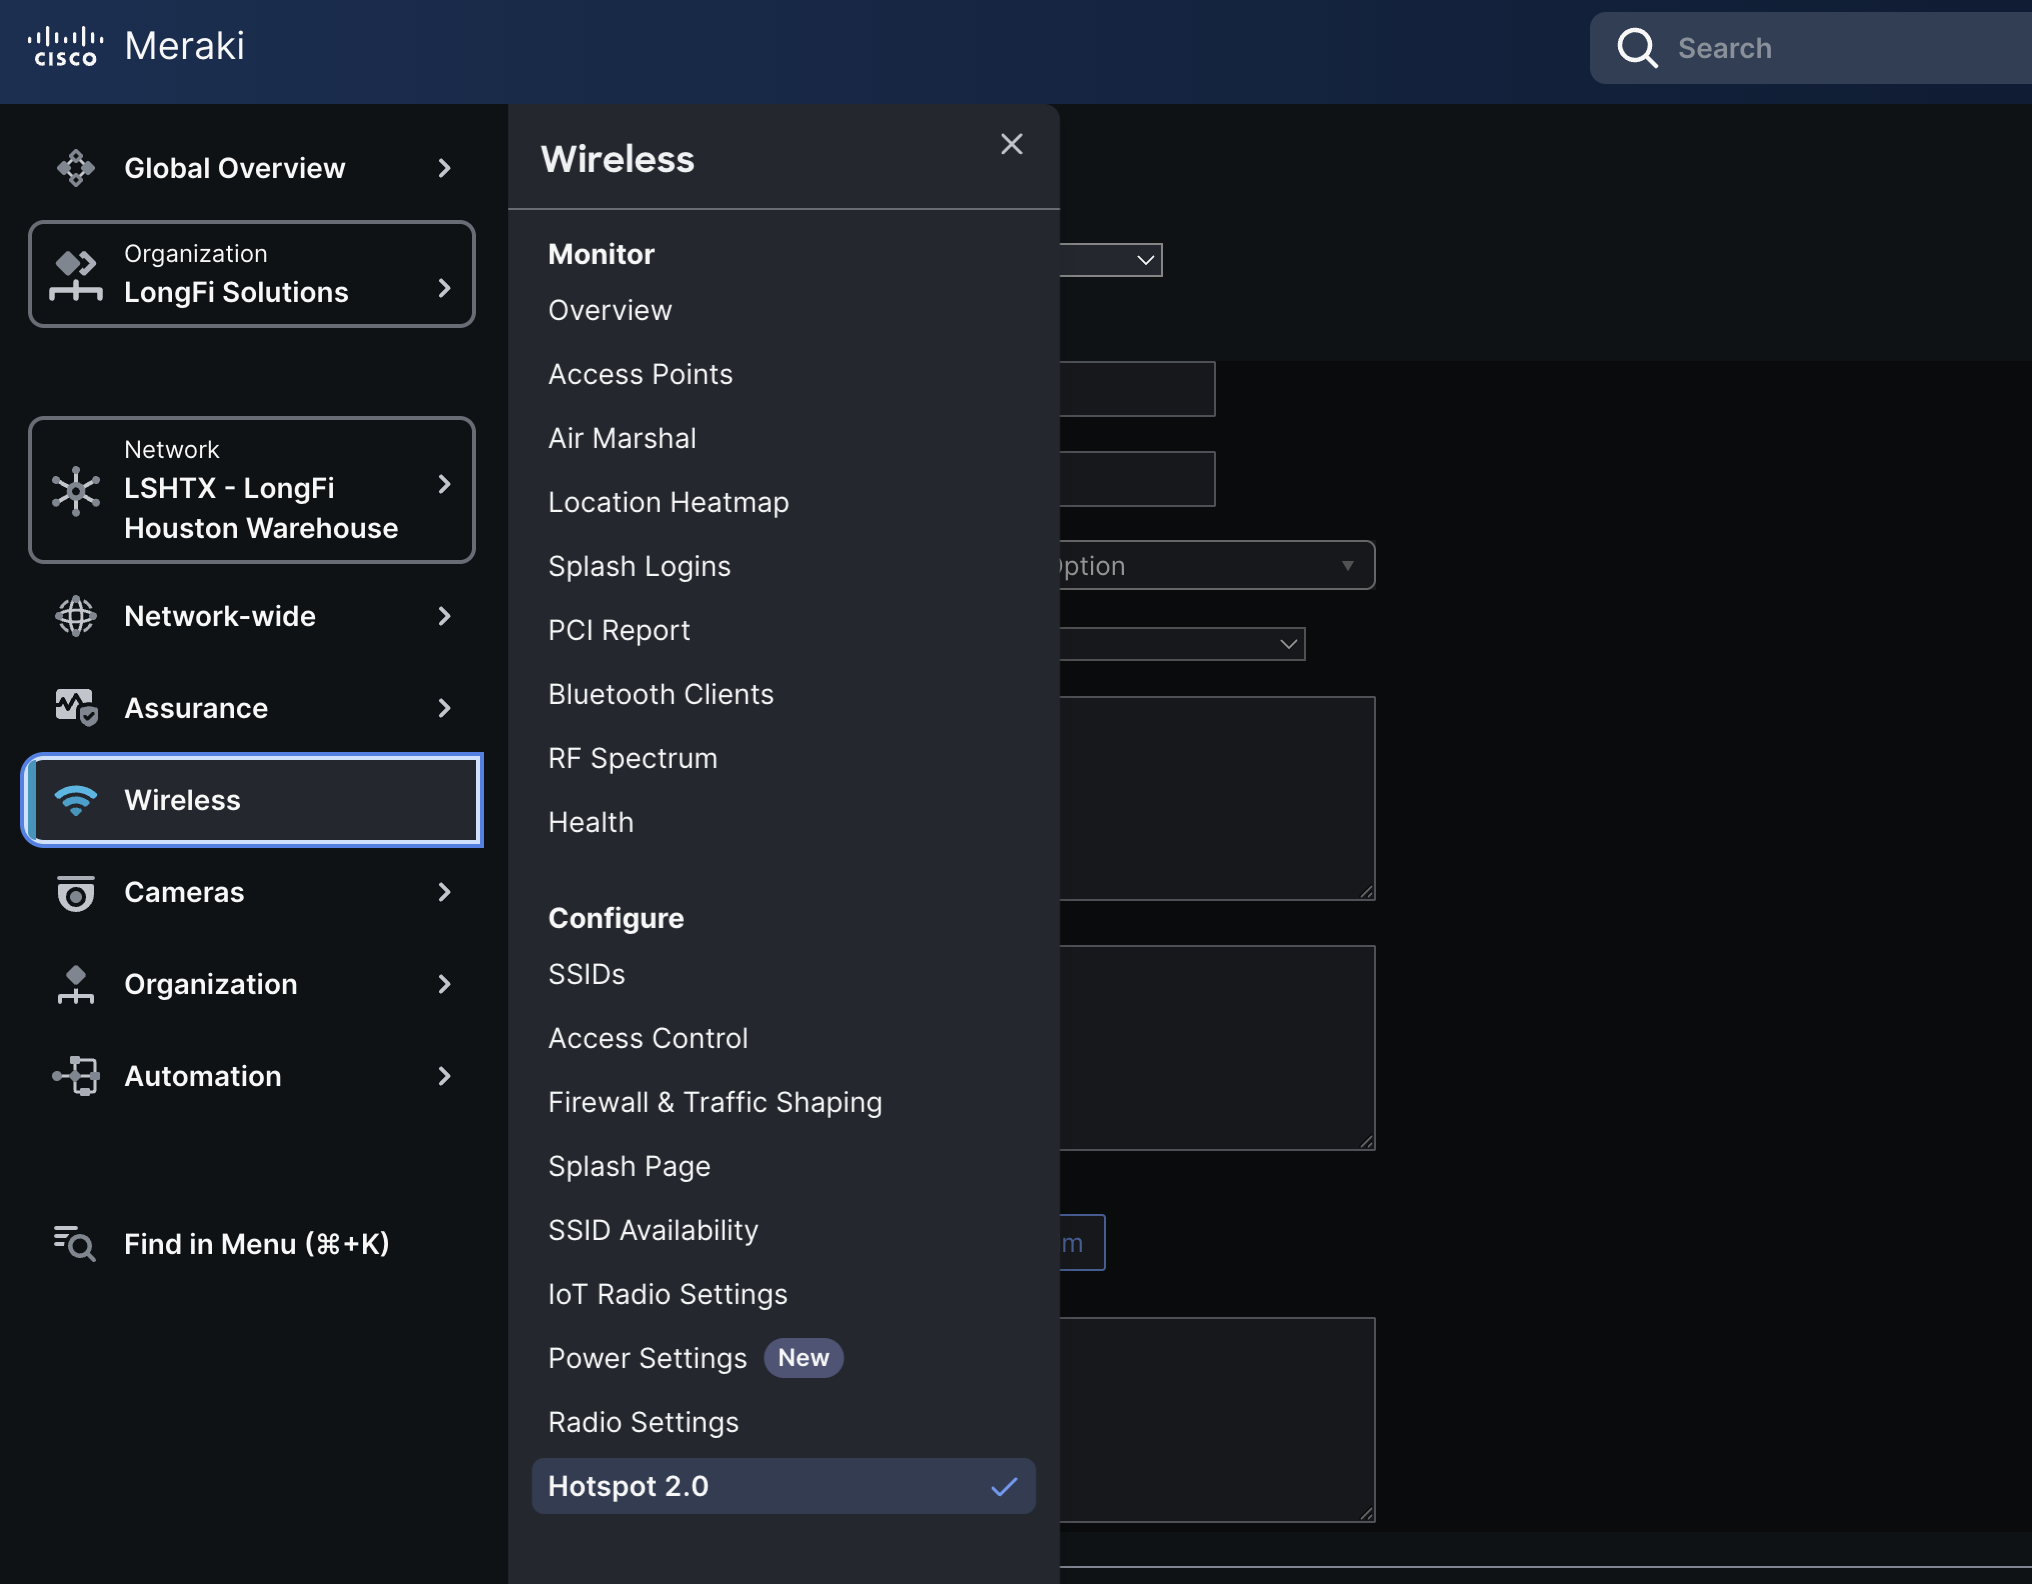
- From the Hotspot 2.0 dashboard, set the SSID to the new LongFi Passpoint SSID
- Set Hotspot 2.0 to Enabled
- Set the Operator name to LONGFISOLUTIONS:US
- Set the Venue name to an appropriate name for your site
- Set the Venue type to the appropriate venue type
- Set the Network type to Chargeable public network
- Under Domain list add the following domains:
- longfisolutions.com
- freedomfi.com
- Under Roaming Consortium OIs add the following RCOIs:
- F4F5E8F5F4
- 2A2F830000
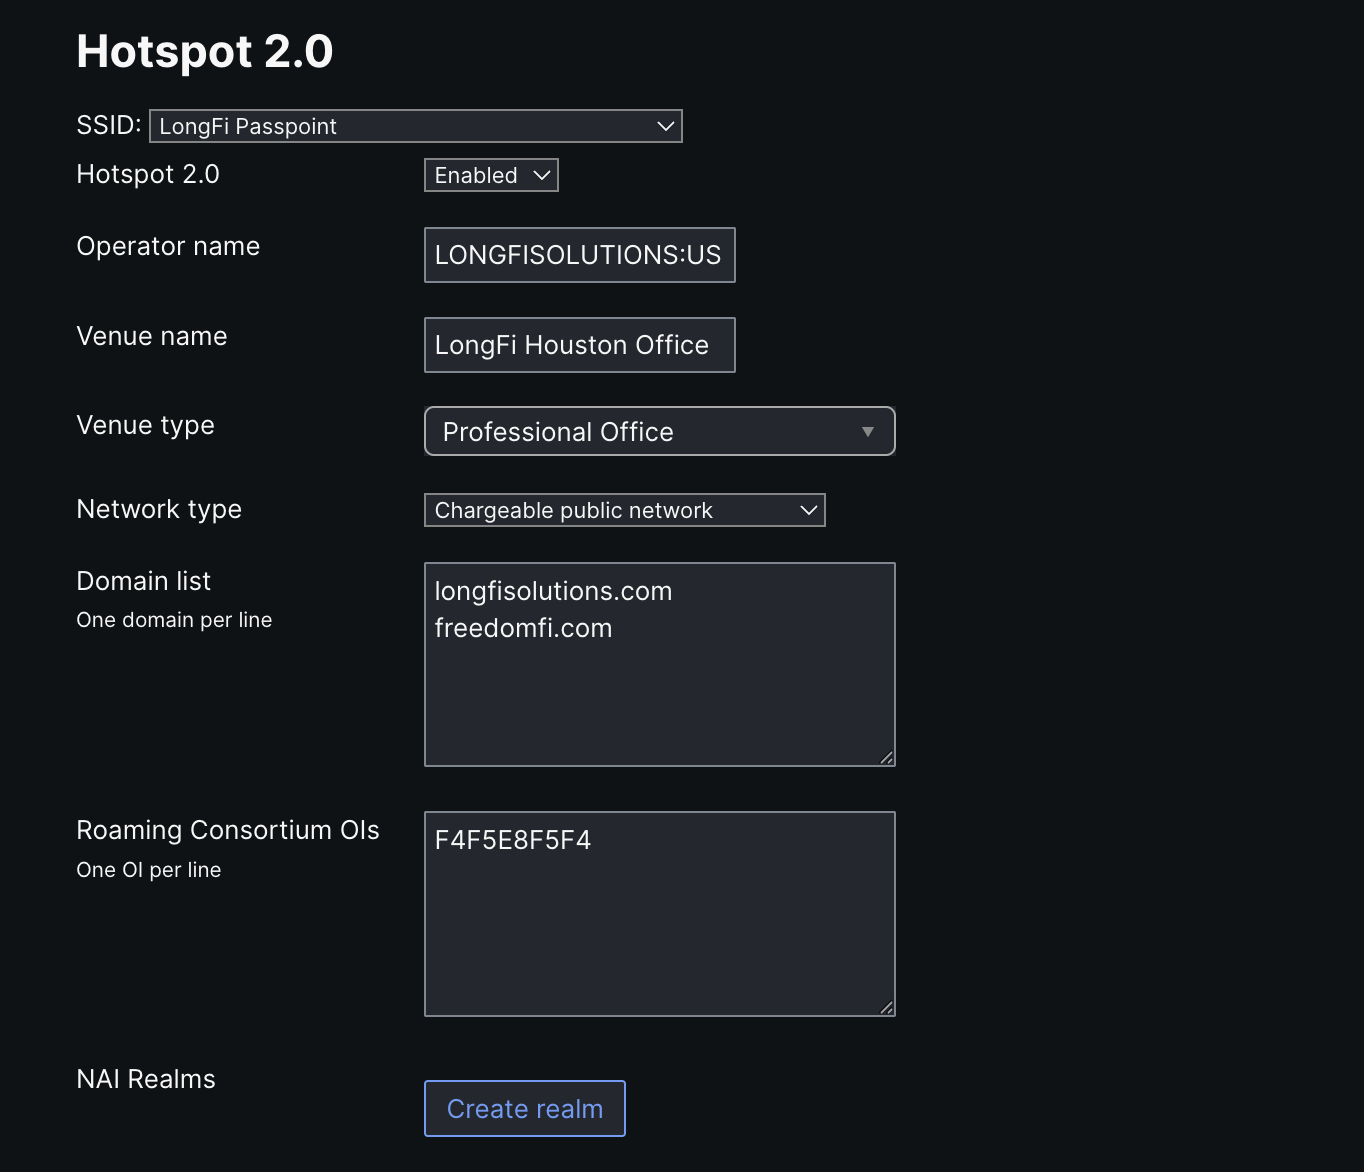
- Next to NAI Realms click Create realm
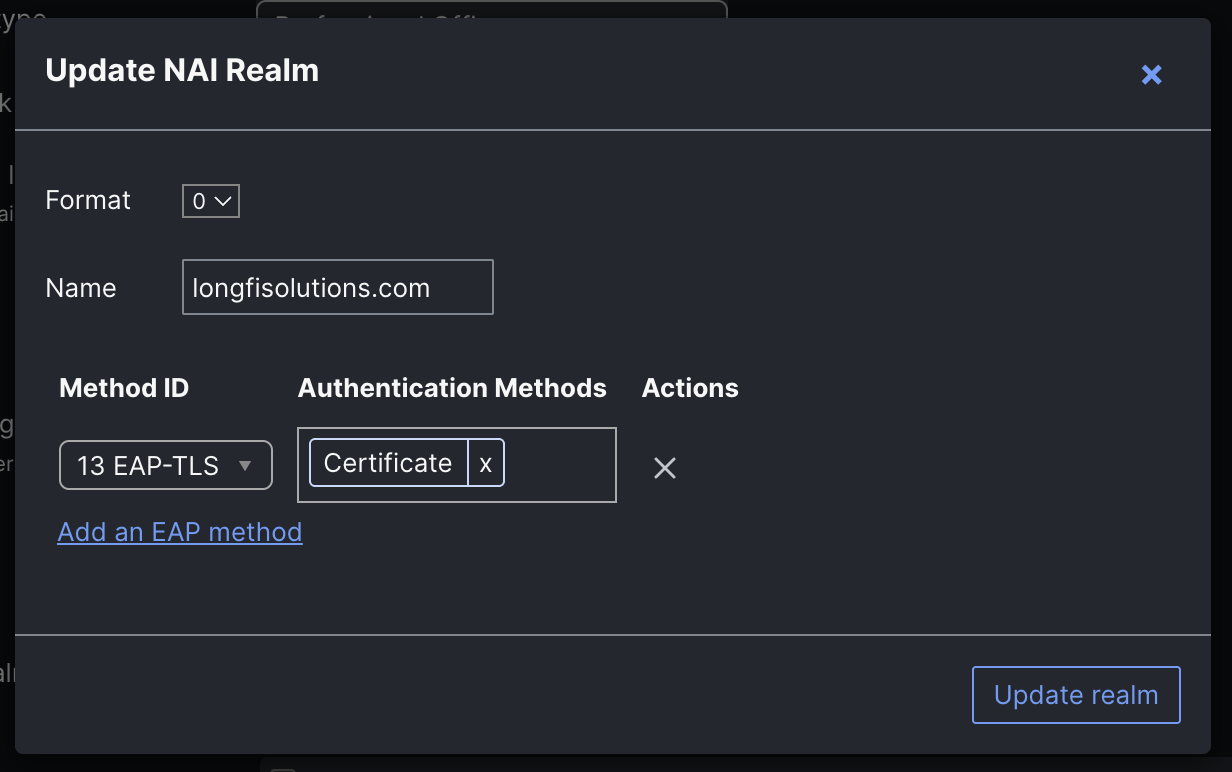
- Under Format select 0
- Set the Name to longfisolutions.com
- Click Add an EAP method
- Under Method ID choose 13 EAP-TLS
- Under Authentication Methods select Credentials > Certificate
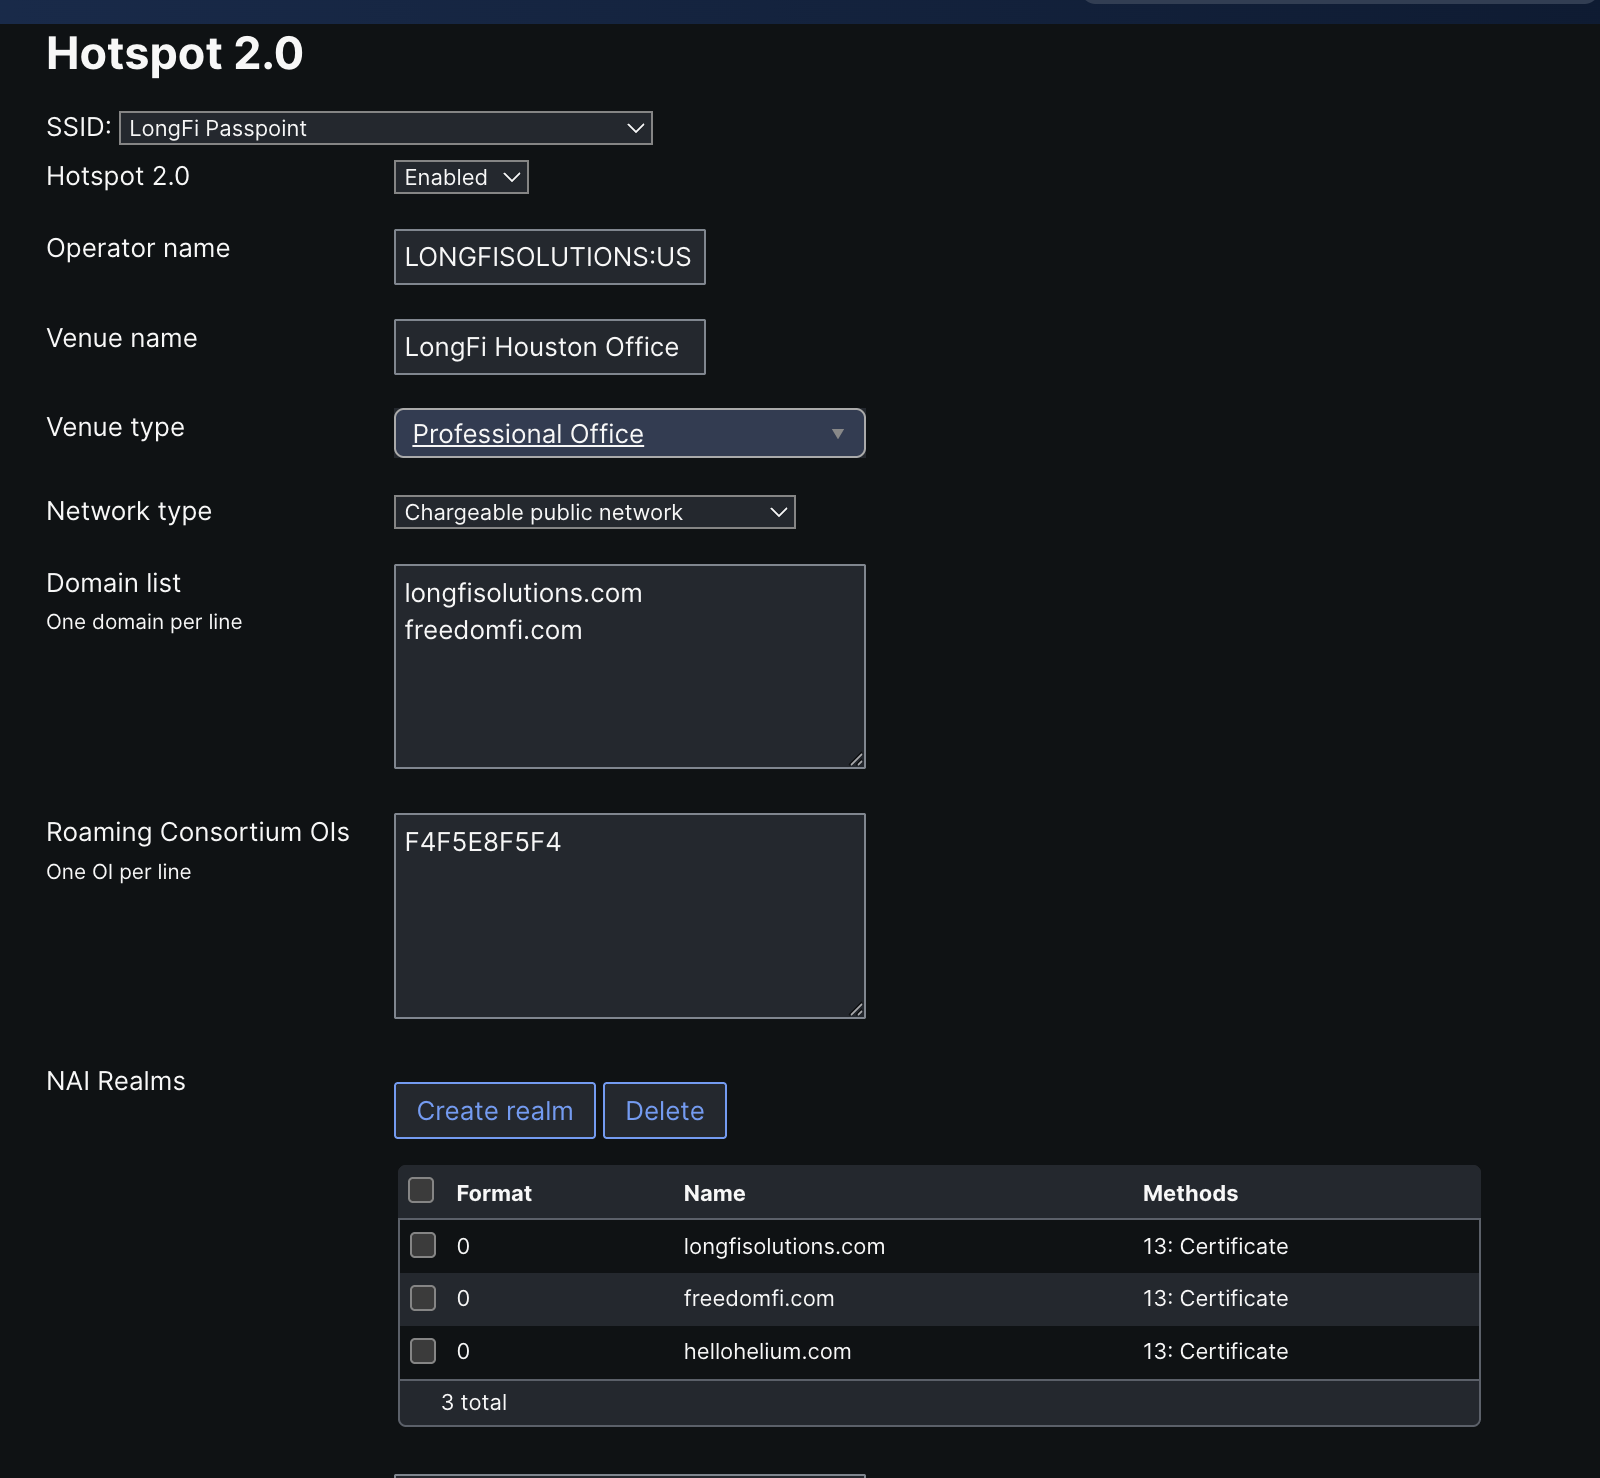
- Repeat this process with all the exact same settings for these additional realms:
- freedomfi.com
- hellohelium.com
- Scroll down to the bottom and click Save
- Your finished configuration should look like this:
Additional RCOIs, Realms, and MCC/MNCs
The domains, RCOIs, and Realms we just entered can be configured and activated prior to carrier approval. You will receive additional domains, RCOIs, Realms, and MCC/MNC codes in your onboarding and activation emails with unique EAP settings. Please refer to the settings provided in your activation email. These additional settings must be activated only on approved sites.
Your LongFi Connect Passpoint Wi-Fi implementation is complete! If you have applied the new SSID to your APs, the LongFi Passpoint SSID will be broadcasting and you can now perform testing and validation.