LongFi Connect - Omada Networks by TP-Link Passpoint Implementation Guide
For support please contact: networks@longfisolutions.com
Prerequisites
Network Requirements:
- The NAS ID and RadSec certificates obtained during your site Onboarding & Activation
- A guest VLAN with the appropriate network segmentation, security, traffic shaping, and firewall policies for your requirements.
- The guest VLAN needs a large DHCP pool with a short lease time. Passpoint clients can automatically discover and join a network, and there will be many more "transient client" connections than a normal guest wifi network.
Omada Official Documentation:
How to Configure Hotspot 2.0 Wi-Fi on Omada Controller
*Please Note:
Depending on your organizational structure and your Omada hardware, software, and firmware versions, you may be able to configure Certificates, the RADIUS profile, and the Passpoint Wi-Fi SSID at the Global level. This can save you a lot of time by allowing the configs to be applied to multiple sites at once. The NAS ID must be unique at the site level, but the certificates, RADIUS RadSec profile, and most SSID settings will be the same at every site. We made this guide using a single Omada AP and controller, with a single site, and the Global configuration options were not available.
Supported Hardware & Firmwares (as of May 2026):
Controllers
- OC200 / OC300 / OC400 (hardware) — Passpoint: v5.15+, RadSec: v6.1+
- Omada Software Controller — same version thresholds
- Cloud-Based Controller (CBC) — Passpoint supported; RadSec status unclear, RadSec is not yet available for Built-in RADIUS, RADIUS Proxy, Portal, or SSL-VPN and CBC has additional restrictions Omada Network
APs — full stack (Passpoint + 802.1X + RadSec)
These EAP7xx models are fully adapted to controller v6.2 with RadSec support:
- EAP720 V1 — firmware 1.3.x (current 1.3.2)
- EAP723 V1/V2 — firmware 1.3.x / 1.5.x
- EAP770 V2 — firmware 1.5.x
- EAP772 V2 — firmware 1.5.x
- EAP772-Outdoor V1 — firmware 1.5.x
- EAP775-Wall V1 — firmware 1.5.x
- EAP787 V1 — firmware 1.5.x
- EAP725-Wall V1 — firmware 1.3.x
APs — Passpoint + 802.1X only (no RadSec confirmed)
Omada Controller v5.15.24 supports Hotspot 2.0 but not RadSec, and the EAP6xx generation received v6.1 controller adaptation but RadSec support has not been confirmed in their firmware release notes: Omada Network
- EAP650, EAP650-Wall, EAP650-Outdoor
- EAP653, EAP653 UR
- EAP660 HD
- EAP670, EAP673
- EAP680, EAP683 LR, EAP683 UR
- EAP690E HD
- EAP620 HD, EAP623-Outdoor HD, EAP625-Outdoor HD
- EAP610, EAP610-Outdoor
Omada Networks Firmware Download:
https://support.omadanetworks.com/us/download/firmware/
High Level Steps
- Submit NAS ID, Obtain RadSec Certificates, complete Prerequisites
- Configure TP-Link Omada Controller and AP
- Configure Certificate Profile
- Configure RADIUS Profile
- Configure the Passpoint Wi-Fi SSID WLAN
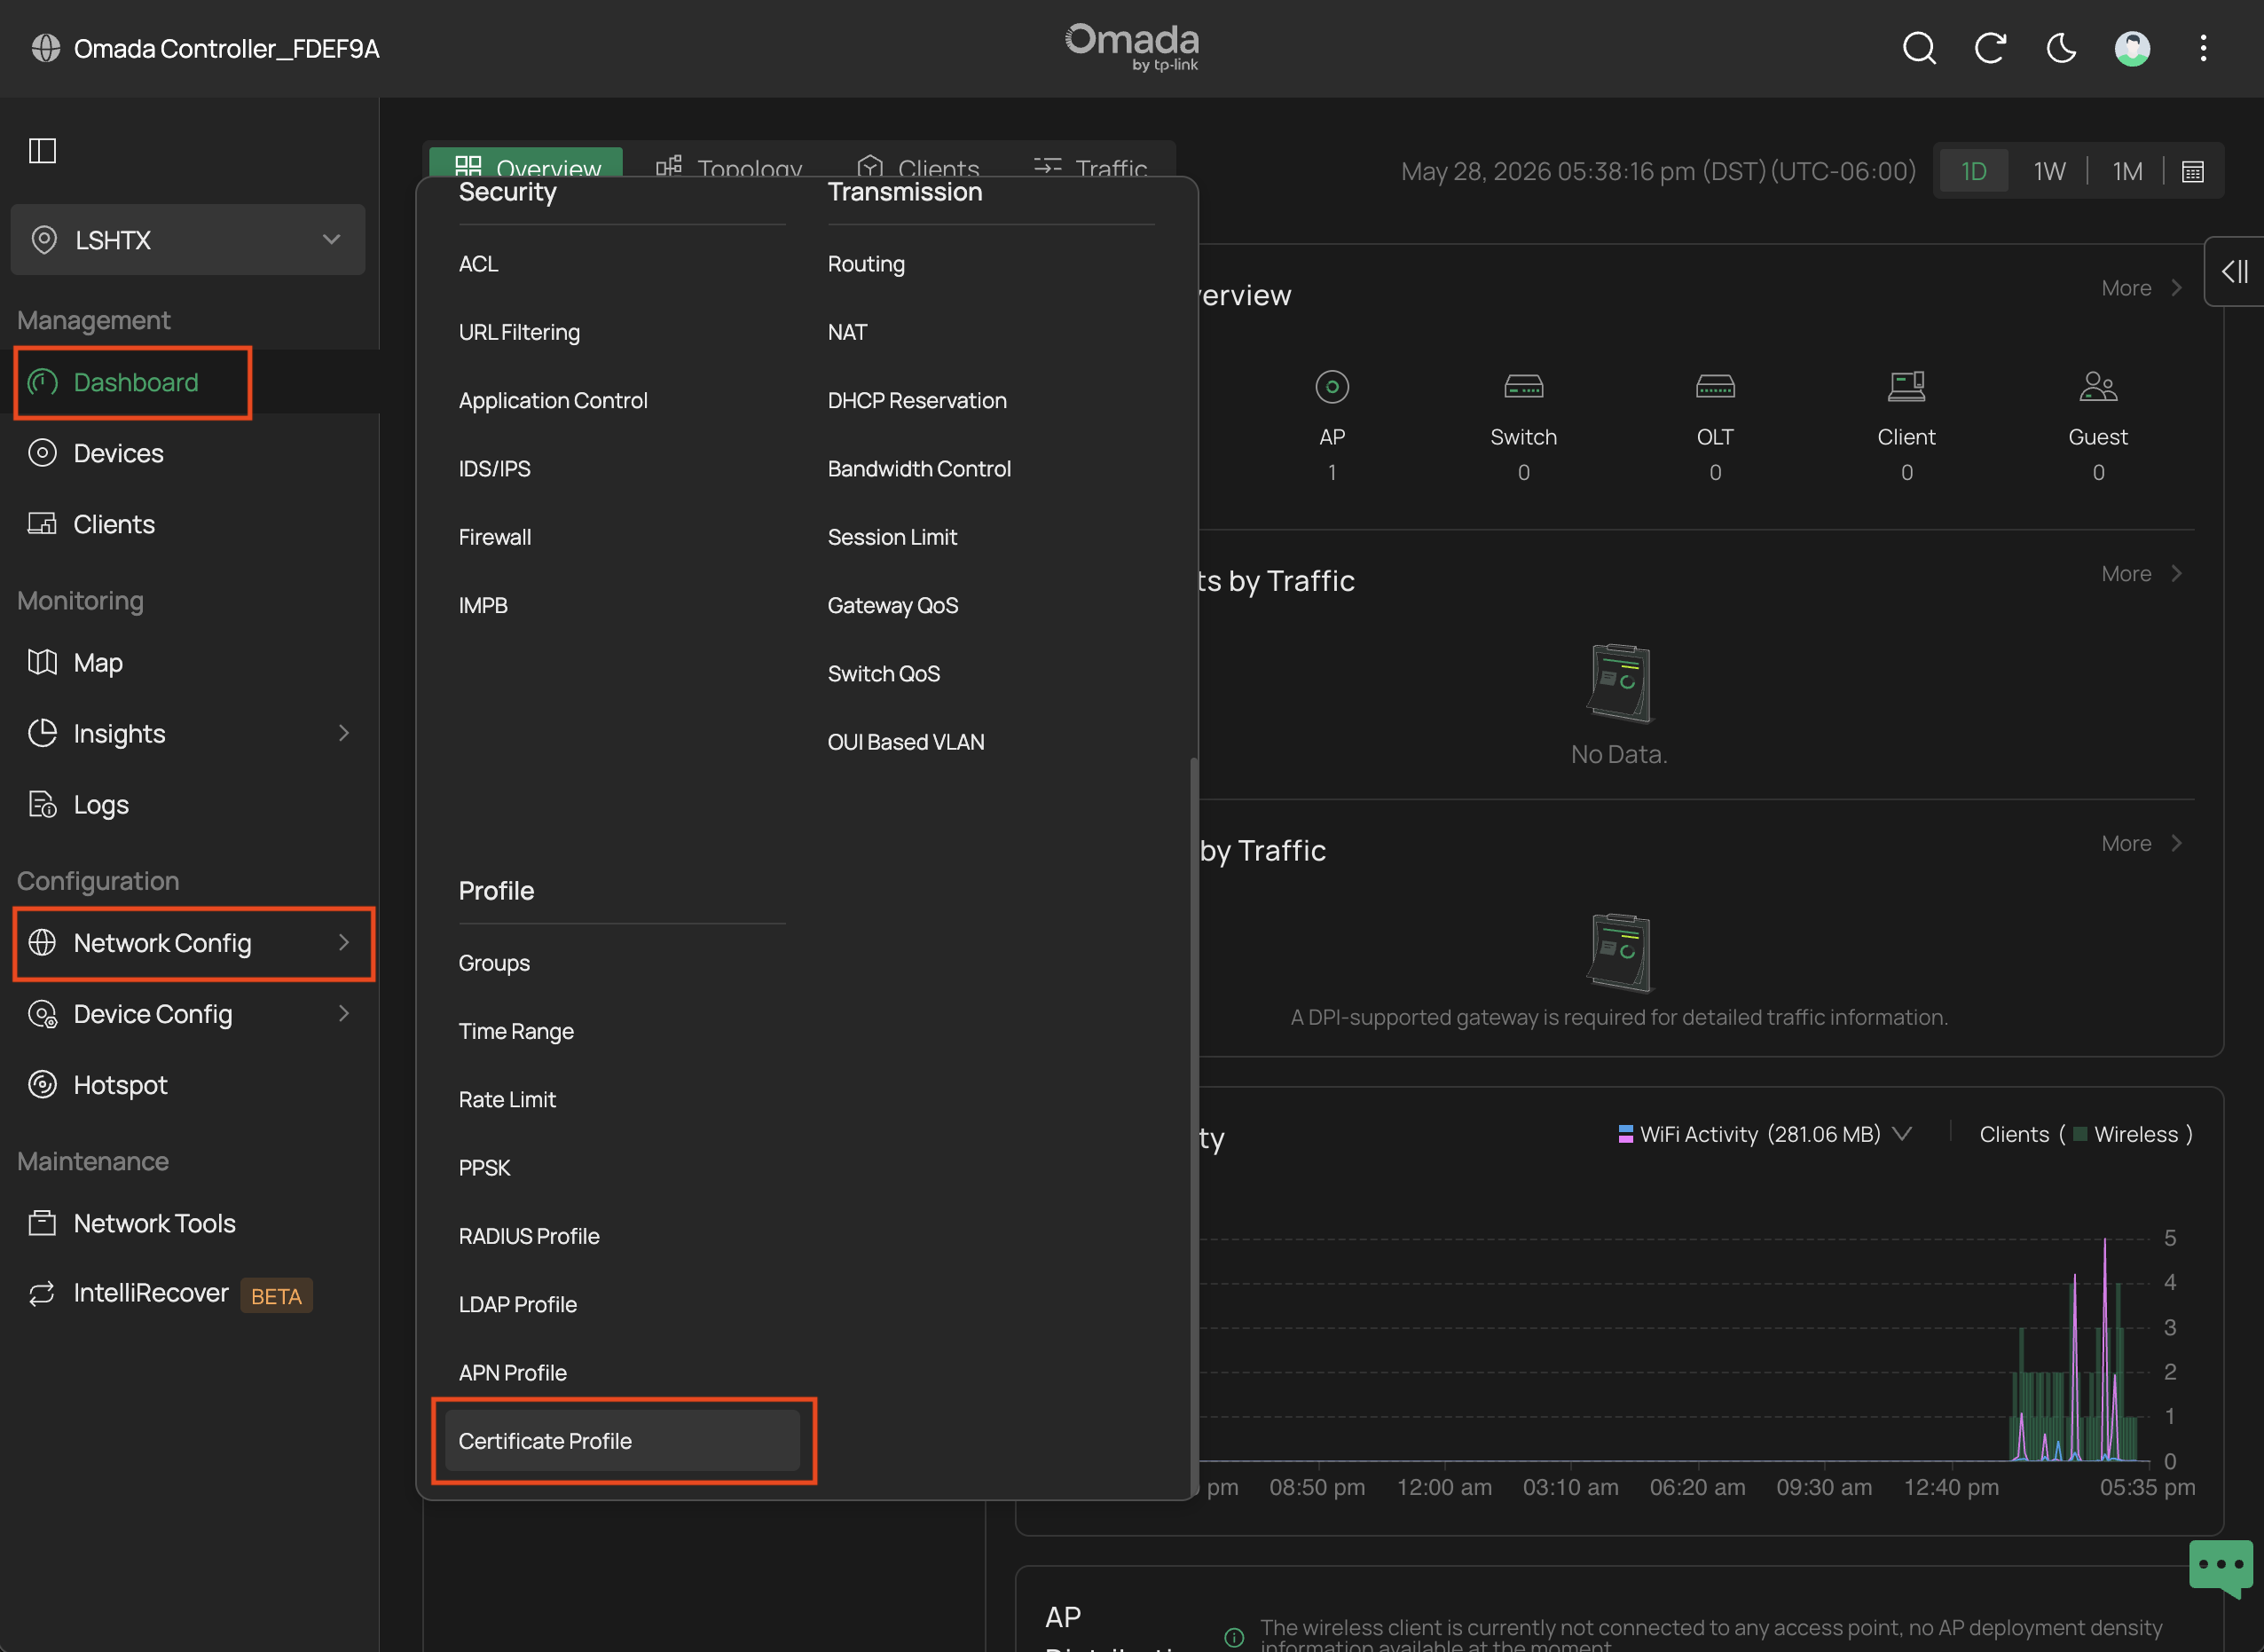
Configure TP-Link Omada Controller and/or APs
Configure a Certificate Profile
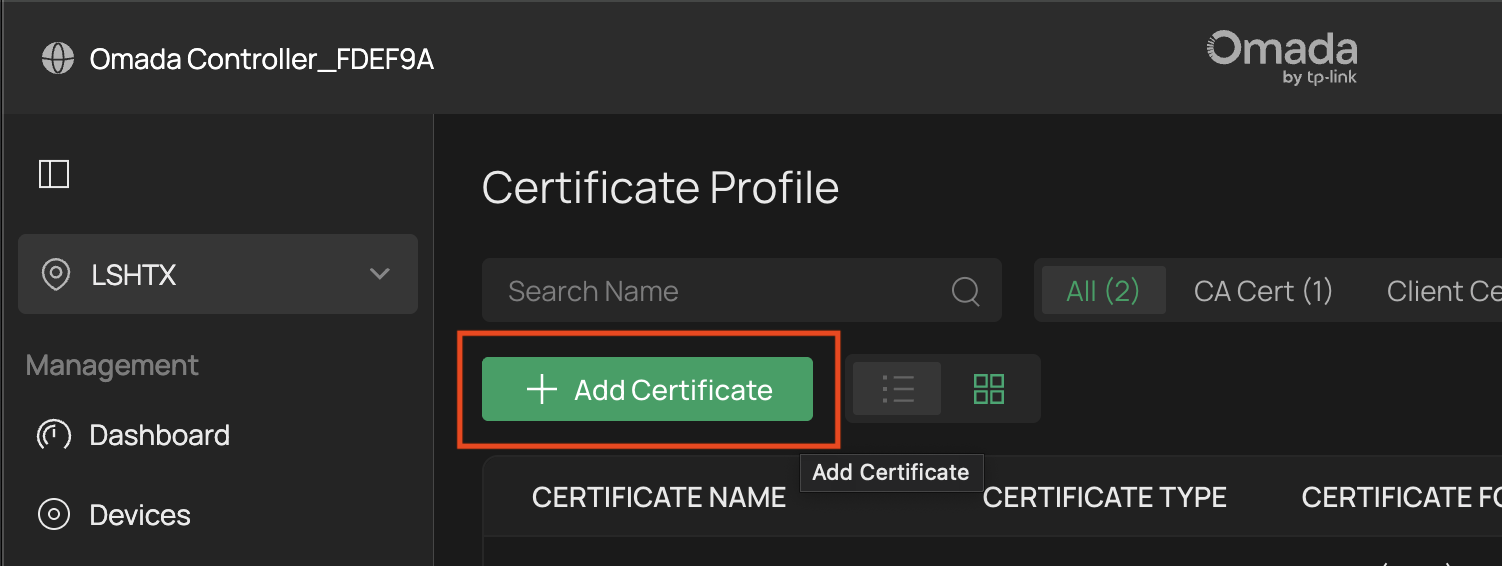
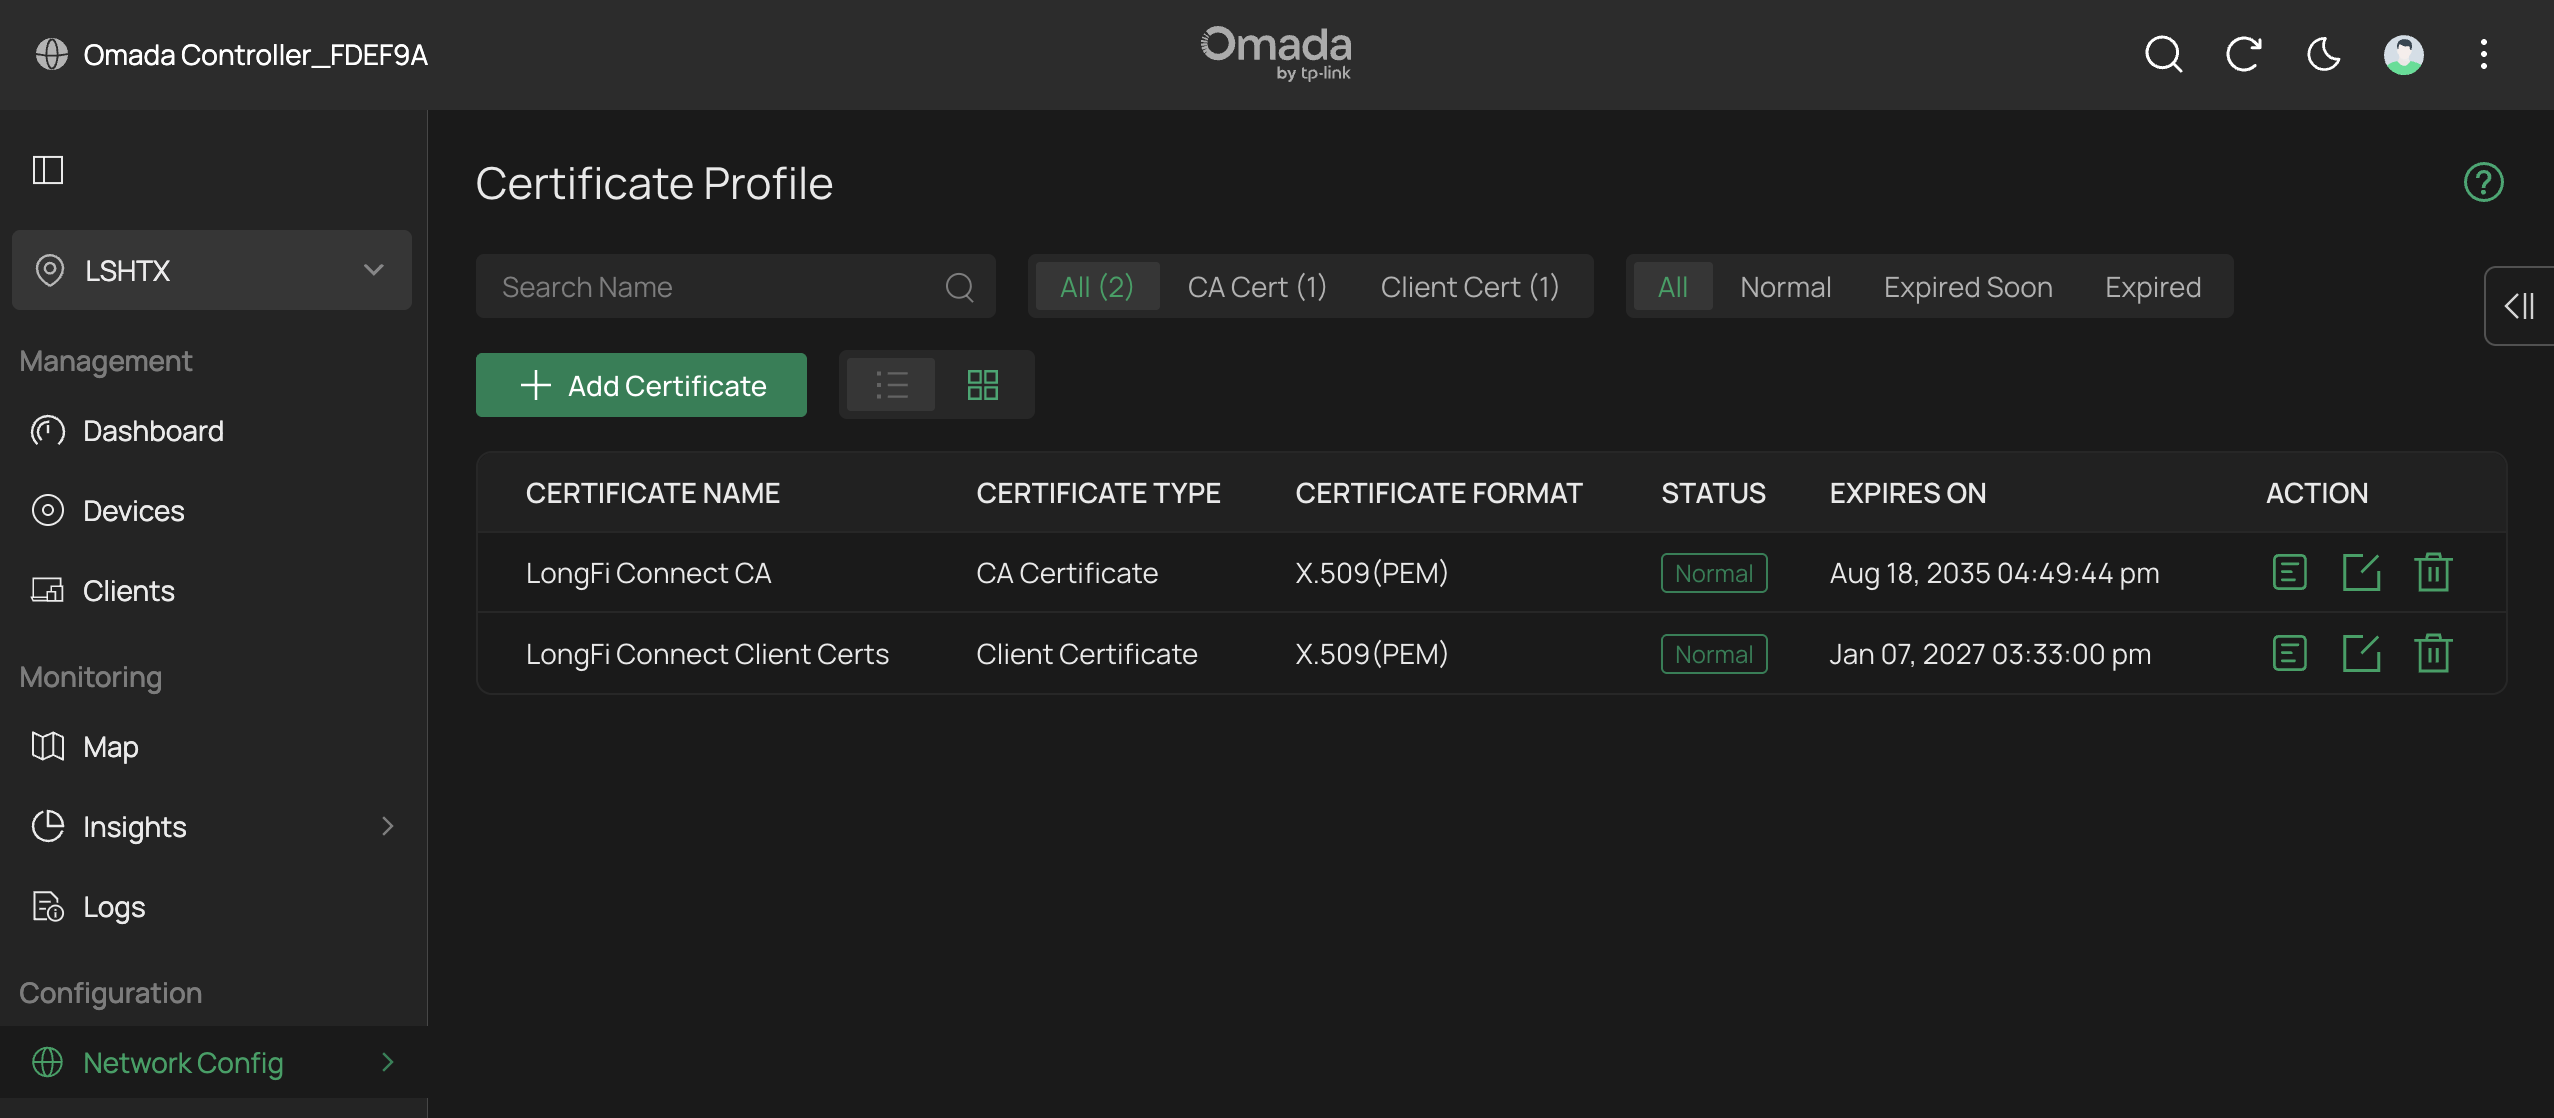
From the Omada Dashboard go to Configuration > Network Config > Profile > Certificate Profile
Click the button to + Add Certificate
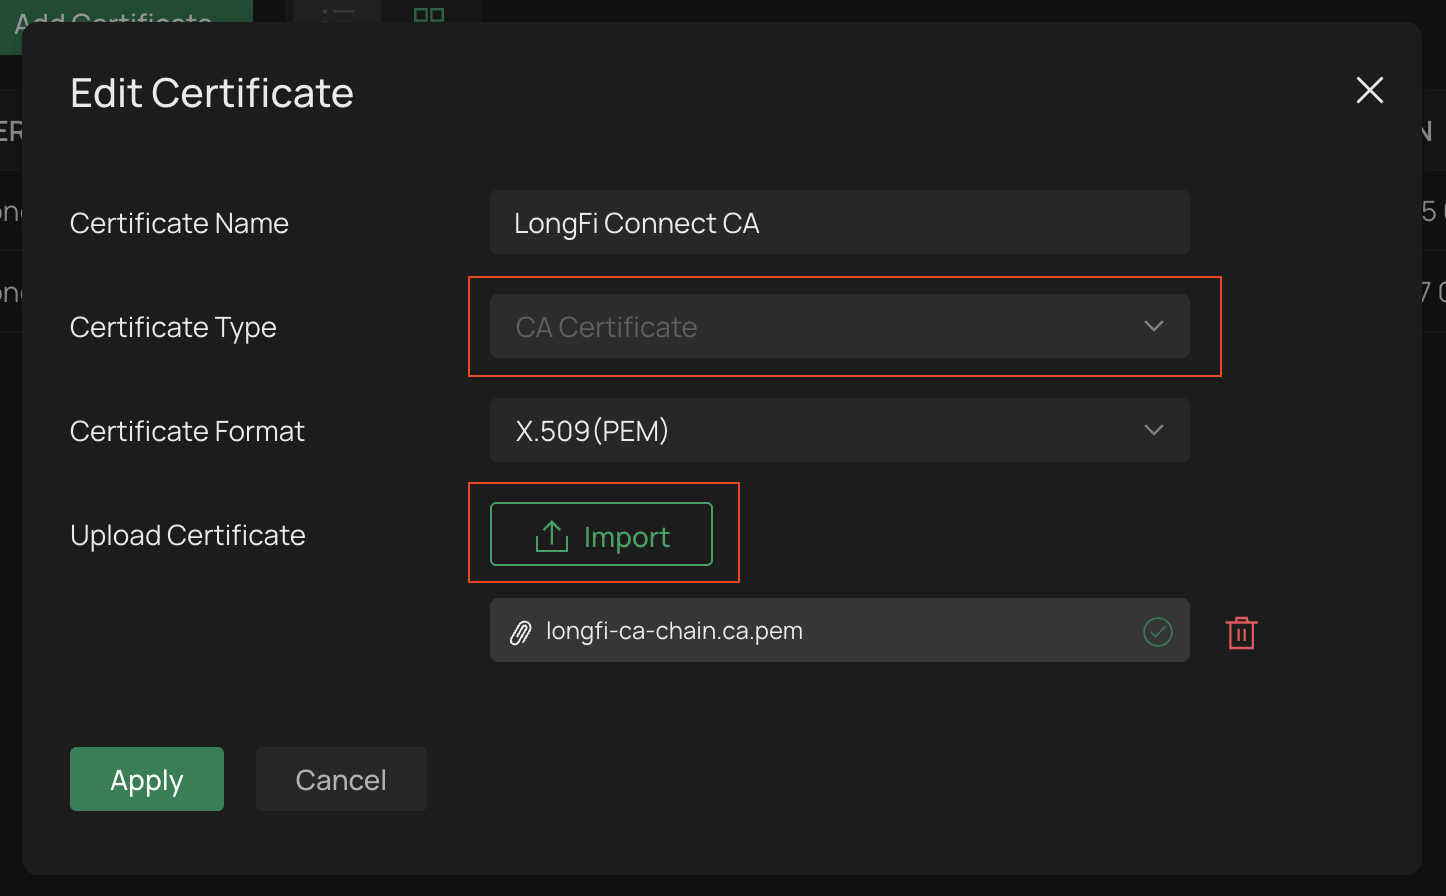
- In the Add Certificate window, set the Certificate Name to LongFi Connect CA
- Set the Certificate Type to CA Certificate
- Set the Certificate Format to X.509(PEM)
- Click the Import button to Upload Certificate
- Upload the LongFi CA certificate file provided in your onboarding email. This will usually be called longfi_connect.ca.pem
- Click Apply to add the CA Certificate
Click the button once more to + Add Certificate
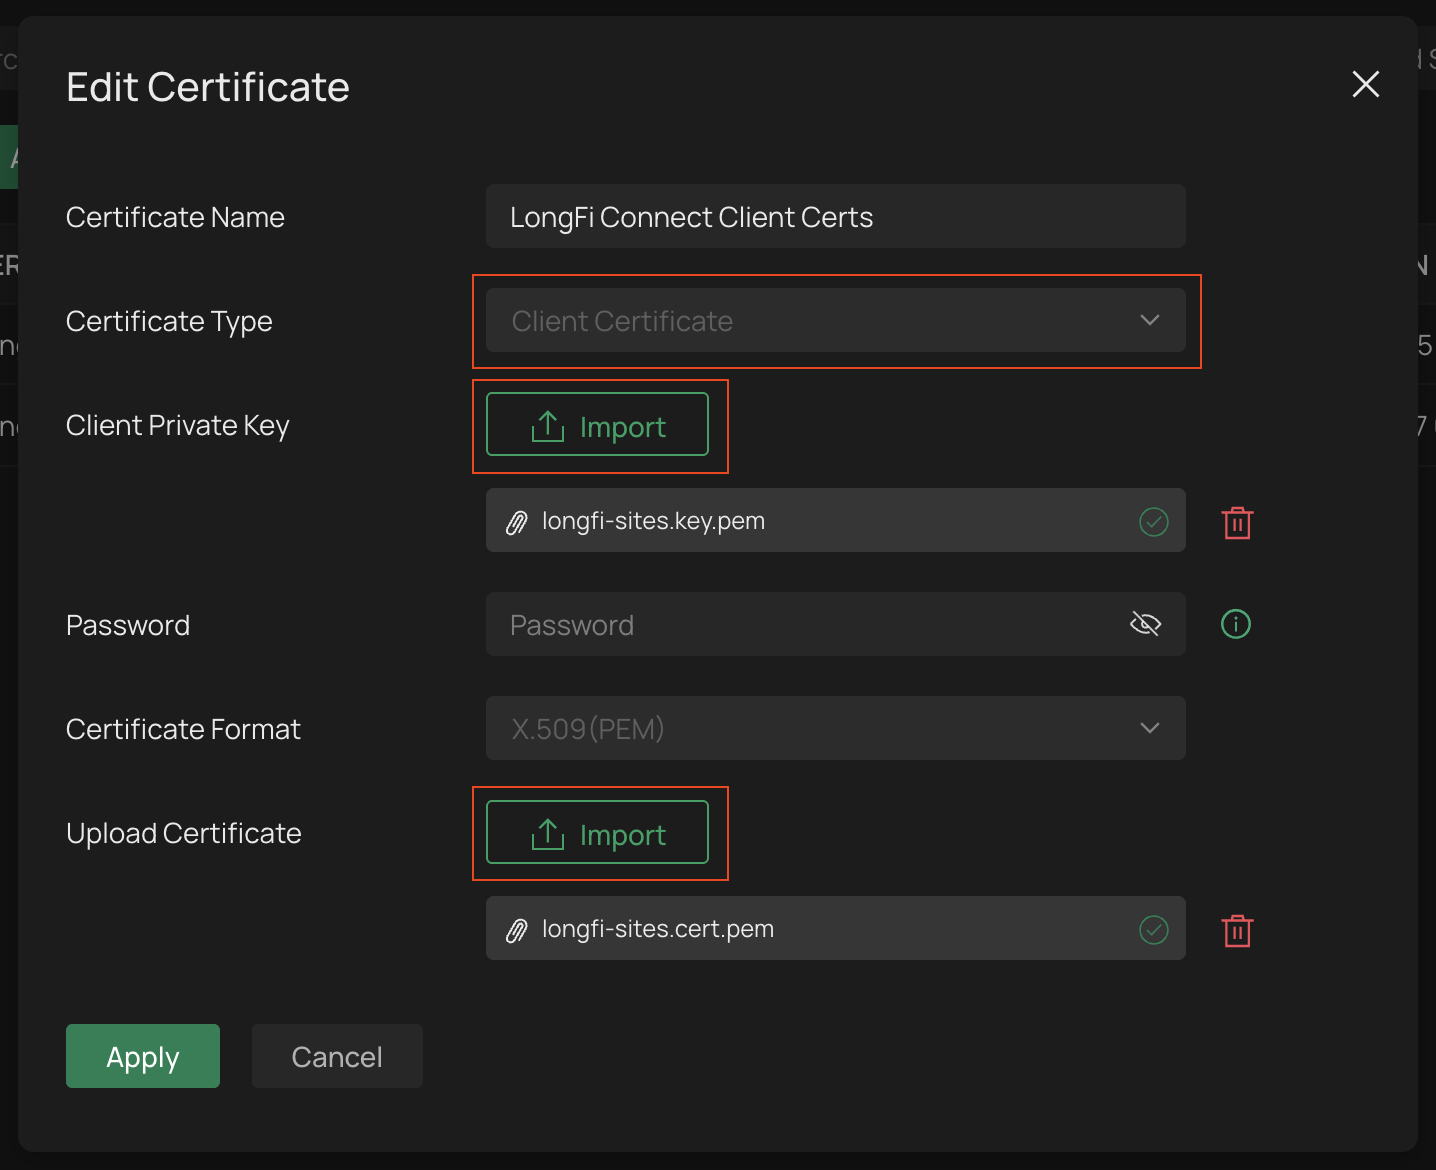
- In the Add Certificate window, set the Certificate Name to LongFi Connect Client Certs
- Set the Certificate Type to Client Certificate
- Click the Import button to upload the Client Private Key
- Upload the key.pem certificate file provided in your onboarding email. This will usually be named using your company name such as mycompany.key.pem
- Leave the password blank
- Set the Certificate Format to X.509(PEM)
- Click the Import button next to Upload Certificate to upload the client certificate
- Upload the cert.pem certificate file provided in your onboarding email. This will usually be named using your company name such as mycompany.cert.pem
- Click Apply to add the new client certificate and private key
Once finished uploading the CA and Client certificates, your Certificate Profile window should look like this:
Configure a RADIUS Profile
*Please Note: you may receive an error message saying that one or more devices does not support RadSec. If you have a Controller or AP model that supports RadSec, you will need to update the firmware before proceeding. The Omada dashboard may show that your Controller or APs are "Up To Date" or "Latest Version", but that may not be the case. Visit the firmware page and follow the instructions to get the newest firmware for your devices:
https://support.omadanetworks.com/us/download/firmware/
From the Omada Dashboard go to Configuration > Network Config > Profile > RADIUS Profile
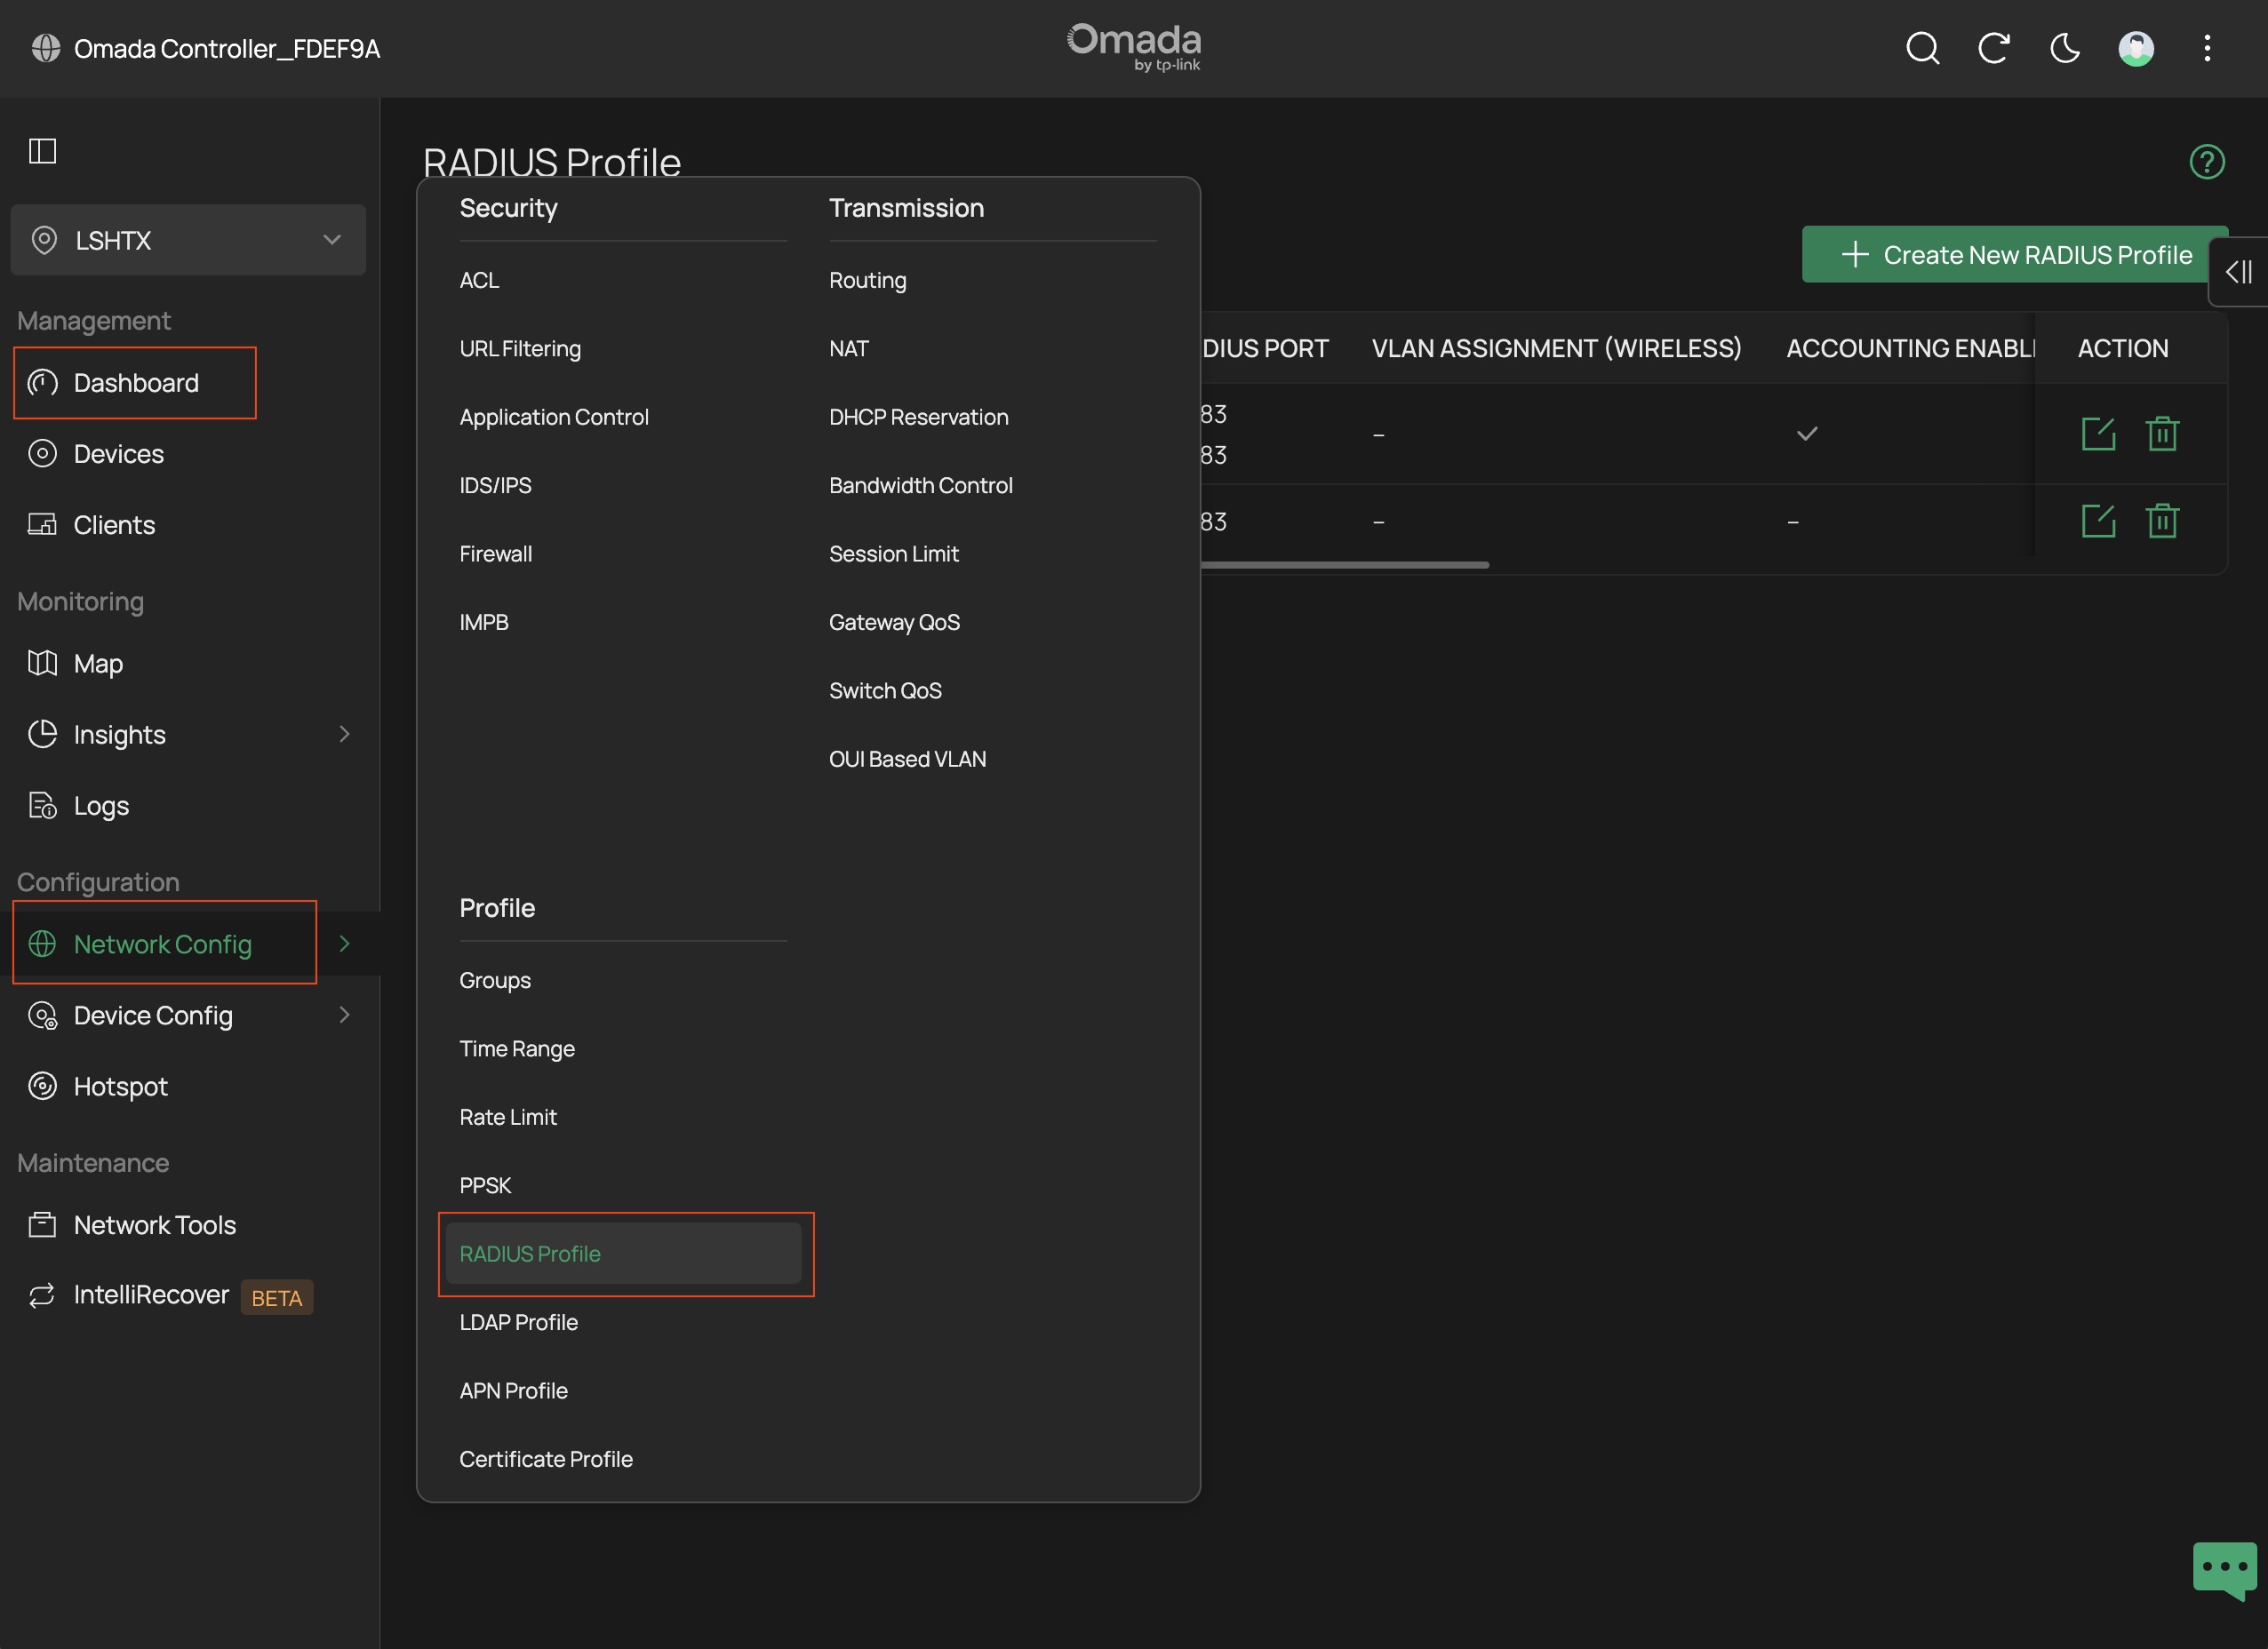
Click the button to + Create New RADIUS Profile

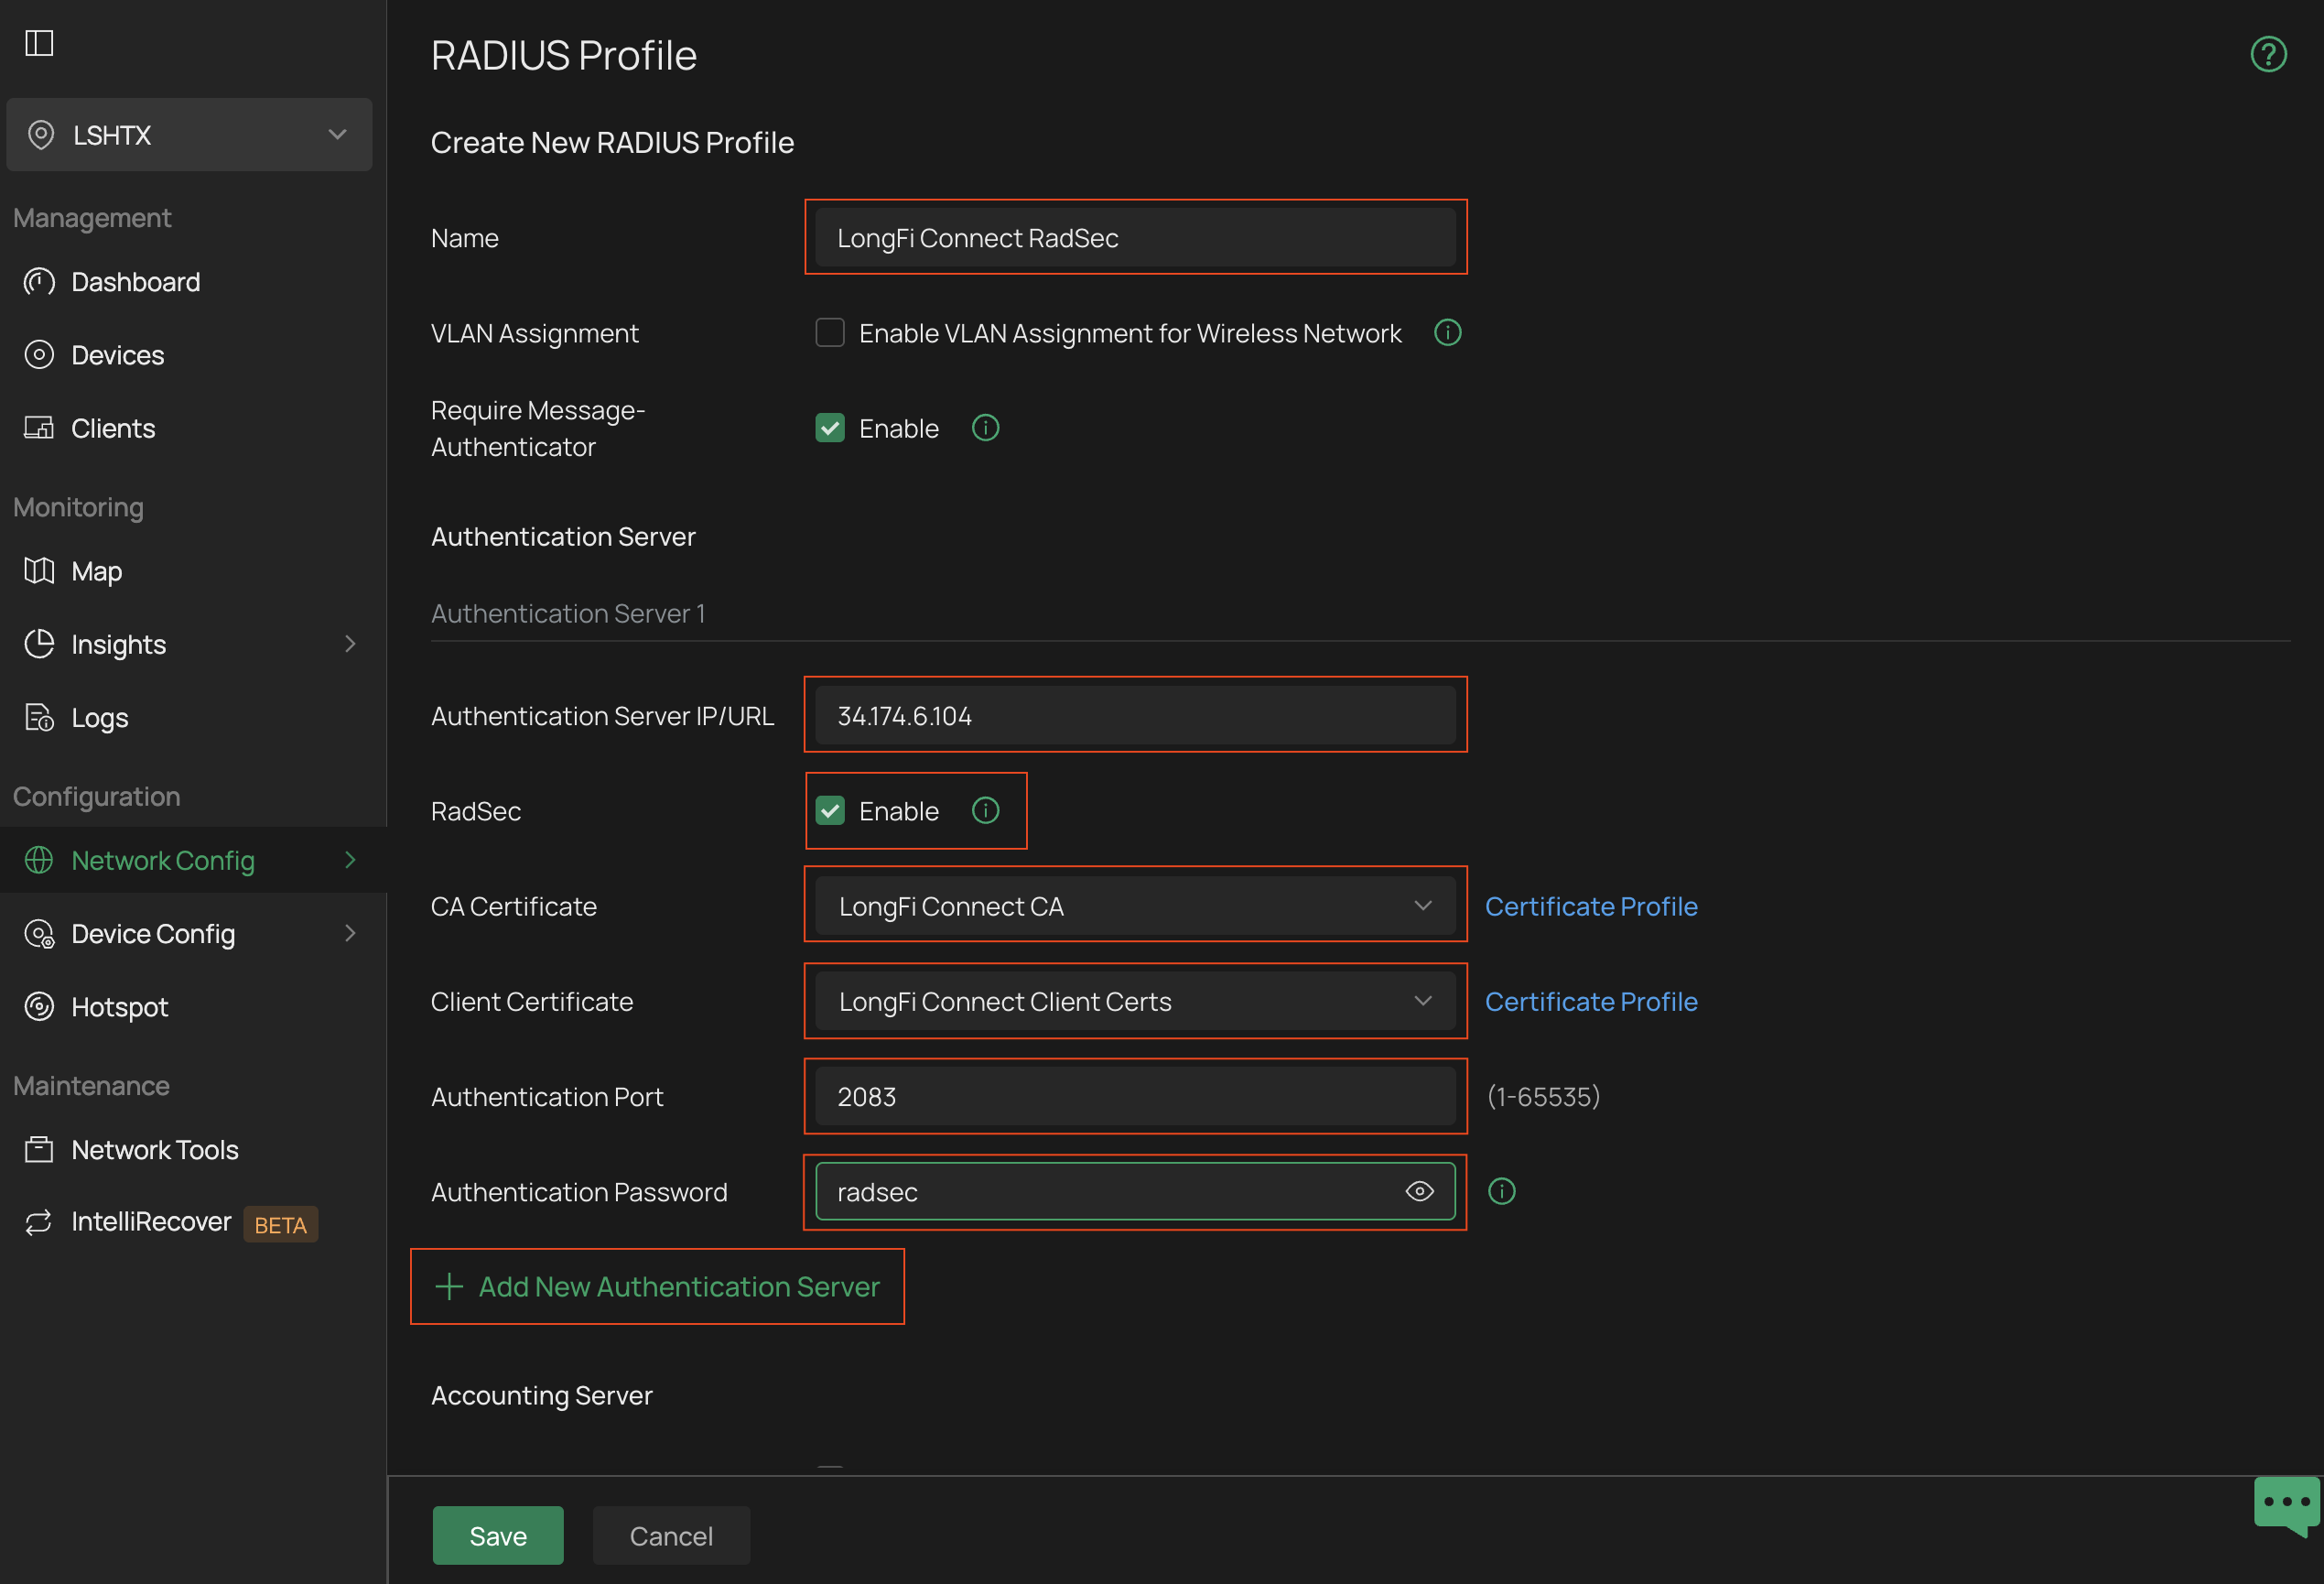
- Name the profile LongFi Connect RadSec
- Under Authentication Server 1, set the Authentication Server IP/URL to 34.174.6.104
- Check the Enable box to enable RadSec
- For the CA Certificate select the LongFi Connect CA as the Certificate Profile
- For the Client Certificate select the LongFi Connect Client Certs as the Certificate Profile
- For the Authentication Port enter 2083
- For the Authentication Password enter radsec
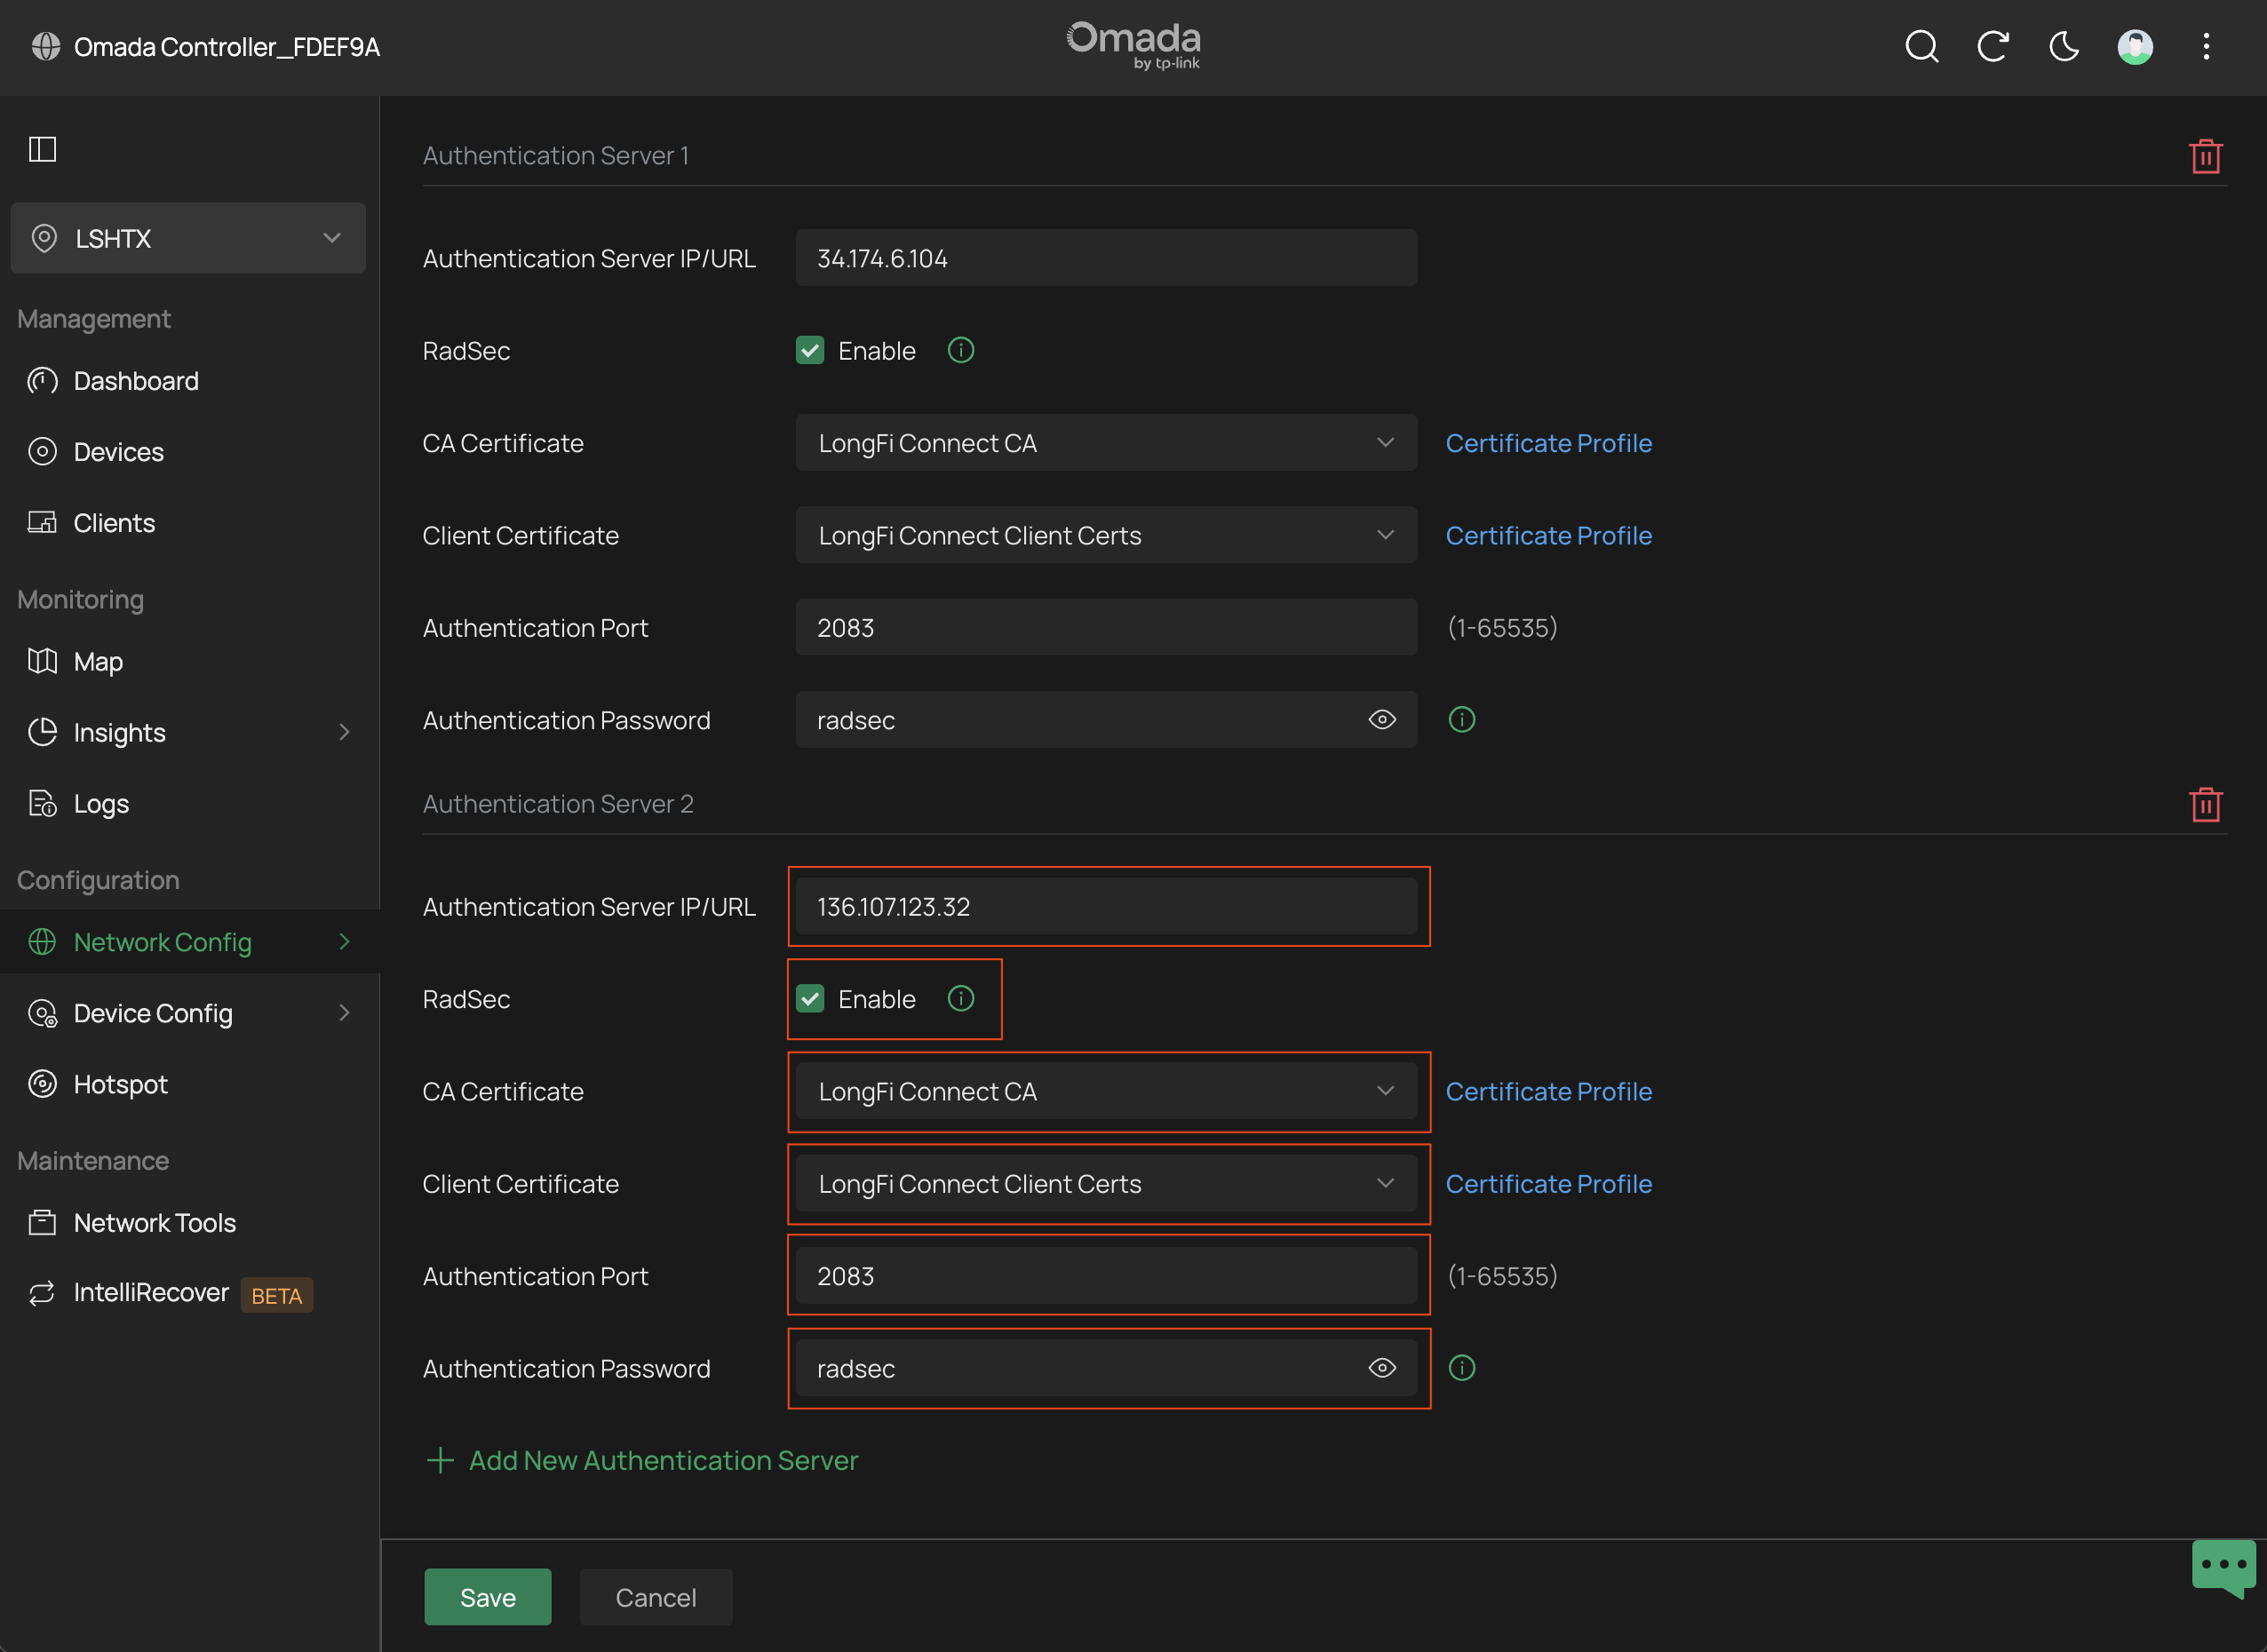
- Click + Add New Authentication Server to add a second server IP
- Repeat the exact same steps as above and set the Authentication Server IP/URL to 136.107.123.32
Scroll down to the Accounting Server settings
- Under Accounting Server check the box to Enable the RADIUS Accounting server
- Under Interim Update check the box to Enable the Interim Update
- For the Interim Update Interval set the value to 300 Seconds
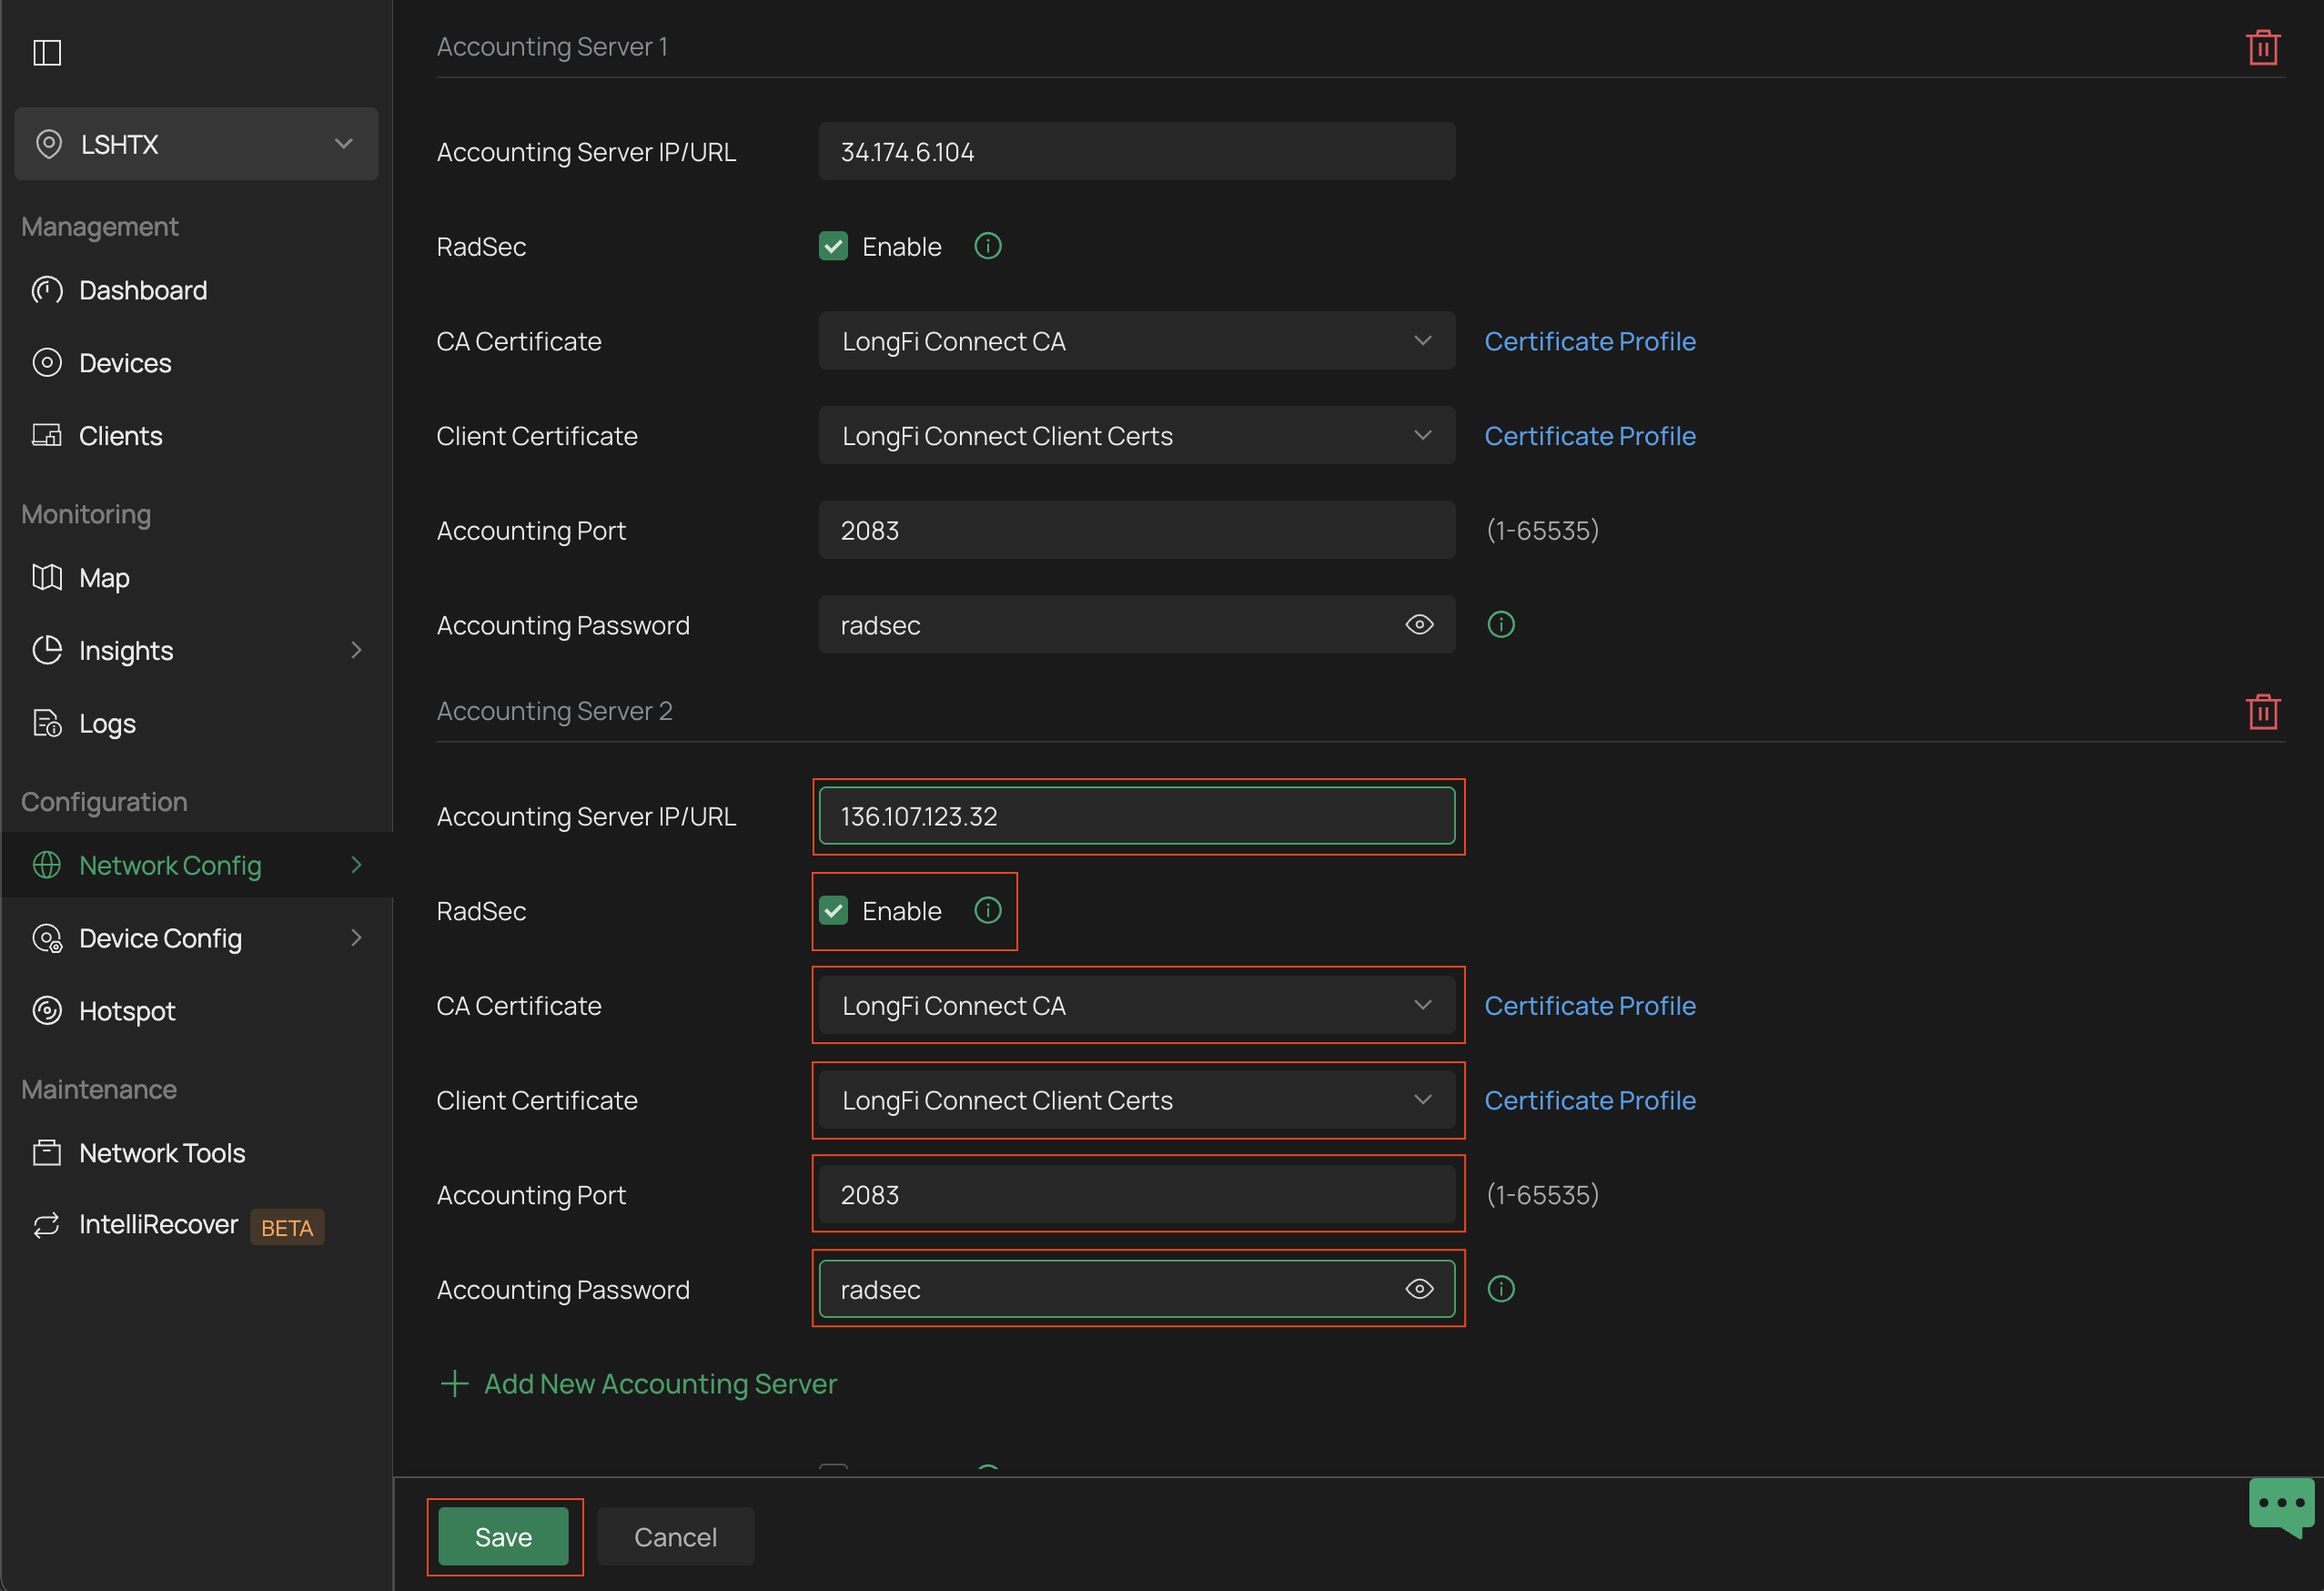
- Under Accounting Server 1 set the Accounting Server IP/URL to 34.174.6.104
- Check the Enable box to enable RadSec
- For the CA Certificate select the LongFi Connect CA as the Certificate Profile
- For the Client Certificate select the LongFi Connect Client Certs as the Certificate Profile
- For the Accounting Port enter 2083
- For the Accounting Password enter radsec
- Click + Add New Accounting Server to add the second server
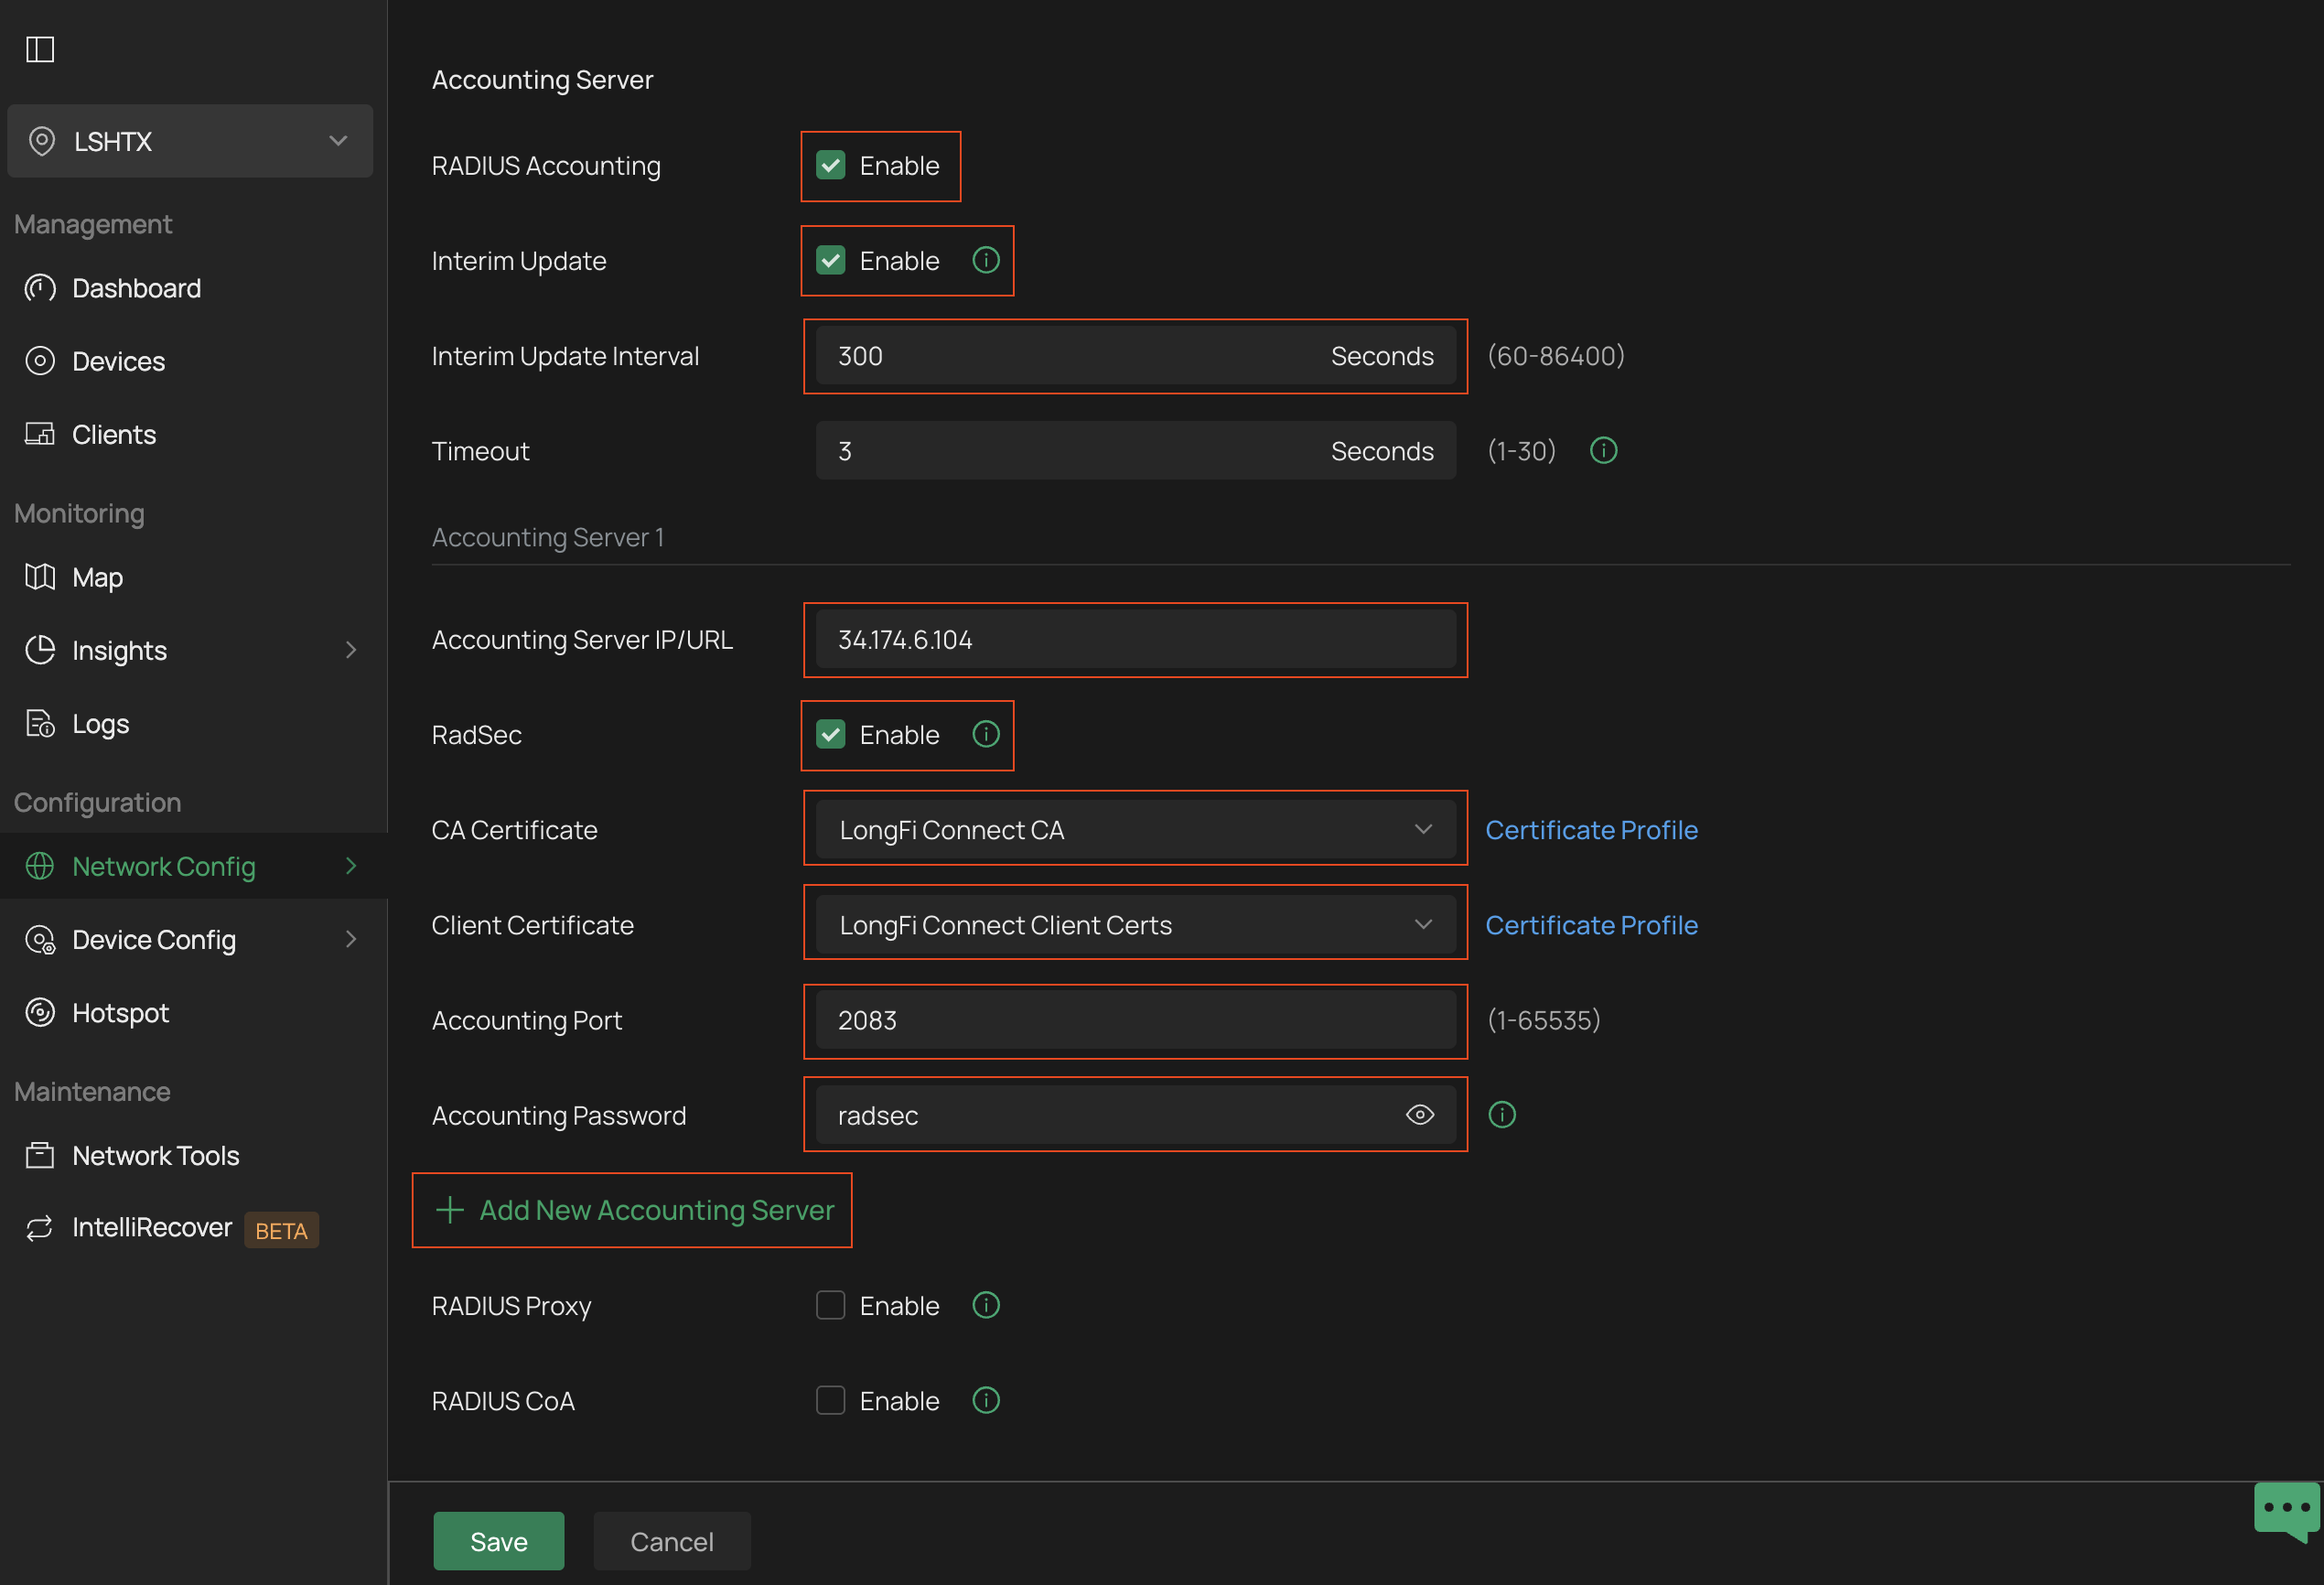
- Repeat the exact same steps as above and set the Accounting Server IP/URL to 136.107.123.32
- Click Save to save the RADIUS Profile
Configure the Passpoint Wi-Fi SSID
*Please Note: this guide covers configurations related to Passpoint only. For general recommendations and best practices on other Wi-Fi settings (ie. 802.11r, Multicast/Broadcast filtering, disabling 2.4 GHz, etc) please visit the Best Practices documentation
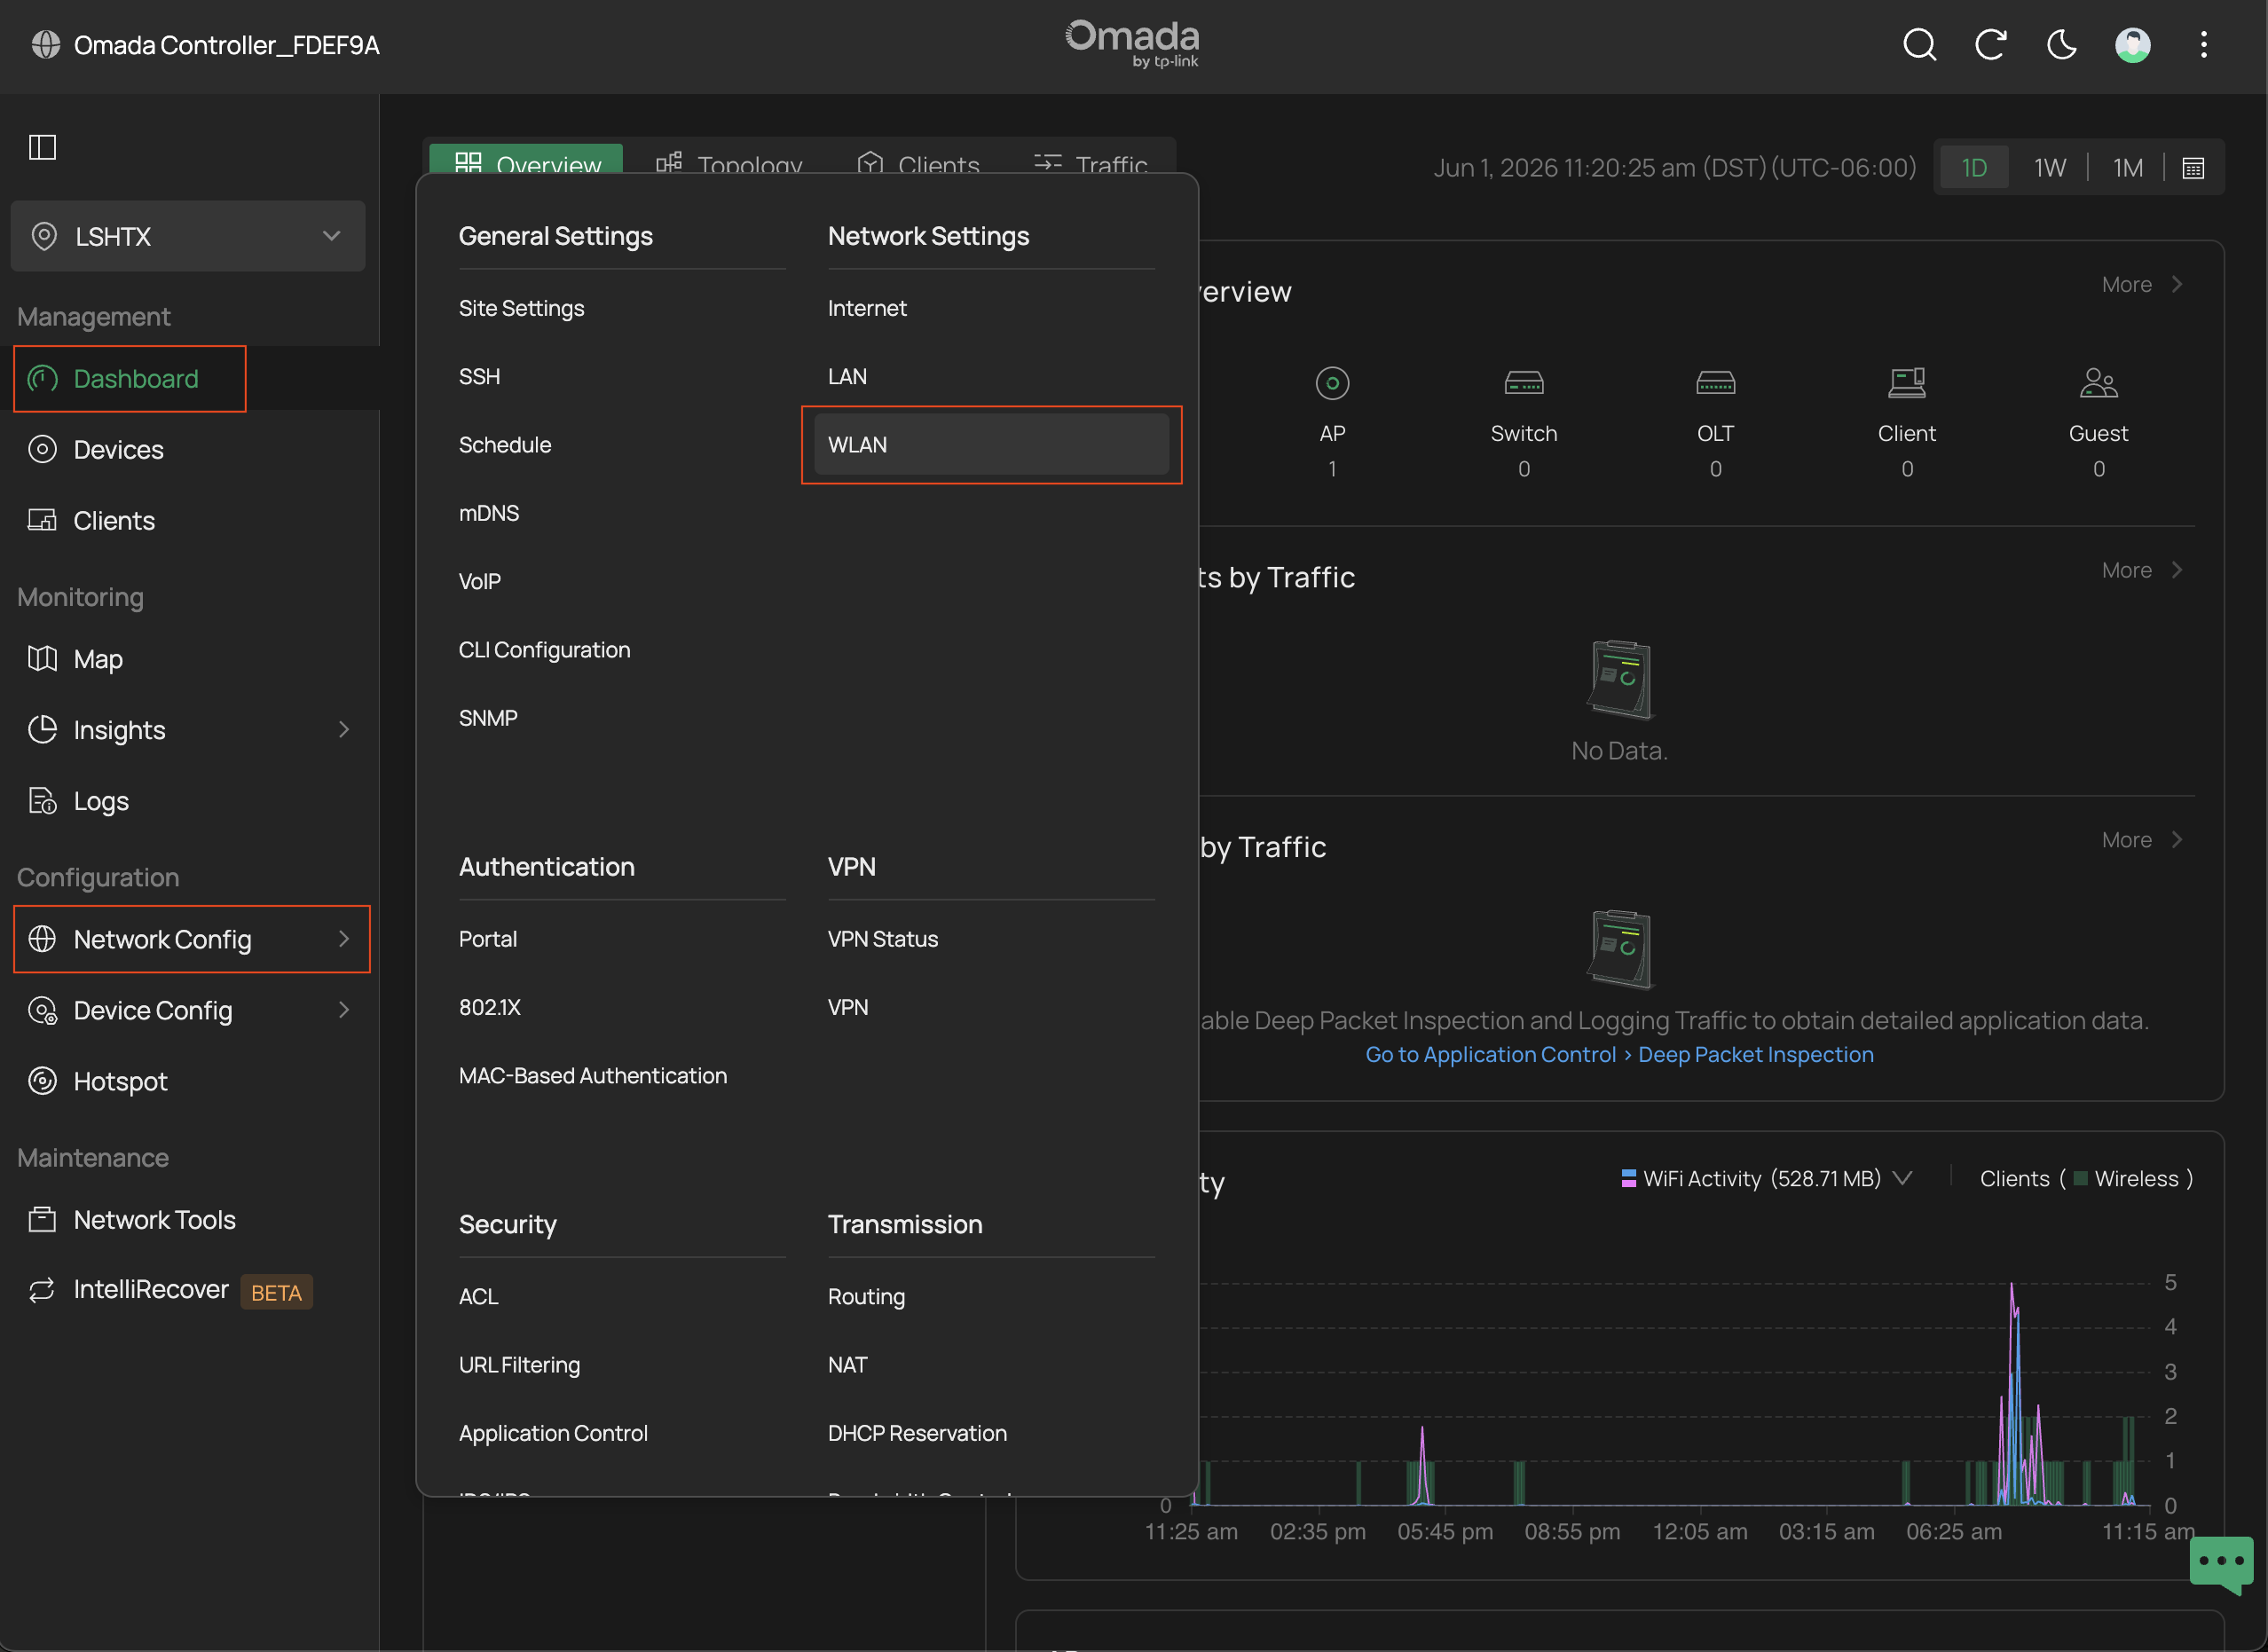
From the Omada Dashboard, go to Configuration > Network Config > Network Settings > WLAN
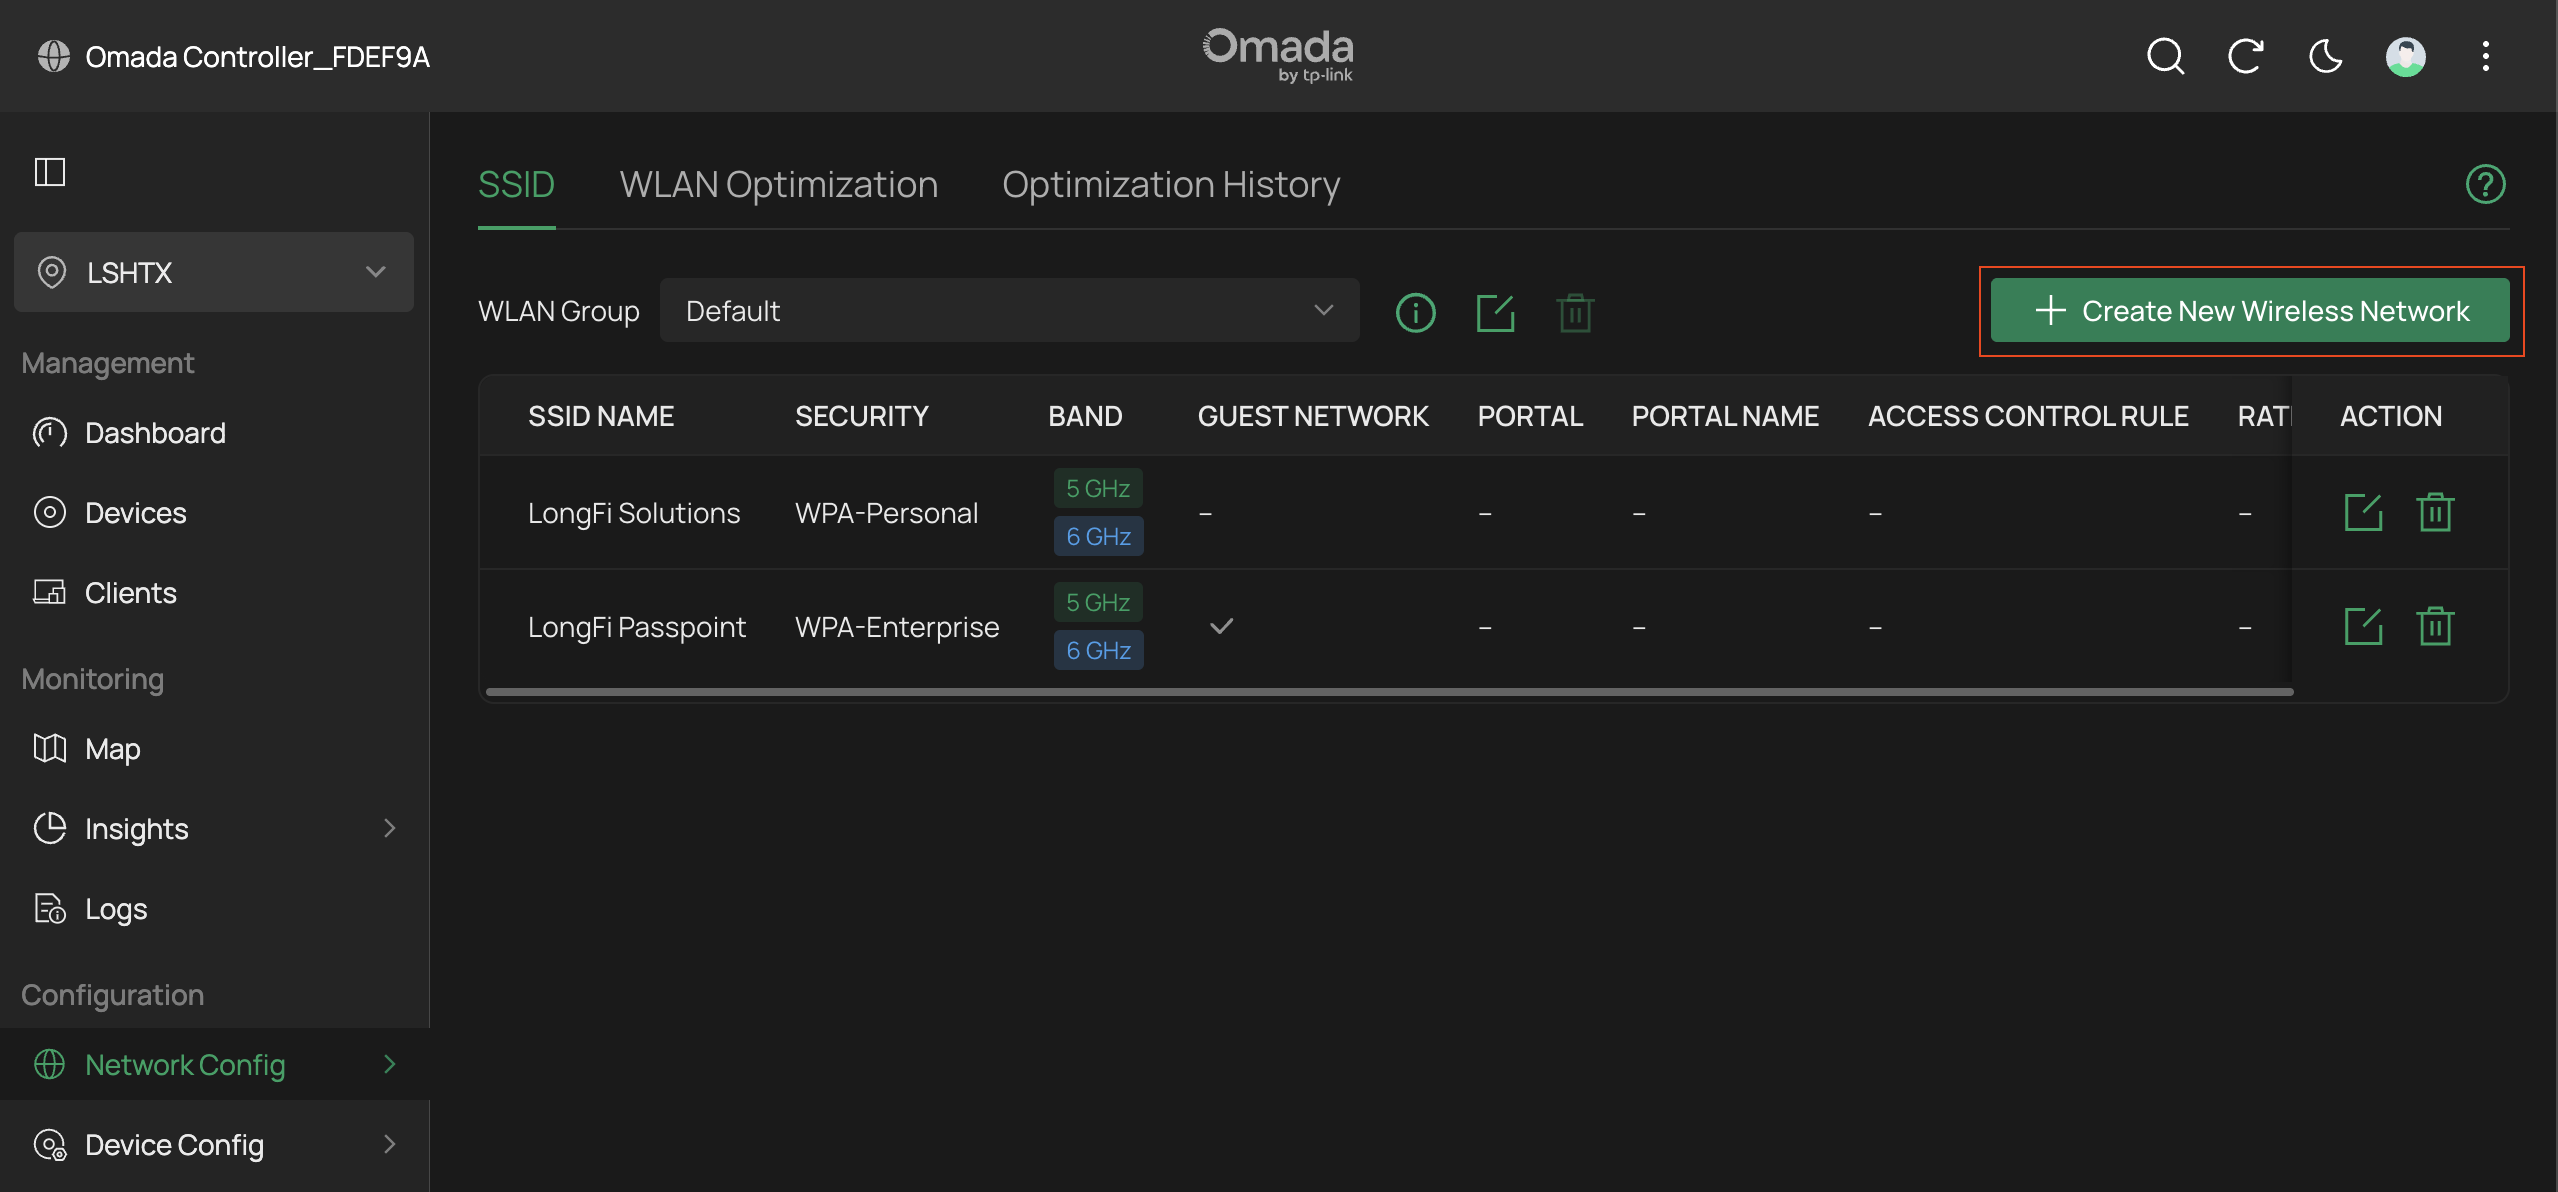
From the SSID tab hit the button to + Create New Wireless Network
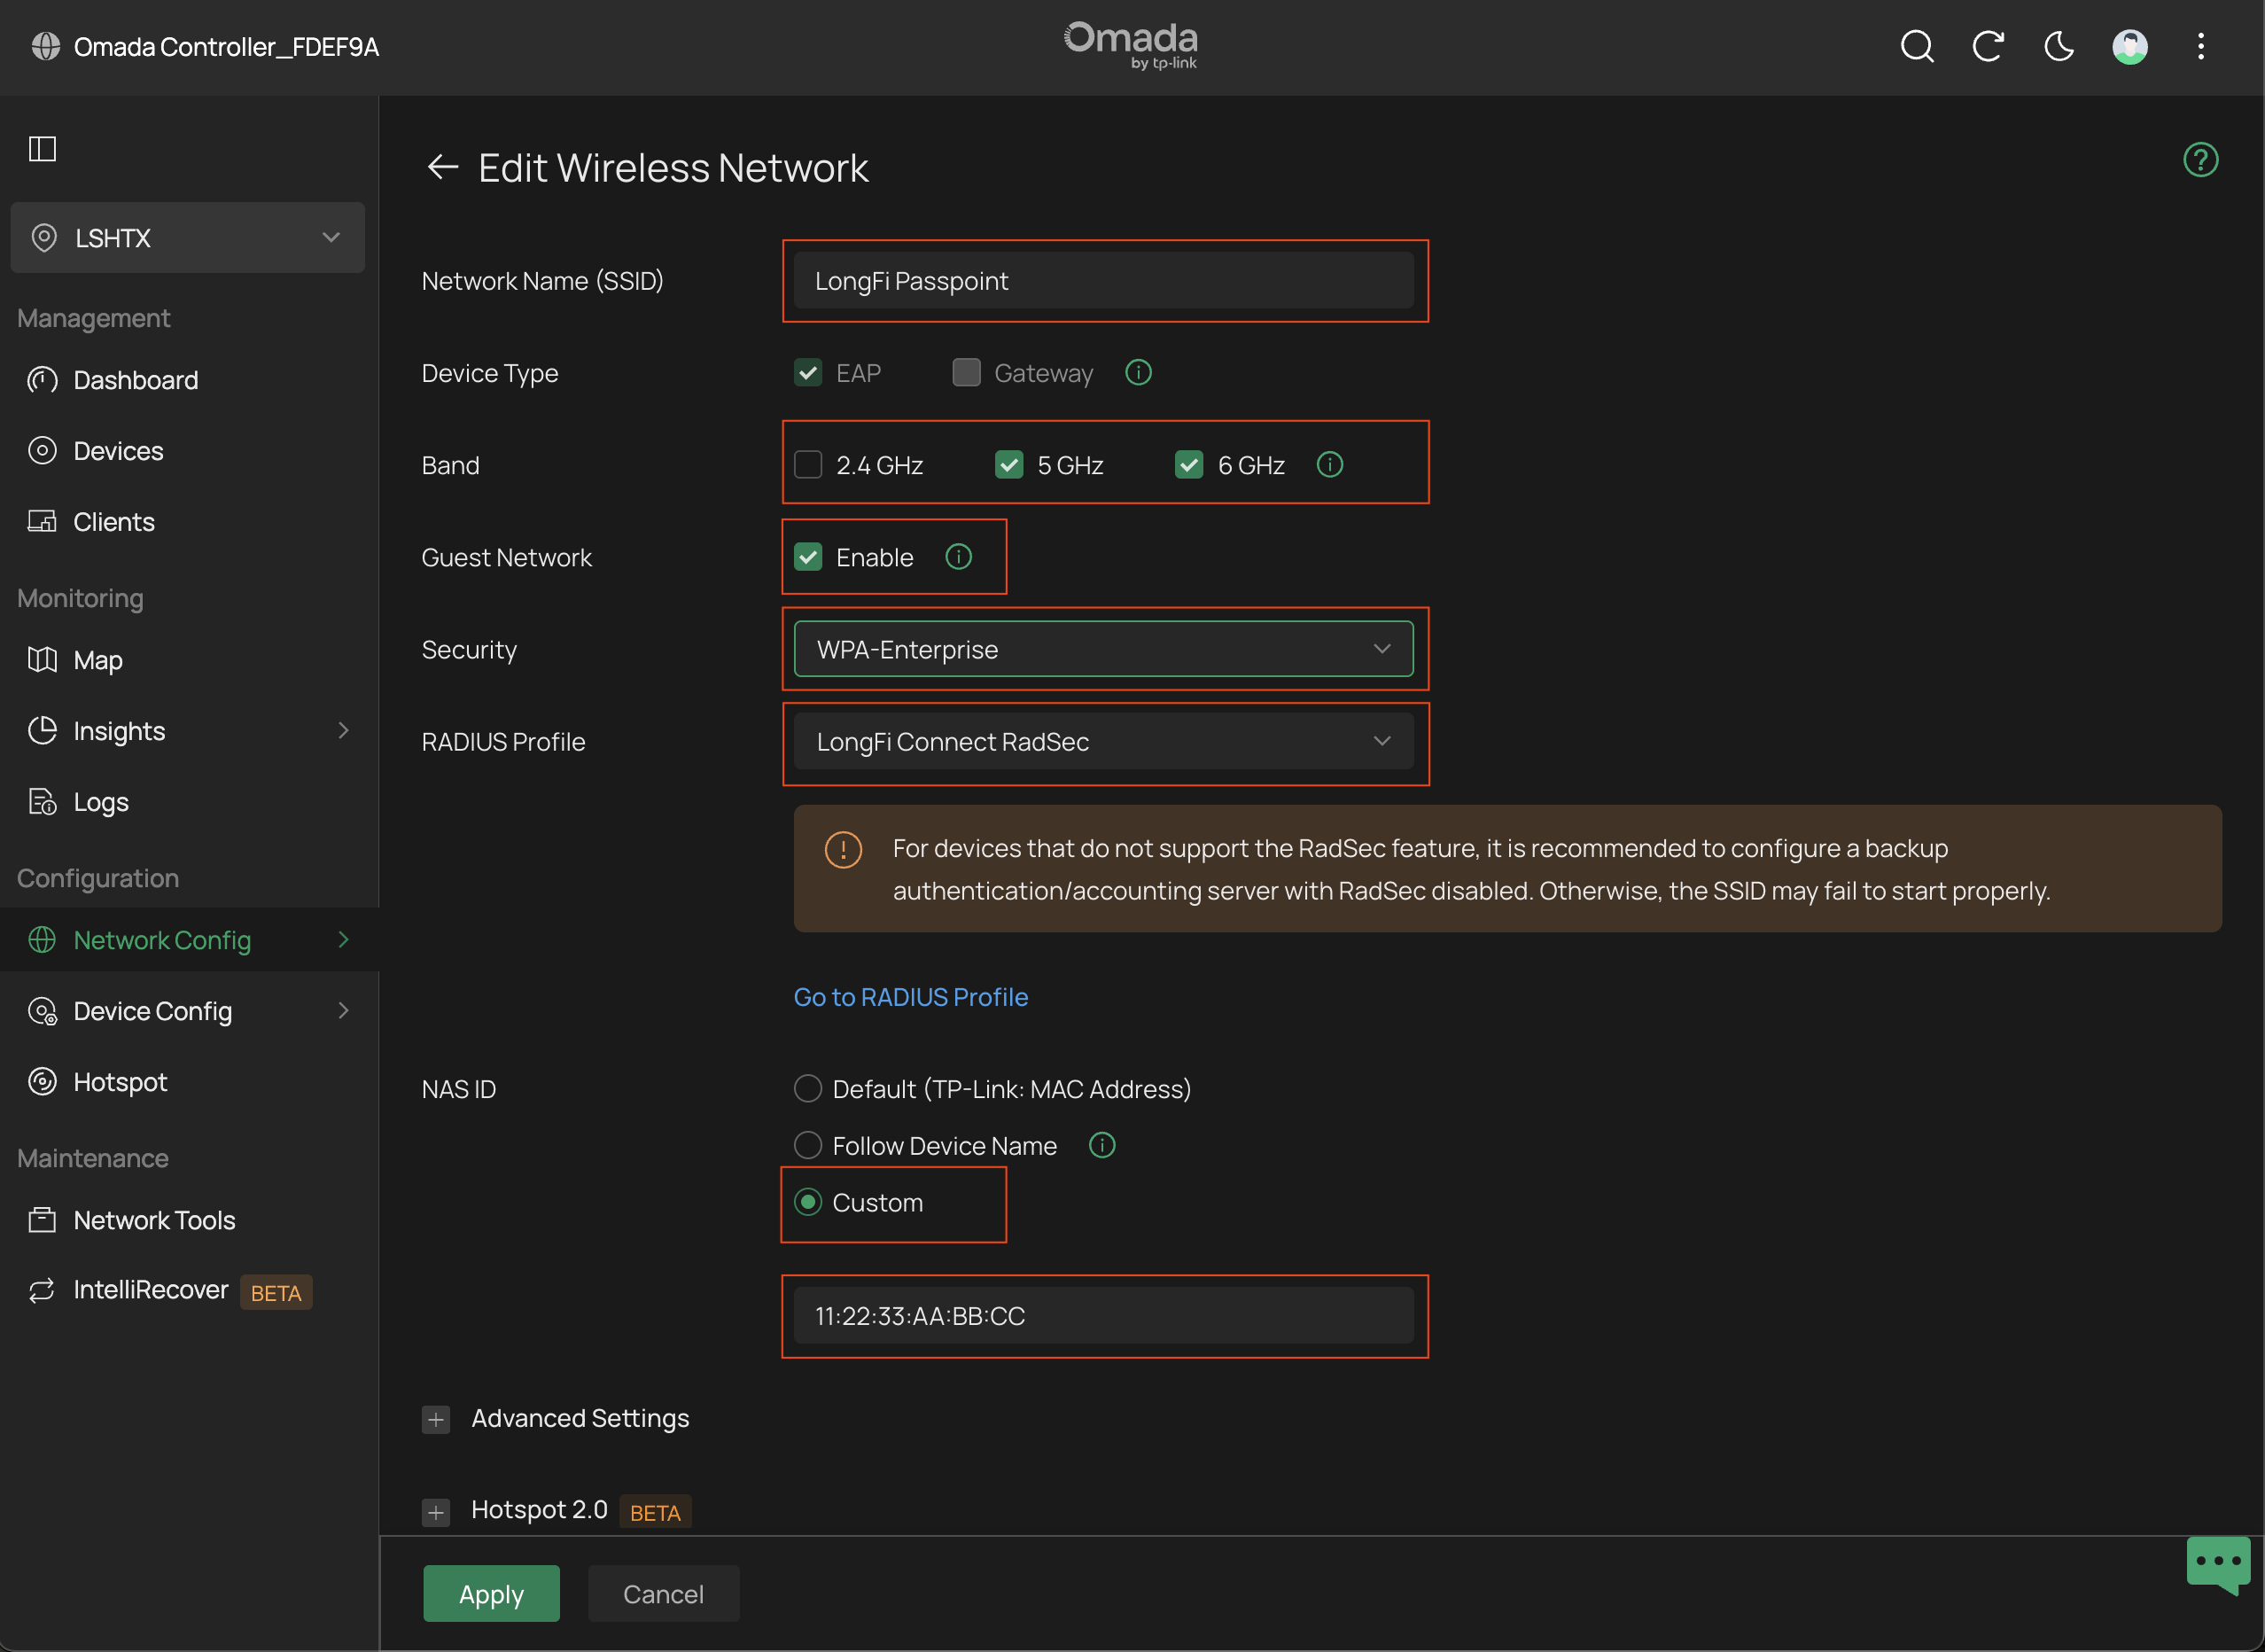
- Under Network Name (SSID) set the name to LongFi Passpoint
- Choose the appropriate Device Type (EAP or Gateway), we used EAP for this guide
- Set the Band to 5 GHz and (if your hardware supports it) enable 6 GHz as well
- *Please Note: we find little or no benefit to enabling 2.4 GHz on Passpoint Wi-Fi, and significant downsides. See our Best Practices Guide for more information
- Under Guest Network check the box to Enable client isolation
- For Security choose the option for WPA-Enterprise
- For the RADIUS Profile choose the LongFi Connect RadSec profile we created earlier
- For the NAS ID choose Custom and enter the NAS ID that was registered during your onboarding and activation emails. This will usually be a MAC address from one of your APs such as 11:22:33:AA:BB:CC
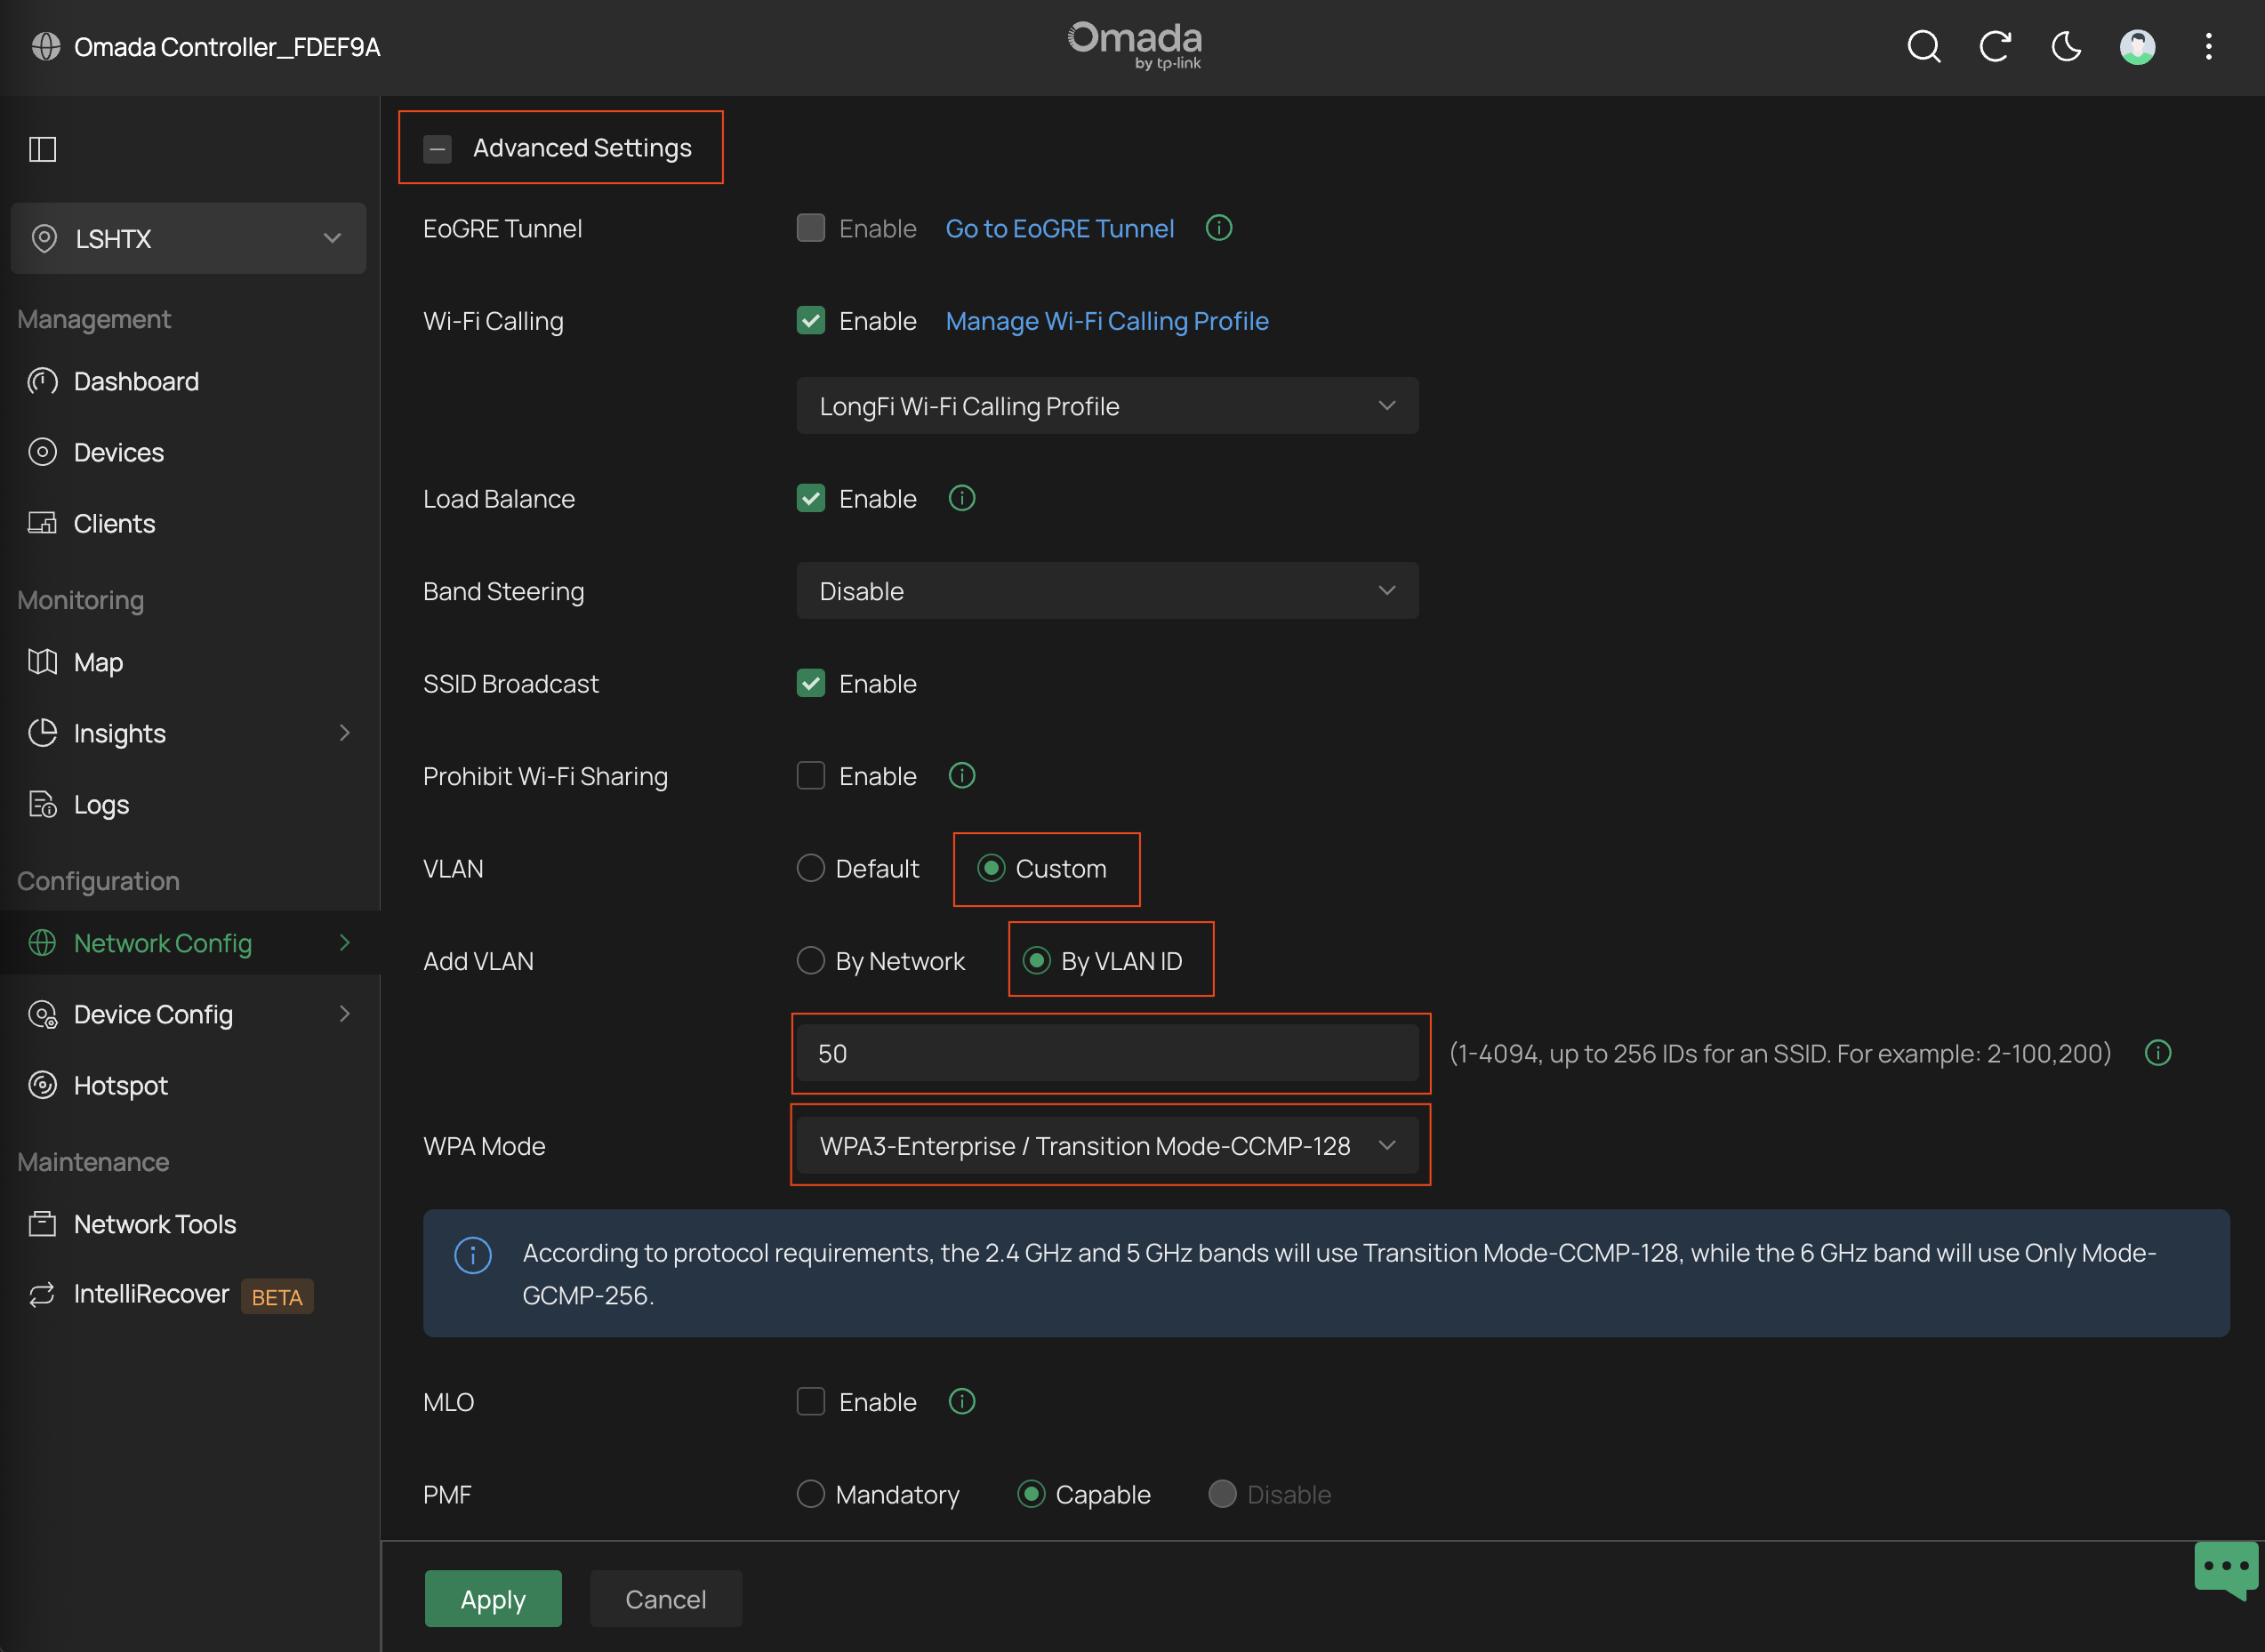
- Scroll down and expand the + Advanced Settings
- Set the VLAN to Custom and choose your Guest/Passpoint Wi-Fi VLAN
- Please note that a separate VLAN with a large DHCP pool and short DHCP lease time is required for Passpoint Wi-Fi. This is a prerequisite that must be set up in advance of following this guide, and is not covered by this guide.
- Please note: we used a 3rd party gateway while creating this guide, if you have an Omada gateway your VLAN settings may be different here.
- Set the WPA Mode to WPA3-Enterprise / Transition Mode-CCMP-128 (this mode is mostly backward compatible with WPA2 devices)
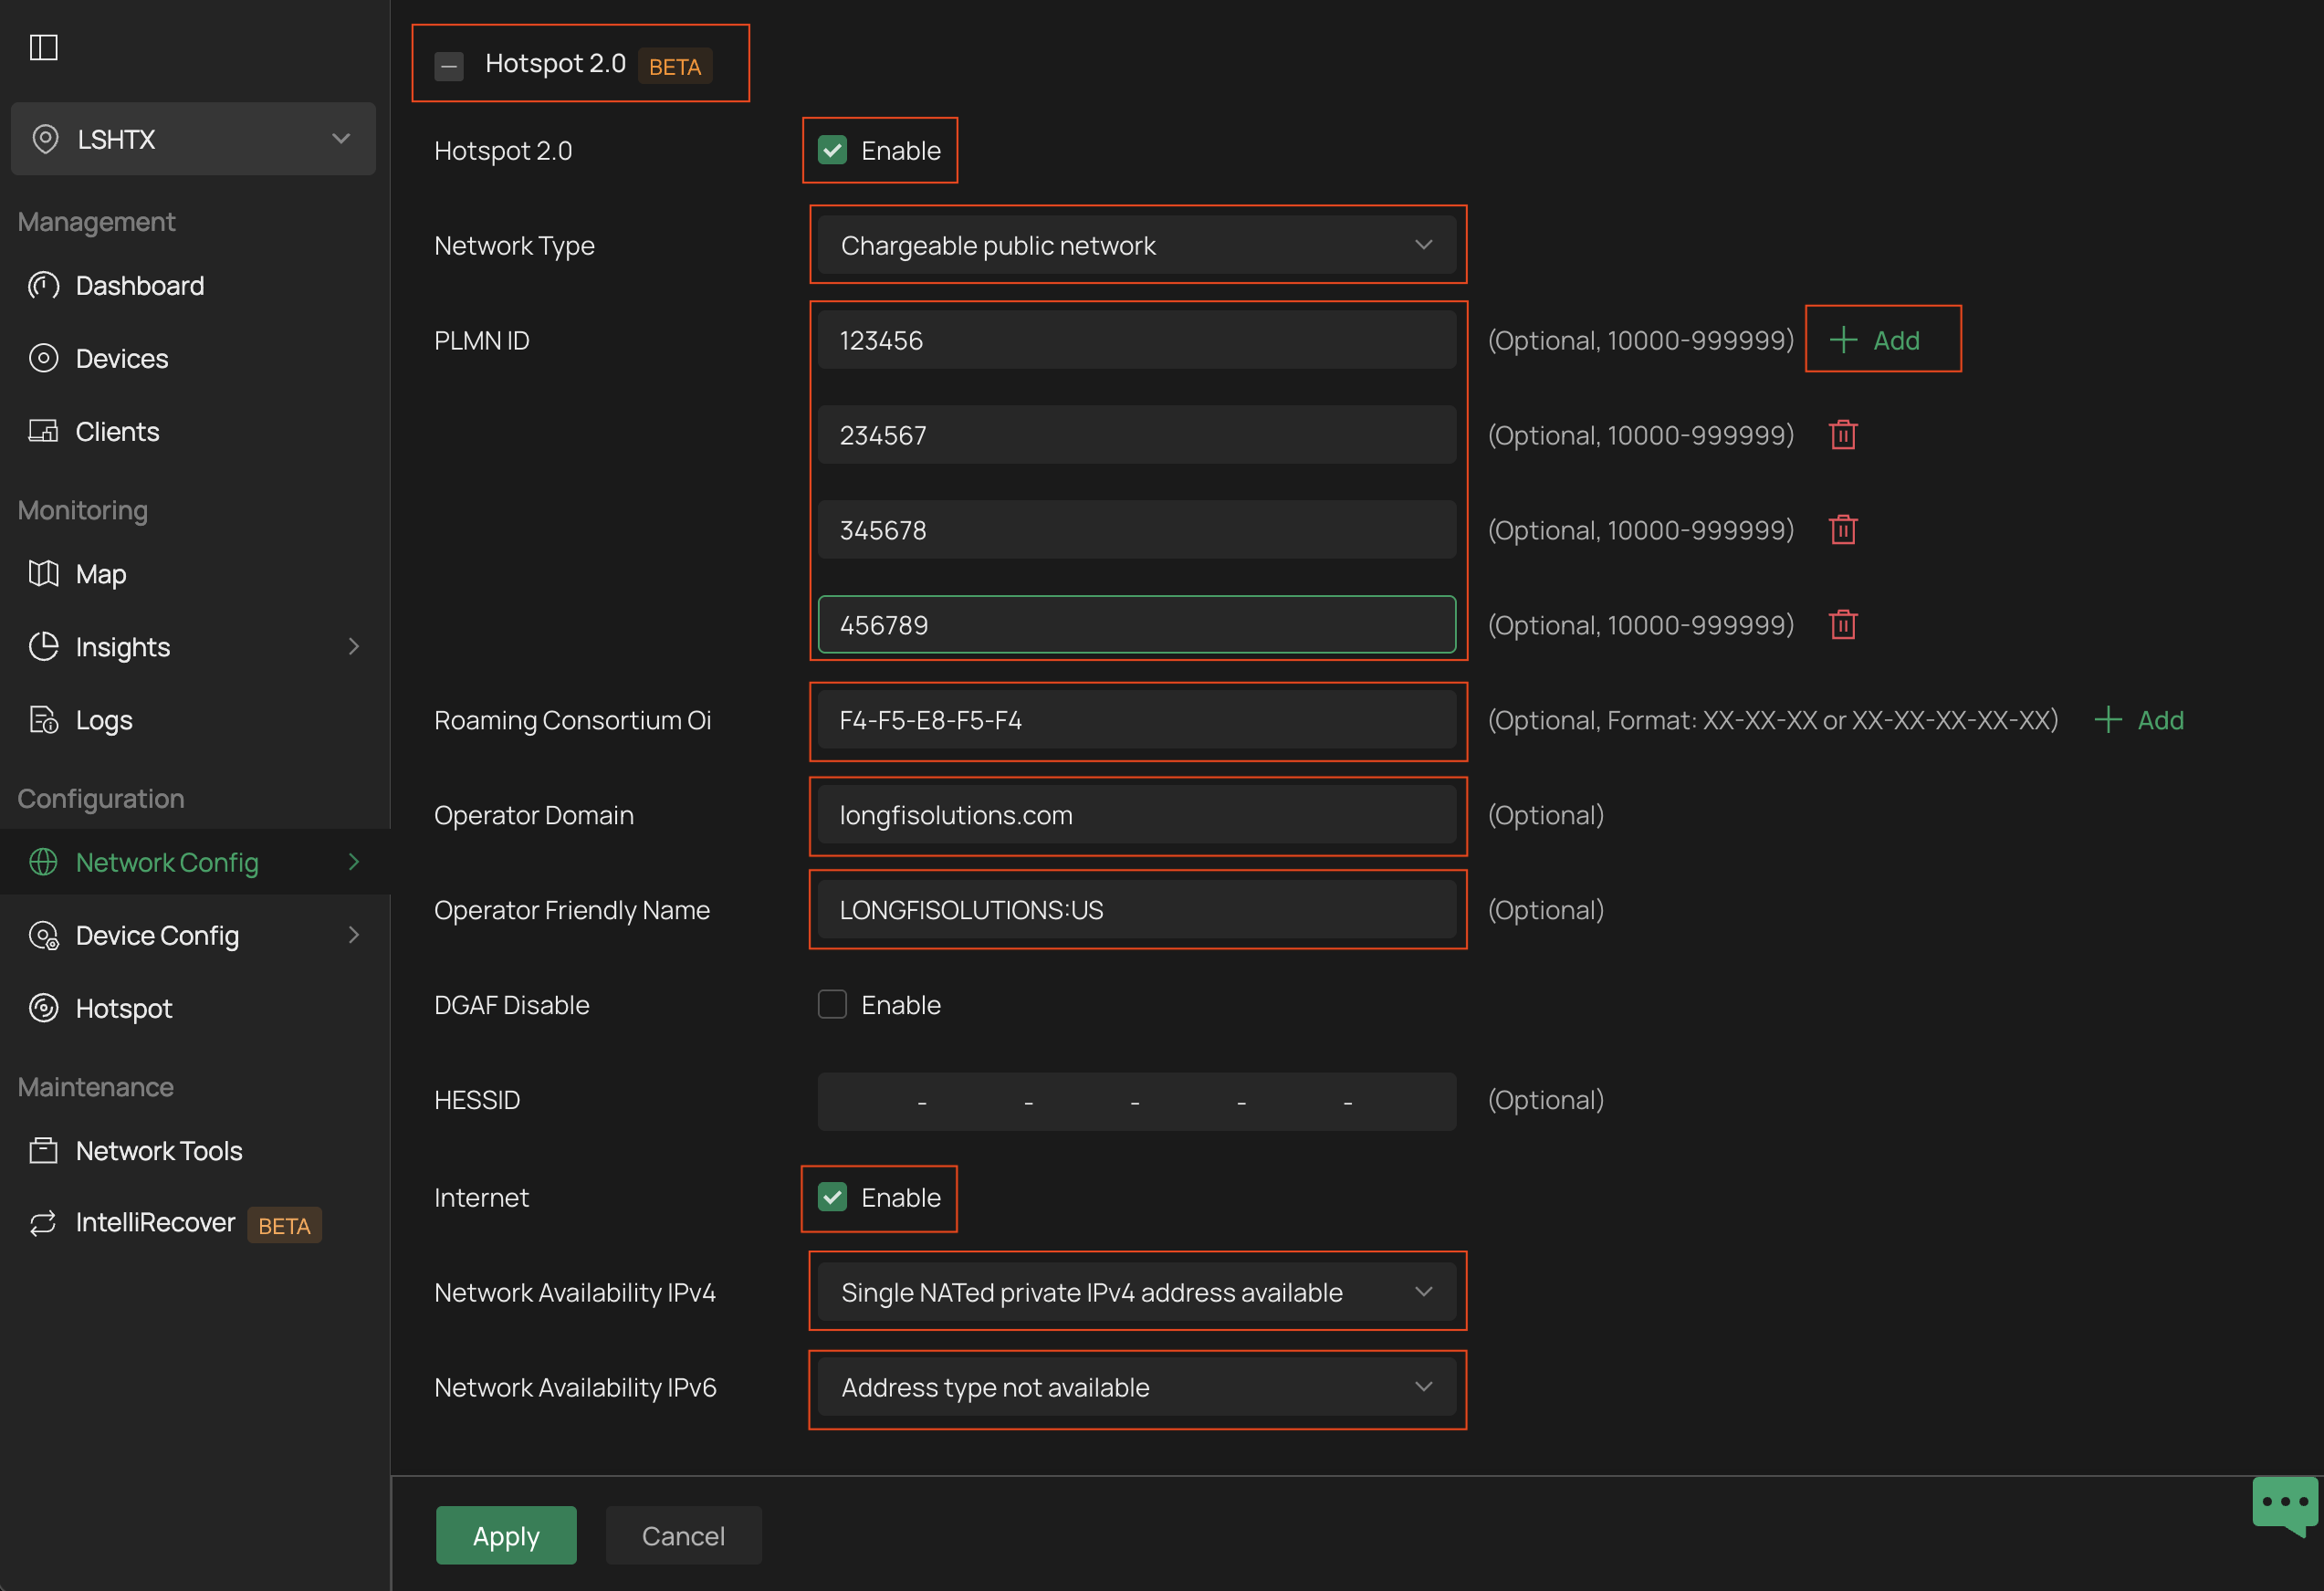
- Expand the Hotspot 2.0 menu and set Hotspot 2.0 to Enable
- Set the Network Type to Chargeable Public Network
- Under PLMN ID, enter all of the 3GPP MCC/MNC codes provided in your onboarding and activation emails. (the PLMN IDs shown here are for demonstration purposes only and are not real PLMN IDs, refer to the email)
- *Important Note: PLMN IDs, RCOIs, and NAI Realms may only be configured once the network has been registered and approved for activation. Activation of any unapproved sites constitutes a breach of your carrier offload agreement.
- *Please Note: We provide PLMN IDs in the 3GPP MCC|MNC format. Most network vendors prefer this format, such as MCC: 123, MNC: 456. TPLink Omada prefers the PLMN ID format. The PLMN ID is simply the combination of those two codes such as 123456. If you received the 3GPP MCC|MNC codes of 234 and 567, enter the PLMN ID of 234567
- Under Roaming Consortium Oi enter all of the RCOI codes provided in your onboarding and activation emails.
- *Please Note: We provide the RCOI codes in a string format such as A1B2C3D4E5. Most network vendors prefer this format. TPLink Omada prefers the hexadecimal format such as A1-B2-C3-D4-E5
- The following RCOIs may be configured prior to activation approval:
- Google Orion: F4-F5-E8-F5-F4
- Set the Operator Domain to longfisolutions.com
- Set the Operator Friendly Name to LONGFISOLUTIONS:US
- Set Internet to Enable
- Set the Network Availability IPv4 to Single NATed private IPv4 address available
- *Please Note: if you are behind Double NAT (ie. firewall/router behind ISP modem/router) choose the option for Double NATed, but please take note that Double NAT is not recommended, is not considered Voice-Grade, and may result in traffic being rejected by the carriers
- Set the Network Availability IPv6 to Address type not available
- Scroll down to Venue Info
- Under Venue Info choose an appropriate Venue Group and Venue Type, ie. Assembly and Convention Center
- Under Venue Name give your venue a name
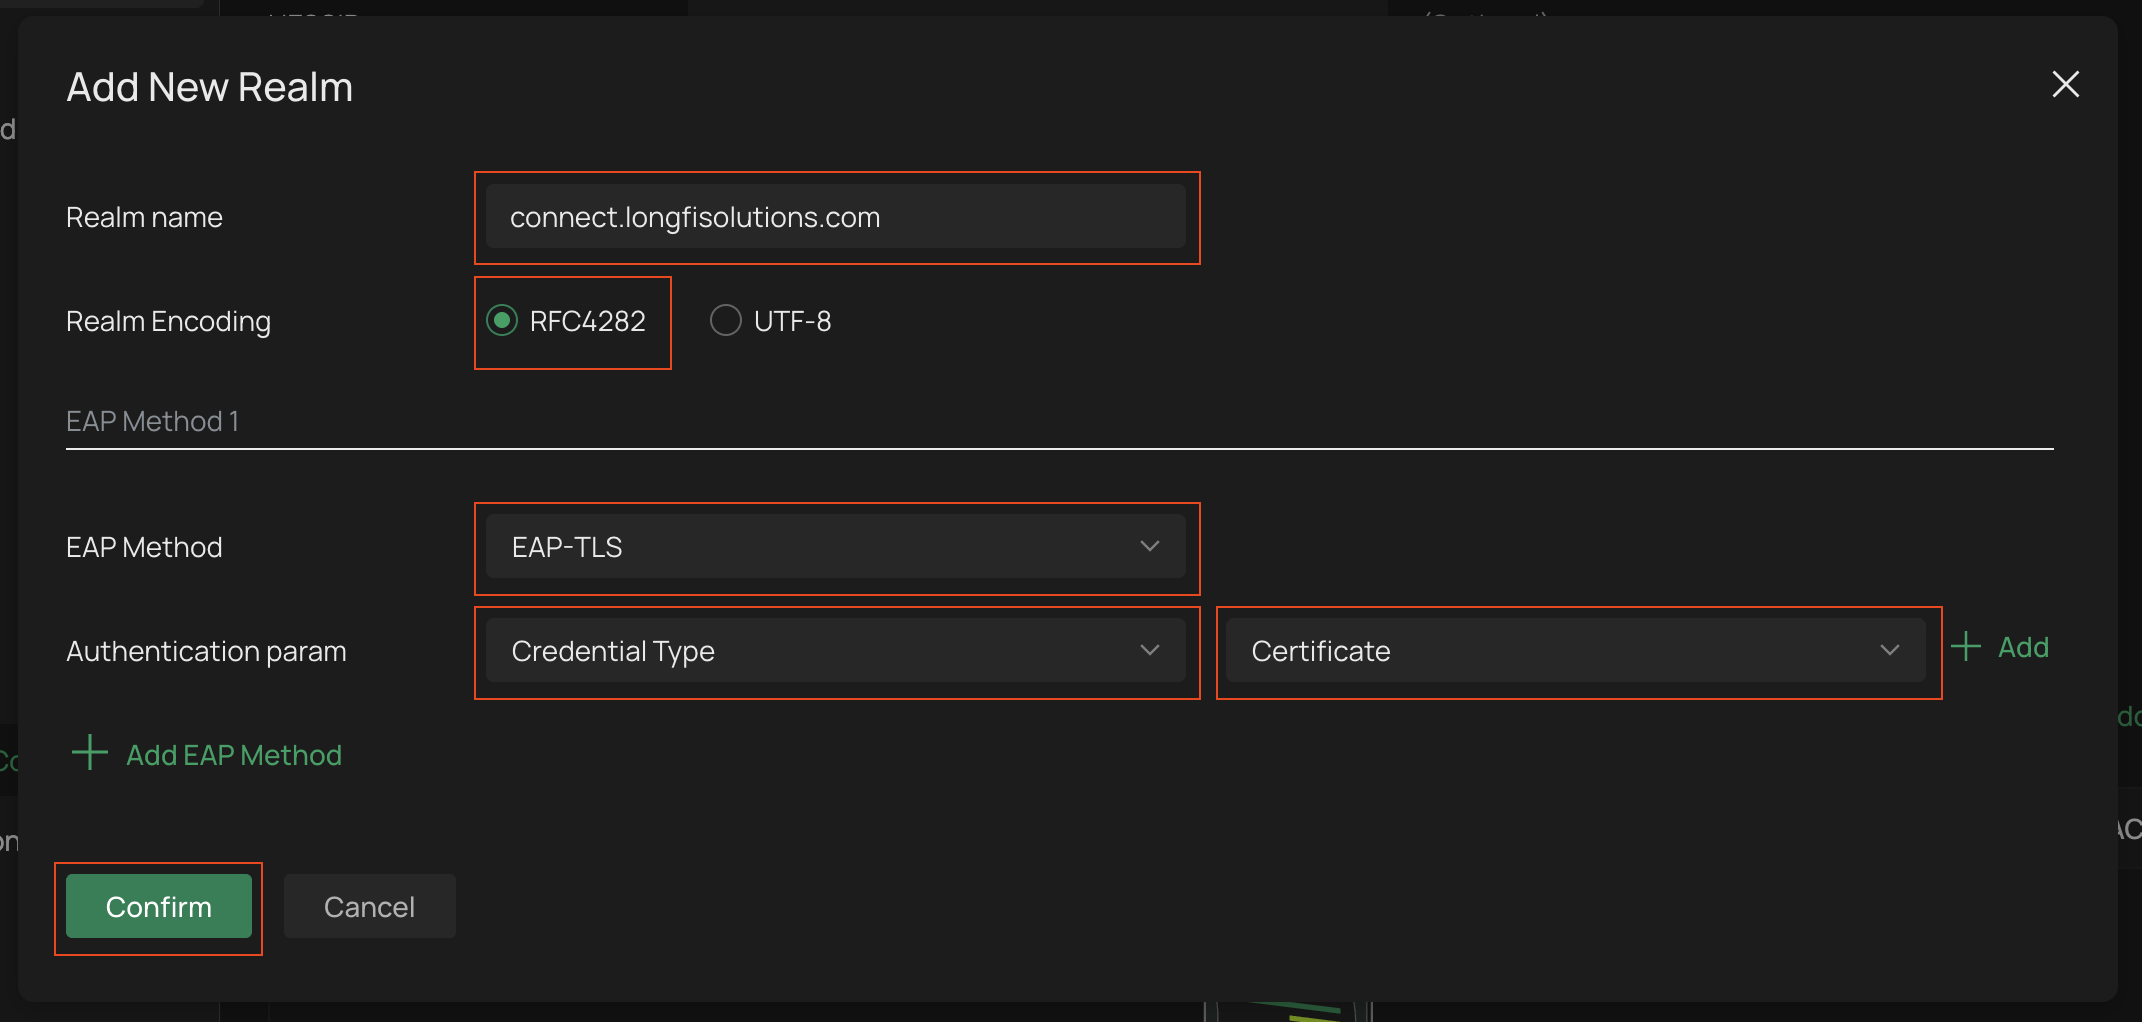
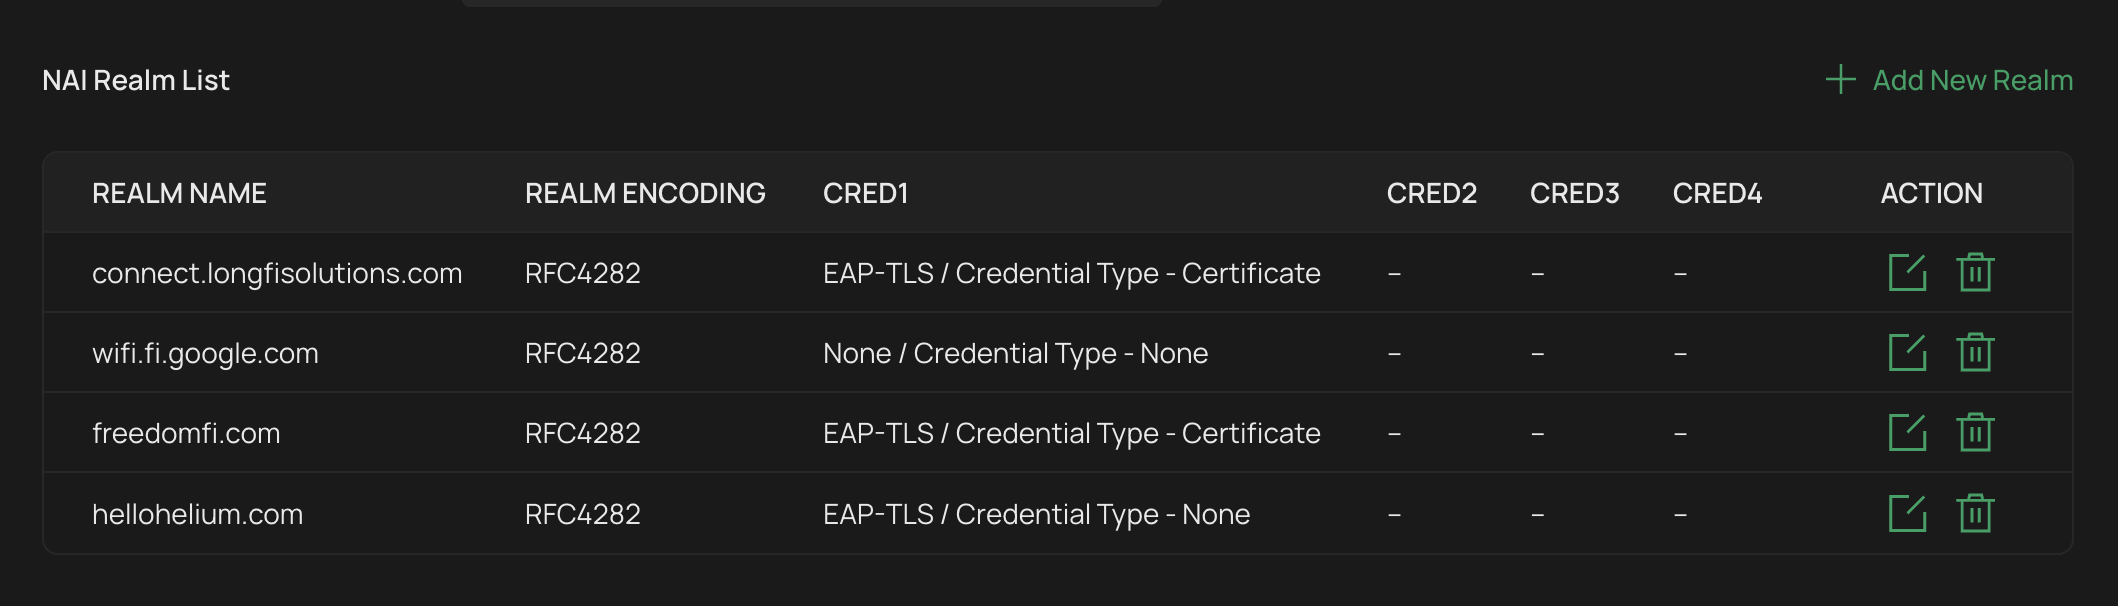
- Under NAI Realm List click the button to + Add New Realm. You will enter at least 3-4 and as many as 8-10 NAI Realms each with unique EAP settings. The NAI Realms will be provided in your onboarding and activation emails. Again, NAI Realms may only be configured once the network has been registered and approved for activation.
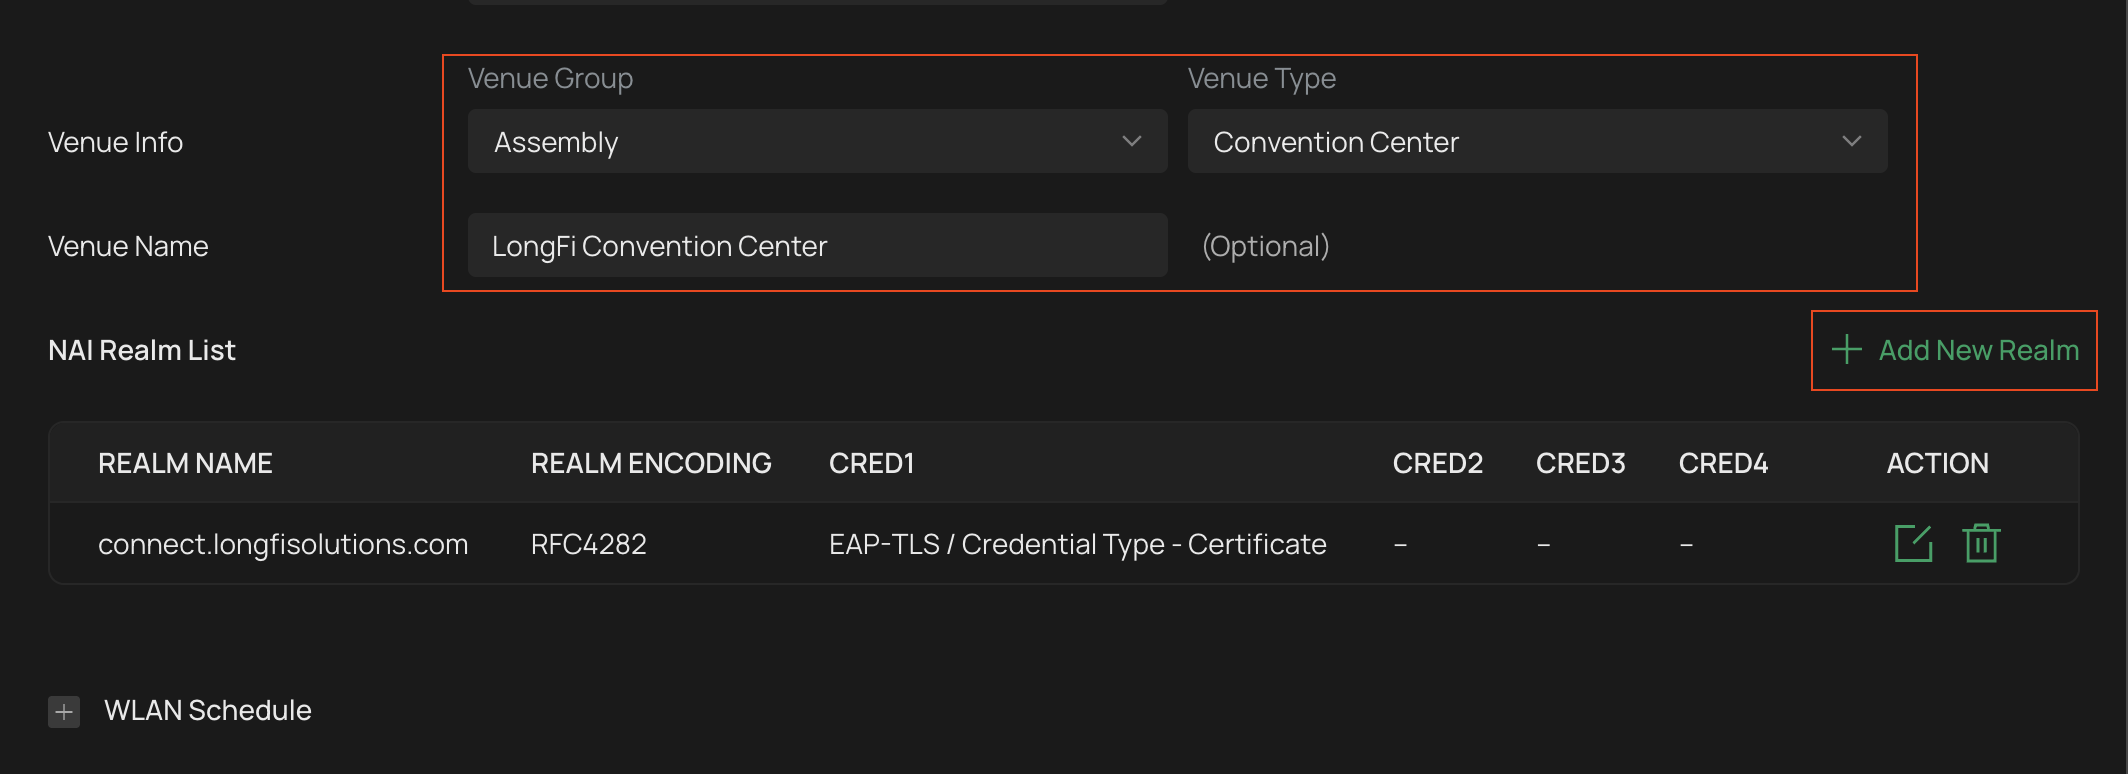
- The following realms may be configured with or without additional carrier approval:
- Realm Name: connect.longfisolutions.com
- Realm Encoding: RFC4282
- EAP Method: EAP-TLS
- Authentication param: Credential Type, Certificate
- Realm Name: wifi.fi.google.com
- Realm Encoding: RFC4282
- EAP Method: EAP-TLS
- Authentication param: Credential Type, Certificate
- Realm Name: freedomfi.com
- Realm Encoding: RFC4282
- EAP Method: EAP-TLS
- Authentication param: Credential Type, Certificate
- Realm Name: hellohelium.com
- Realm Encoding: RFC4282
- EAP Method: EAP-TLS
- Authentication param: Credential Type, Certificate
- Your dashboard should look like this now:
- Additional Carrier Realms will normally configured as follows (please check your onboarding and activation emails for any deviations):
- Realm Name: wlan.mnc123.mcc456.3gppnetwork.org (fake example)
- Realm Encoding: RFC4282
- EAP Method: None
- Authentication param: Credential Type > None
Scroll down to the bottom of the main window and hit Apply to save the new LongFi Passpoint WLAN. Congratulations, you have configured LongFi Connect Passpoint Wi-Fi for Carrier Offload!
You can check in the Clients section to see if nearby SIM based devices are connecting.